
Introduction
There’s something undeniably magical about a warm, gooey chocolate chip cookie straight from the oven. The aroma alone is enough to transport you back to childhood, to cozy kitchens filled with laughter and the promise of a sweet treat. These aren’t just any chocolate chip cookies; these are the kind that make your eyes widen with delight – thick, perfectly golden-brown on the edges, and with a center so soft and chewy it practically melts in your mouth. Each bite is a symphony of textures and flavors, from the slightly crisp exterior to the tender, buttery dough, all punctuated by an abundance of rich, melty chocolate chips. It’s the ultimate comfort food, a timeless classic that never fails to bring a smile.
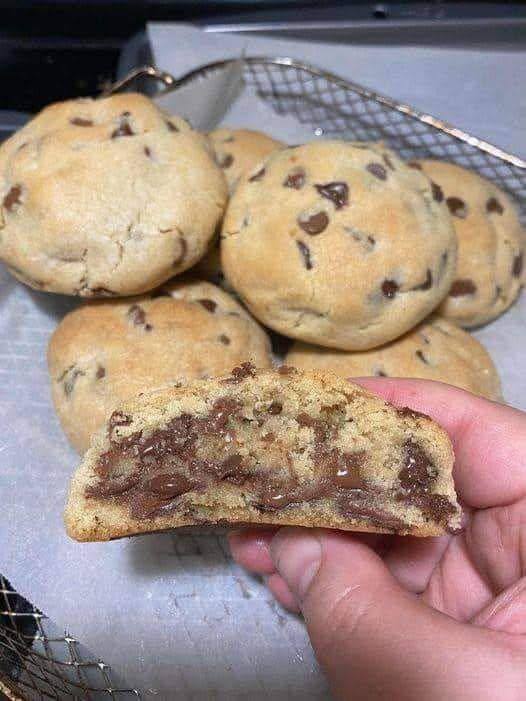
What makes this particular recipe stand out? Just look at them! The image speaks volumes: these cookies boast generous pools of deeply melted chocolate, perfectly distributed so that every single bite delivers that irresistible chocolatey goodness. They’re plump and substantial, promising a satisfying chew without being dense. We’ve cracked the code to achieving that coveted bakery-style perfection right in your own home. Forget flat, sad cookies; prepare yourself for a batch of masterpieces that are as beautiful to behold as they are delicious to devour. This isn’t just a recipe; it’s a guide to creating an experience – an experience of pure, unadulterated chocolate chip cookie bliss.
Whether you’re baking for a special occasion, treating yourself after a long day, or simply craving that classic homemade taste, this recipe is your new go-to. We’ve refined the process to ensure that even novice bakers can achieve spectacular results. With simple ingredients and straightforward steps, you’ll be pulling these incredible cookies from your oven in no time, ready to share (or not!) with loved ones. Get ready to discover the secrets to the best chocolate chip cookies you’ll ever make – thick, chewy, and bursting with melty chocolate in every single bite.
Nutritional Information
Per serving (approximate values):
- Calories: 220 kcal
- Protein: 3g
- Carbohydrates: 30g
- Fat: 11g
- Fiber: 1g
- Sodium: 150mg
Ingredients
- 2 ¼ cups (270g) all-purpose flour
- 1 teaspoon baking soda
- ½ teaspoon salt
- 1 cup (226g) unsalted butter, softened to room temperature
- ¾ cup (150g) granulated sugar
- ¾ cup (165g) packed light brown sugar
- 2 large eggs, room temperature
- 2 teaspoons pure vanilla extract
- 1 ½ cups (255g) semi-sweet chocolate chips or chunks
Instructions
- Preheat your oven to 375°F (190°C). Line two large baking sheets with parchment paper or silicone baking mats. This is crucial for preventing sticking and ensuring even baking.
- In a medium bowl, whisk together the all-purpose flour, baking soda, and salt. Make sure these dry ingredients are thoroughly combined to ensure proper leavening throughout the cookies. Set aside.
- In a large bowl, using an electric mixer (stand mixer or hand mixer) fitted with the paddle attachment, cream together the softened unsalted butter, granulated sugar, and packed light brown sugar on medium speed until light and fluffy. This process typically takes about 2-3 minutes. The mixture should be pale in color and have a smooth, airy texture.
- Add the eggs one at a time, beating well after each addition until fully incorporated. Then, stir in the pure vanilla extract. Scrape down the sides of the bowl as needed to ensure all ingredients are evenly mixed.
- Gradually add the dry ingredients to the wet ingredients, mixing on low speed until just combined. Be careful not to overmix the dough, as overmixing can lead to tough cookies. Stop mixing as soon as no streaks of flour are visible.
- Fold in the chocolate chips or chunks using a rubber spatula. Mix until they are evenly distributed throughout the dough. You want a good amount of chocolate in every cookie!
- Drop rounded tablespoons or use a 2-tablespoon cookie scoop to portion the dough onto the prepared baking sheets, leaving about 2 inches between each cookie. For extra visual appeal, you can press a few extra chocolate chips onto the top of each dough ball before baking.
- Bake for 9-12 minutes, or until the edges are golden brown and the centers are set but still look slightly soft and gooey. The exact baking time will depend on your oven and the size of your cookies. For that perfect gooey center, it’s better to underbake slightly.
- Remove the baking sheets from the oven and let the cookies cool on the baking sheets for 5-10 minutes before transferring them to a wire rack to cool completely. This resting period allows the cookies to set up and prevents them from breaking when moved.
- Serve warm and enjoy your delicious, homemade chocolate chip cookies!
Cooking Tips and Variations
For truly perfect chocolate chip cookies, attention to detail makes all the difference. Firstly, ensure your butter is at true room temperature – it should be soft enough to indent with your finger but not melted. This allows it to cream properly with the sugars, creating an airy base for your cookies. Similarly, room temperature eggs emulsify better into the butter mixture, resulting in a smoother, more cohesive dough. Don’t be tempted to overmix the dry ingredients into the wet; mix only until just combined. Overmixing develops the gluten in the flour too much, leading to tough, dense cookies instead of the desirable soft and chewy texture. When it comes to baking, keep a close eye on them. The key to a gooey center is to pull them from the oven when the edges are golden brown but the centers still look slightly underdone. They will continue to cook and set as they cool on the hot baking sheet.
A highly recommended tip for enhancing both flavor and texture is to chill the dough. While not strictly necessary, chilling the dough for at least 30 minutes, or even overnight, allows the flavors to meld and the butter to firm up. This prevents the cookies from spreading too much in the oven, resulting in thicker, chewier cookies with a more concentrated flavor. If you find your cookies are spreading too much, try chilling the dough for longer or adding a tablespoon or two more of flour to the recipe. Using high-quality chocolate chips or even chopped chocolate bars will elevate the taste significantly, providing richer, more complex chocolate notes. A mix of semi-sweet and milk chocolate chips can offer a wonderful balance of sweetness and intensity.
Experimentation is part of the fun! To add a delightful twist, sprinkle a pinch of flaky sea salt on top of the cookies immediately after they come out of the oven. This enhances the chocolate flavor and provides a lovely salty-sweet contrast. For different flavor profiles, consider adding a handful of chopped nuts like walnuts or pecans for extra crunch, or substitute some of the chocolate chips with peanut butter chips, white chocolate chips, or even chopped caramels. A touch of espresso powder (about 1 teaspoon) can be added to the dry ingredients to deepen the chocolate flavor without making the cookies taste like coffee. You can also vary the extract – almond extract can be a delightful addition, or even a hint of orange zest for a citrusy brightness. For a truly indulgent treat, sandwich two cookies with a scoop of your favorite ice cream to make homemade ice cream sandwiches.
Storage and Reheating
Proper storage is key to keeping your chocolate chip cookies fresh and delicious. Once the cookies have cooled completely to room temperature, store them in an airtight container. A cookie jar or a plastic container with a tight-fitting lid works perfectly. Placing a slice of bread (any kind will do) in the container with the cookies can help keep them soft and moist by transferring its moisture to the cookies. This trick works wonders and can keep your cookies fresh for up to 3-5 days at room temperature.
If you’ve baked a large batch or want to prepare ahead, chocolate chip cookies freeze beautifully. For baked cookies, once they are completely cool, place them in a single layer on a baking sheet and freeze for about an hour until solid. Then, transfer the frozen cookies to a freezer-safe airtight container or a heavy-duty freezer bag. They will keep well in the freezer for up to 3 months. When you’re ready to enjoy them, you can thaw them at room temperature for a few hours, or for that fresh-baked experience, reheat them. For raw cookie dough, scoop individual portions onto a parchment-lined baking sheet and freeze until firm. Then transfer the frozen dough balls to a freezer bag. You can bake them directly from frozen, adding a couple of extra minutes to the baking time.
To reheat baked cookies and bring back that warm, gooey center, you have a few options. The best method is to place them on a baking sheet and reheat in a preheated oven at 300°F (150°C) for about 5-7 minutes. This will gently warm them through and re-melt the chocolate without drying them out. Alternatively, you can pop a single cookie in the microwave for 10-15 seconds. Be careful not to overheat, as this can make the cookies tough. The microwave is great for instant gratification, but the oven method is preferred for larger batches or for achieving a slightly crisper edge. Enjoying them warm is truly the best way to experience their full glory.
Frequently Asked Questions
Why are my cookies flat and spread too much?
Flat cookies are a common issue and can be caused by several factors. The most likely culprits are butter that is too soft or melted, insufficient flour, or using too much baking soda. Ensure your butter is at room temperature (soft but not melted) and measure your flour accurately, preferably by weight. Chilling the dough for at least 30 minutes before baking can also help prevent spreading by firming up the butter. If your baking soda is old, it might not be active, but too much can also contribute to excessive spread.
Can I make the cookie dough ahead of time?
Absolutely, and it’s highly recommended! Making the dough ahead of time can actually improve the flavor and texture of your cookies. Prepare the dough as instructed, then cover the bowl tightly with plastic wrap and refrigerate for at least 30 minutes, or up to 2-3 days. The longer the dough chills, the more the flavors deepen and the less the cookies will spread. When ready to bake, you can scoop and bake directly from the fridge, adding a minute or two to the baking time.
What’s the secret to a gooey center?
The secret to that coveted gooey center lies in slightly underbaking your cookies. You want to remove them from the oven when the edges are golden brown and set, but the centers still look visibly soft, slightly puffy, and even a little underdone. They will continue to cook and firm up as they cool on the hot baking sheet. Overbaking even by a minute or two can turn a gooey center into a firm one. Trust the visual cues and err on the side of caution.