
Introduction
There’s something undeniably comforting about a classic dessert, and few evoke that feeling quite like an Old-Fashioned Vanilla Baked Custard. This isn’t just a sweet treat; it’s a hug in a bowl, a gentle reminder of simpler times and the pure joy of a perfectly executed, humble dish. Imagine a spoon gliding effortlessly through a silky-smooth, pale yellow custard, its delicate vanilla aroma filling the air, culminating in the delightful crackle of a perfectly caramelized sugar crust. That’s the magic we’re talking about here – a dessert that’s both elegant and approachable, sophisticated in its simplicity, and utterly irresistible.
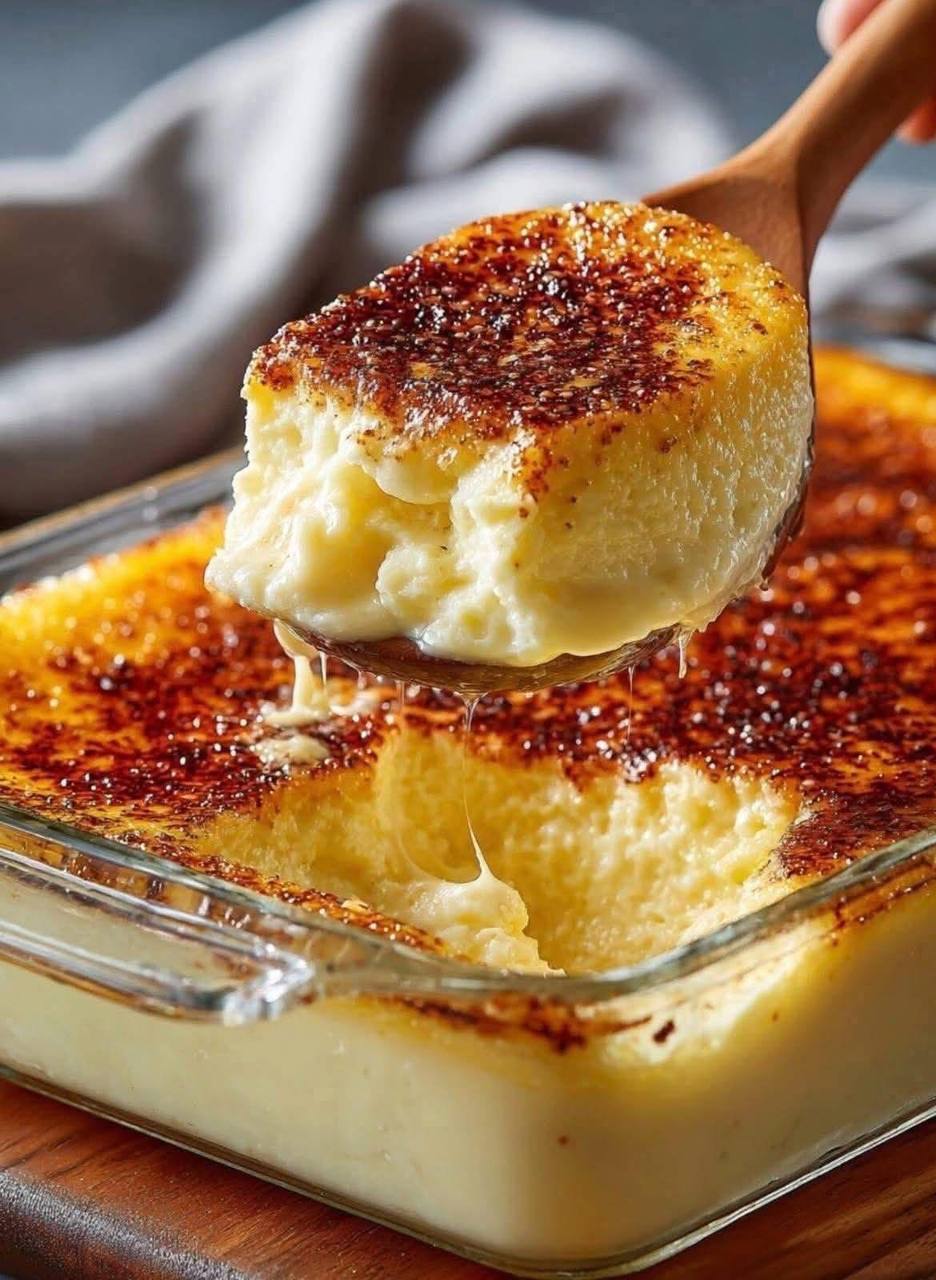
Baked custard, at its heart, is a testament to how a few basic ingredients can be transformed into something truly extraordinary. It’s a creamy, rich, and tender dessert, gently cooked until just set, often crowned with a glistening, brittle layer of caramelized sugar. Our “old-fashioned” approach emphasizes authenticity, focusing on the timeless techniques that yield a custard with unparalleled texture and flavor. This isn’t about fancy ingredients or complicated steps; it’s about respecting the process and letting the quality of each component shine through. The result is a dessert that satisfies on every level, offering a soothing sweetness that feels both nostalgic and utterly fresh.
What makes this particular recipe stand out? It’s the promise of perfection with ease. We’ll guide you to a custard that’s impeccably smooth, with no trace of graininess or rubberiness. The delicate vanilla notes will sing, harmonizing beautifully with the rich dairy and the subtle sweetness. And then there’s that caramelized top – a beautiful, dark amber crust that provides a delightful textural contrast and a hint of bittersweet complexity. Whether you’re a seasoned baker or just starting your culinary journey, this recipe is designed to help you achieve a stunning dessert with minimal fuss, proving that true comfort food never goes out of style.
Nutritional Information
Per serving (approximate values):
- Calories: 350-400
- Protein: 10-12g
- Carbohydrates: 35-40g
- Fat: 20-25g
- Fiber: 0g
- Sodium: 100-120mg
Ingredients
- 4 large eggs
- 2 large egg yolks
- 1/2 cup granulated sugar, plus 2-4 tablespoons for caramelizing
- 1/4 teaspoon salt
- 2 cups whole milk
- 1 cup heavy cream
- 2 teaspoons pure vanilla extract (or 1 vanilla bean, split and scraped)
Instructions
- Preheat your oven to 325°F (160°C).
- Prepare a water bath: Find a baking dish large enough to hold your custard ramekins or a single baking dish (approx. 8×8 inch square or 9-inch round pie dish). Place a clean kitchen towel at the bottom of the larger dish to prevent the custard dishes from sliding and to help distribute heat evenly.
- In a large bowl, whisk together the whole eggs, egg yolks, 1/2 cup granulated sugar, and salt until well combined and slightly pale. Do not over-whisk to avoid incorporating too much air.
- In a medium saucepan, combine the whole milk and heavy cream. If using a vanilla bean, add the scraped seeds and the pod to the milk mixture. Heat over medium-low heat until small bubbles form around the edges of the pan and the mixture is steaming, but do not boil. If using vanilla extract, do not add it yet.
- Slowly temper the egg mixture: Gradually pour about half of the warm milk mixture into the egg mixture, whisking constantly to prevent the eggs from scrambling. Once combined, pour the tempered egg mixture back into the saucepan with the remaining milk mixture, whisking continuously.
- If using vanilla extract, stir it into the custard mixture now. If you used a vanilla bean, remove the pod.
- For the smoothest custard, strain the mixture through a fine-mesh sieve into a clean bowl or directly into your prepared baking dish(es). This removes any cooked egg bits or vanilla bean particles.
- Carefully pour the custard mixture into your ramekins or single baking dish.
- Place the filled ramekins or baking dish into the larger baking dish prepared with the kitchen towel. Carefully pour hot water into the larger baking dish, making sure it comes about halfway up the sides of the custard dishes.
- Carefully transfer the entire setup (large dish with water bath and custard) to the preheated oven.
- Bake for 45-60 minutes for individual ramekins, or 60-75 minutes for a larger dish. The baking time will vary depending on the size and depth of your dishes. The custard is done when the edges are set, but the center still has a slight jiggle when gently shaken. An instant-read thermometer inserted into the center should read 170-175°F (77-79°C).
- Carefully remove the large baking dish from the oven. Using tongs or oven mitts, carefully lift the custard dishes out of the water bath.
- Let the custards cool completely at room temperature, then cover them and refrigerate for at least 4 hours, or preferably overnight, to allow them to fully set and for the flavors to meld.
- To caramelize the top: Just before serving, sprinkle 1-2 tablespoons of granulated sugar evenly over the top of each chilled custard.
- Using a culinary torch, move the flame steadily over the sugar until it melts, bubbles, and turns a rich amber-brown. Alternatively, place the custards on a baking sheet under a preheated broiler (watch very carefully, as sugar burns quickly) until caramelized.
- Serve immediately after caramelizing, while the sugar crust is still warm and crisp.
Cooking Tips and Variations
Achieving custard perfection is all about gentle heat and careful technique. The water bath, or “bain-marie,” is your best friend here. It creates a moist, even cooking environment, preventing the custard from cooking too quickly, curdling, or cracking. Without it, the edges would set before the center, leading to an uneven texture. Always ensure the water in the bath is hot, but not boiling, when it goes into the oven. When tempering the eggs, the key is to add the hot liquid slowly while whisking vigorously. This gradually raises the temperature of the eggs without shocking them, preventing a scrambled egg situation. Straining the mixture is a small but crucial step for that incredibly smooth, silken texture. Even if you think you’ve whisked perfectly, tiny bits of cooked egg or undissolved sugar can remain, and the sieve catches them all. For the caramelization, a culinary torch offers the most control and best results, creating an even, crisp crust. If using a broiler, keep a very close eye on it; sugar can go from perfectly golden to burnt in seconds. Position the custards on a baking sheet about 4-6 inches from the heat source and rotate them if necessary for even browning. Don’t be tempted to overbake your custard; a slight jiggle in the center is exactly what you want, as it will continue to set as it cools. Overbaking leads to a rubbery texture.
While the classic vanilla is truly divine, this versatile recipe lends itself beautifully to variations. For a subtle spice, a pinch of freshly grated nutmeg or a whisper of cinnamon can be added to the milk mixture. Citrus zest, like orange or lemon, infused into the milk, offers a bright counterpoint to the richness. Coffee lovers might enjoy a tablespoon or two of instant espresso powder dissolved in the warm milk. For a more decadent twist, finely grated dark chocolate can be melted into the warm milk, creating a chocolate baked custard. You can also experiment with different extracts, such as almond or coconut, keeping the quantities modest. Serving suggestions are equally flexible. Beyond the caramelized top, a dollop of freshly whipped cream, a scattering of fresh berries, or a light dusting of cocoa powder can elevate the presentation and add complementary flavors. For a truly elegant presentation, consider serving individual custards in charming ramekins, or opt for a larger, communal dish for family-style enjoyment. The choice between individual ramekins and a large dish often comes down to preference; ramekins offer a more personal portion and easier brûlée, while a large dish is great for feeding a crowd and scooping out generous servings.
Storage and Reheating
Old-Fashioned Vanilla Baked Custard is best enjoyed chilled and, if caramelized, immediately after the sugar crust has set. Uncaramelized custards can be stored in the refrigerator for up to 3-4 days. Make sure they are tightly covered with plastic wrap to prevent them from absorbing any refrigerator odors and to maintain their moisture. If you plan to caramelize the top, do so just before serving, as the sugar crust will soften and become sticky if refrigerated for an extended period. The beautiful crispness is fleeting, so timing is key here. If you have caramelized custards that you need to store, they will still be delicious, but the topping will lose its crunch. You could attempt to re-caramelize them, but this often results in a thicker, less appealing crust as the underlying sugar has already been heated. For this reason, it’s highly recommended to only caramelize what you plan to eat right away.
Reheating baked custard is generally not recommended if you want to preserve its delicate texture. The gentle baking process creates a tender, almost melt-in-your-mouth consistency that can be compromised by reintroducing heat. Reheating can cause the custard to become rubbery, watery, or even curdle, especially if done too quickly or at too high a temperature. This dessert is truly meant to be served chilled, allowing its subtle flavors and smooth texture to be fully appreciated. If, for some reason, you must warm it slightly, perhaps for a very short period in a low oven or microwave, be extremely cautious and only warm it enough to take the chill off, not to make it hot. However, for the best experience, embrace the chilled nature of this classic dessert. The contrast between the cool, creamy custard and a warm, brittle caramelized crust is one of its most delightful characteristics.
Frequently Asked Questions
Why did my custard crack or curdle?
Cracking and curdling are usually signs of overbaking or cooking at too high a temperature. Custards need gentle, even heat, which is why a water bath is so crucial. Overbaking causes the proteins in the eggs to seize up too much, leading to a cracked surface and a rubbery, curdled interior. Ensure your oven temperature is accurate, use a water bath, and remove the custard from the oven when the center still has a slight jiggle.
Can I make this dairy-free?
While traditional baked custard relies heavily on dairy for its rich flavor and creamy texture, you can experiment with dairy-free alternatives. Use full-fat coconut milk or a blend of cashew milk and coconut cream as substitutes for the whole milk and heavy cream. Be aware that the flavor and texture will be slightly different, and the custard might be less firm due to the different protein and fat composition of plant-based milks. Adjust sweetness as needed, as some dairy-free milks are naturally sweeter.
How can I prevent the caramelized sugar from becoming sticky?
The key to a crisp, non-sticky caramelized topping is to caramelize it just before serving. The sugar crust is hygroscopic, meaning it absorbs moisture from the air and the custard, which causes it to soften and become sticky over time. If you caramelize the custard and then refrigerate it, the crust will lose its crispness. For the best results, have your chilled custards ready, and only apply and torch the sugar right before you plan to eat them.