
Introduction
The allure of KFC’s iconic fried chicken is undeniable. That perfectly golden, impossibly crispy skin, the succulent, juicy meat beneath, and that mysterious blend of eleven herbs and spices – it’s a flavor profile etched into the culinary memory of millions. For years, home cooks have attempted to crack the code, searching for that elusive “secret recipe” to recreate the magic in their own kitchens. Today, we’re not just offering a recipe; we’re unveiling a homemade version that captures the very essence of that beloved taste, bringing the finger-licking goodness right to your dining table.
What makes this particular recipe special? It’s a harmonious symphony of key techniques and ingredients. We start with a strategic marinade, infusing the chicken with moisture and a foundational layer of savory and spicy notes. Then comes our meticulously crafted spice blend, a homage to the original’s complexity, ensuring every bite is bursting with flavor. Finally, the secret to that unparalleled crispiness lies in our double-dredging technique, creating a robust, craggy coating that fries to golden perfection. Get ready to embark on a culinary adventure that promises to deliver a truly authentic and incredibly satisfying fried chicken experience.
Nutritional Information
Per serving (approximate values, based on one drumstick):
- Calories: 380
- Protein: 28g
- Carbohydrates: 20g
- Fat: 20g
- Fiber: 2g
- Sodium: 850mg
Ingredients
- 8-10 large chicken drumsticks, skin on
- 3 cups all-purpose flour, divided
- 1.5 cups buttermilk (or milk with 1 tbsp vinegar/lemon juice, left for 5 minutes)
- 1/4 cup Cholula hot sauce
- 2 tablespoons tomato paste or ketchup
- 2 tablespoons Tony Chachere’s Original Creole Seasoning
- 1 tablespoon cayenne pepper
- 1 tablespoon smoked paprika
- 1 tablespoon garlic powder
- 1 tablespoon onion powder
- 1 teaspoon dried oregano
- 1 teaspoon dried thyme
- 1 teaspoon black pepper
- 1 teaspoon dried mustard powder
- 1/2 teaspoon ground ginger
- 1/2 teaspoon white pepper
- 2 teaspoons salt, plus more for seasoning
- Oil for deep frying (vegetable, canola, or peanut oil recommended), about 6-8 cups
Instructions
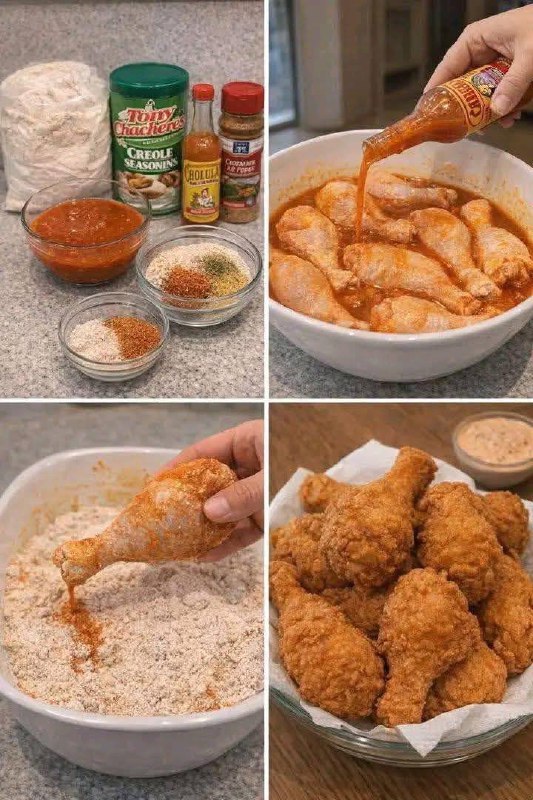
- Prepare the Chicken and Marinade: Begin by thoroughly cleaning your chicken drumsticks under cold water. Pat them completely dry with paper towels. This step is crucial for both the marinade adhesion and achieving a crispy skin. In a large bowl or a resealable plastic bag, combine the buttermilk, Cholula hot sauce, tomato paste (or ketchup), 1 tablespoon of Tony Chachere’s Original Creole Seasoning, 1 teaspoon of cayenne pepper, 1 teaspoon of smoked paprika, 1 teaspoon of garlic powder, and 1 teaspoon of salt. Mix well until all ingredients are thoroughly combined.
- Marinate the Chicken: Add the dried chicken drumsticks to the marinade, ensuring each piece is fully coated. Cover the bowl or seal the bag and refrigerate for a minimum of 4 hours, or preferably overnight, for the best flavor penetration and tenderization. The longer the chicken marinates, the more flavorful and juicy it will be.
- Create the Flavorful Breading: In a large, shallow dish or a sturdy resealable plastic bag, combine the remaining 2.5 cups of all-purpose flour, 1 tablespoon of Tony Chachere’s Original Creole Seasoning, 1 tablespoon of cayenne pepper, 1 tablespoon of smoked paprika, 1 tablespoon of garlic powder, 1 tablespoon of onion powder, 1 teaspoon of dried oregano, 1 teaspoon of dried thyme, 1 teaspoon of black pepper, 1 teaspoon of dried mustard powder, 1/2 teaspoon of ground ginger, 1/2 teaspoon of white pepper, and 1 teaspoon of salt. Whisk or shake vigorously to ensure all the spices are evenly distributed throughout the flour. This is your “secret” spice blend!
- Set Up Your Breading Station: Remove the marinated chicken from the refrigerator. Set up a breading station with your marinated chicken in one bowl, the seasoned flour mixture in another shallow dish or bag, and a large plate or wire rack nearby to place the breaded chicken.
- The Double-Dredging Process: Working with one drumstick at a time, remove it from the marinade, allowing any excess liquid to drip off. Immediately transfer the drumstick to the seasoned flour mixture. Ensure the chicken is completely coated, pressing the flour firmly onto all surfaces. For an extra crispy crust, you can perform a “double dredge”: dip the flour-coated chicken back into the remaining marinade (just a quick dip to re-moisten), then return it to the flour mixture for a second coating, pressing firmly again. This creates those desirable craggy bits that get extra crispy when fried. Place the breaded chicken on the plate or wire rack and repeat with the remaining drumsticks. Let the breaded chicken rest for at least 15-20 minutes at room temperature. This resting period allows the breading to adhere better, preventing it from falling off during frying.
- Prepare for Frying: In a large, heavy-bottomed pot, Dutch oven, or deep fryer, pour enough oil to submerge the chicken drumsticks (about 3-4 inches deep). Heat the oil over medium-high heat to 350°F (175°C). It is highly recommended to use a candy or deep-fry thermometer to monitor the oil temperature accurately. Maintaining the correct temperature is key to perfectly cooked, crispy chicken.
- Fry to Golden Perfection: Carefully lower 2-3 drumsticks into the hot oil, ensuring not to overcrowd the pot. Overcrowding will lower the oil temperature too quickly, resulting in greasy or soggy chicken. Fry for 6-8 minutes per side, turning occasionally, until the chicken is a deep golden brown and cooked through. The internal temperature of the chicken should reach 165°F (74°C) when measured with an instant-read thermometer inserted into the thickest part of the drumstick, avoiding the bone.
- Drain and Rest: Once cooked, carefully remove the chicken from the oil using tongs and place it on a wire rack set over a baking sheet lined with paper towels. This allows excess oil to drain off and helps maintain crispiness. Season lightly with a pinch of extra salt immediately after removing from the oil. Repeat the frying process with the remaining chicken drumsticks, ensuring the oil returns to 350°F (175°C) between batches.
- Serve: Serve your homemade “KFC” chicken hot and enjoy the crispy, juicy, and incredibly flavorful results!
Cooking Tips and Variations
For the crispiest results, ensure your chicken is patted as dry as possible before marinating. Any excess moisture will hinder the breading from adhering properly. When breading, use a “wet hand, dry hand” technique to keep your hands from getting too messy. Designate one hand for handling the wet chicken from the marinade and the other for pressing the dry flour mixture onto the chicken. Don’t be shy about really pressing that flour onto the chicken; a thicker, more textured coating means more crispiness. The resting period after breading is not optional if you want that coating to stay put. It gives the flour a chance to absorb some moisture from the chicken and adhere. If you don’t have buttermilk, you can easily make your own by adding one tablespoon of white vinegar or lemon juice to a measuring cup, then filling the rest with regular milk until it reaches 1.5 cups. Let it sit for 5 minutes until it curdles slightly. For a spicier kick, increase the amount of cayenne pepper in both the marinade and the breading, or add a pinch of ghost pepper powder if you’re feeling adventurous. If you prefer a less spicy version, simply reduce the cayenne pepper. You can also experiment with different types of chicken pieces such as thighs or wings, adjusting the frying time accordingly. Thighs will take a similar amount of time to drumsticks, while wings will cook faster.
Storage and Reheating
To store leftover fried chicken, allow it to cool completely to room temperature. Place the cooled chicken in an airtight container or wrap individual pieces tightly in aluminum foil. Store in the refrigerator for up to 3-4 days. For longer storage, you can freeze fried chicken for up to 2-3 months. To freeze, arrange the cooled chicken in a single layer on a baking sheet and freeze until solid. Once frozen, transfer the pieces to a freezer-safe bag or container to prevent freezer burn. When reheating, the best method to regain some crispiness is in an oven or air fryer. Preheat your oven to 375°F (190°C) or your air fryer to 350°F (175°C). Place the chicken on a wire rack over a baking sheet (for the oven) or directly in the air fryer basket. Reheat for 15-20 minutes in the oven, or 10-15 minutes in the air fryer, flipping halfway through, until heated through and crispy. Avoid reheating in the microwave, as it will make the crust soggy.
Frequently Asked Questions
Why is my fried chicken not crispy?
There are several common reasons for soggy fried chicken. The most frequent culprits are not patting the chicken dry enough before marinating, not allowing the breaded chicken to rest before frying, and overcrowding the fryer. Overcrowding drops the oil temperature, leading to the chicken absorbing more oil and becoming greasy rather than crispy. Ensure your oil is at the correct temperature (350°F) and fry in small batches.
Can I bake this chicken instead of frying?
While you can bake chicken, this recipe is specifically designed for deep frying to achieve the signature crispy texture and flavor profile of KFC. Baking will result in a different texture, often less crispy, and may require adjustments to cooking time and temperature. If you must bake, you could try baking at a higher temperature (around 400°F/200°C) for 35-45 minutes, flipping halfway, but expect a different outcome.
What kind of oil is best for deep frying?
For deep frying, it’s best to use oils with a high smoke point and a neutral flavor. Vegetable oil, canola oil, and peanut oil are excellent choices. Olive oil and butter have low smoke points and are not suitable for deep frying. The neutral flavor ensures that the oil doesn’t impart unwanted tastes to your delicious chicken.