
Introduction
There’s nothing quite like the creamy, dreamy indulgence of homemade ice cream. Forget the store-bought tubs; crafting your own frozen treats at home opens up a world of fresh flavors, customizable sweetness, and pure culinary joy. Imagine scooping a perfectly chilled, velvety spoonful that melts delightfully on your tongue, knowing every ingredient that went into it. This isn’t just about dessert; it’s about an experience – a fun activity for the family, a delicious way to beat the heat, and a chance to truly savor the simple pleasures in life. With this recipe, we’re stripping away the complexity and showing you just how easy it can be to whip up your own batch of delicious, personalized ice cream.
Many people shy away from making ice cream at home, assuming it requires specialized equipment or advanced culinary skills. But we’re here to bust that myth! Our “Simple Homemade Ice Cream” recipe is designed for accessibility, whether you have an ice cream maker tucked away in your pantry or rely on the trusty freezer method. The beauty of homemade ice cream lies in its versatility. You can control the sugar content, experiment with a myriad of flavors, and load it up with your favorite mix-ins, creating a dessert that perfectly suits your palate. From the vibrant pink of fresh strawberries to the sunny yellow of ripe mango, the possibilities are endless, and the satisfaction is immense.
What can you expect from following this guide? A truly creamy, flavorful ice cream that rivals any premium brand, but with the added bonus of being made with love in your own kitchen. We’ll walk you through the essential ingredients, simple steps, and offer plenty of tips for customization, allowing you to unleash your inner ice cream artisan. Whether you crave a classic vanilla, a refreshing fruit sorbet-like texture, or a decadent chocolate chip creation, this foundational recipe will be your go-to. Get ready to transform basic ingredients into extraordinary frozen delights – your taste buds will thank you!
Nutritional Information
Per serving (approximate values, based on 1/2 cup serving of vanilla ice cream):
- Calories: 250
- Protein: 4g
- Carbohydrates: 25g
- Fat: 16g
- Fiber: 0g
- Sodium: 60mg
Ingredients
- 2 cups heavy cream (full-fat for best results)
- 1 cup whole milk
- ¾ cup granulated sugar
- 1 teaspoon pure vanilla extract (or vanilla bean paste for richer flavor)
- Pinch of salt
- Optional flavorings and mix-ins:
- For Strawberry/Raspberry: 1 cup fresh or frozen berries, pureed and strained
- For Mango: 1 cup ripe mango puree
- For Chocolate: ¼ cup unsweetened cocoa powder, sifted; ½ cup chocolate chips
- For Cookies & Cream: 1 cup crushed chocolate sandwich cookies
- For Coffee: 2 tablespoons instant espresso powder dissolved in 1 tablespoon hot water
Instructions
- Prepare the Base: In a large mixing bowl, combine the heavy cream, whole milk, granulated sugar, and a pinch of salt. Whisk vigorously until the sugar is completely dissolved. This may take 2-3 minutes. You want the mixture to be smooth and homogenous, without any gritty sugar crystals at the bottom.
- Add Vanilla: Stir in the pure vanilla extract. If using vanilla bean paste, add it now for those beautiful flecks of vanilla bean.
- Chill the Base (Crucial Step): Cover the bowl with plastic wrap and refrigerate the ice cream base for at least 2 hours, or preferably overnight. A well-chilled base will churn more efficiently and result in a creamier ice cream, preventing ice crystal formation.
- Churning (Ice Cream Maker Method):
- Ensure your ice cream maker’s bowl has been frozen for the recommended time (usually 12-24 hours).
- Pour the chilled ice cream base into the frozen bowl of your ice cream maker.
- Churn according to the manufacturer’s instructions, typically for 20-30 minutes, until the ice cream reaches a soft-serve consistency. It will be thick but still pliable.
- No-Churn Method (Alternative if no machine):
- In a large, chilled bowl, whip 2 cups of very cold heavy cream with an electric mixer on medium-high speed until stiff peaks form. Be careful not to over-whip.
- In a separate bowl, combine 1 can (14 ounces) sweetened condensed milk with your desired flavorings (e.g., vanilla, fruit puree).
- Gently fold the whipped cream into the condensed milk mixture until just combined. Do not overmix, as this will deflate the cream.
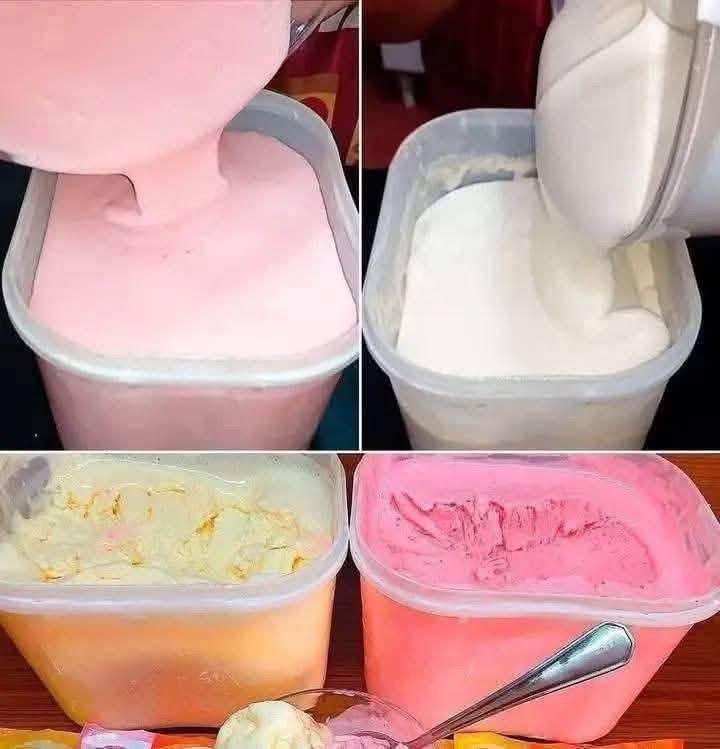
- Add Flavors and Mix-ins (Optional): If you’re creating multiple flavors as seen in the image, divide your churned or no-churn base into separate containers. Now is the time to fold in your desired flavorings and mix-ins. For fruit purees, gently swirl them in. For chocolate chips, crushed cookies, or nuts, fold them in evenly. For a multi-flavor batch, create distinct sections or layers in your final freezing containers.
- Freeze for Firmness: Transfer the soft ice cream (from either churning method) to an airtight container. If you’re making multiple flavors, you can layer them or place them side-by-side in a larger container, as depicted in the image. Press a piece of plastic wrap directly onto the surface of the ice cream to prevent ice crystals from forming, then secure the lid. Freeze for at least 4-6 hours, or until firm enough to scoop. For best results, freeze overnight.
- Serve and Enjoy: Before serving, let the ice cream sit at room temperature for 5-10 minutes to soften slightly, making it easier to scoop. Scoop into bowls or cones and enjoy your homemade delight!
Cooking Tips and Variations
For the creamiest results, always use full-fat dairy products. Heavy cream and whole milk provide the necessary fat content that prevents ice crystals and creates that luxurious mouthfeel. Chilling your base thoroughly before churning (or folding in for no-churn) is absolutely critical; a warm base will result in an icy, less desirable texture. When adding mix-ins like cookies or candy, fold them in during the last few minutes of churning or after the no-churn base is assembled, just before freezing, to ensure they are evenly distributed without getting crushed too much. If using fruit purees, consider cooking them down slightly with a tablespoon or two of sugar first to intensify the flavor and reduce water content, which can lead to iciness. For a truly professional touch, consider adding a tablespoon of vodka or other clear spirit to your base; the alcohol lowers the freezing point, resulting in an even softer, more scoopable ice cream.
The beauty of this simple recipe truly lies in its endless customization. For a vibrant strawberry or raspberry ice cream like the one pictured, puree 1 cup of fresh or frozen berries with 2-3 tablespoons of sugar (adjust to taste), then strain the mixture to remove seeds if desired. Fold this puree into your base. For a rich chocolate ice cream, whisk ¼ cup of unsweetened cocoa powder into your milk and cream mixture before chilling, ensuring it’s fully dissolved. You can also melt ½ cup of chocolate with a tablespoon of cream and swirl that in. For a zesty lemon or lime ice cream, add the zest of two lemons/limes and 2-3 tablespoons of fresh juice to the base. Coffee lovers can dissolve 2 tablespoons of instant espresso powder in 1 tablespoon of hot water, then add it to the base. And don’t forget mix-ins! Crushed Oreos, chopped nuts, mini chocolate chips, brownie chunks, or even a swirl of caramel or fudge sauce can elevate your ice cream to new heights. Feel free to layer different flavors in your freezing container, as shown in the image, for a striking and delicious multi-flavor treat.
Storage and Reheating
Proper storage is key to maintaining the quality and texture of your homemade ice cream. Always store your ice cream in an airtight container to prevent freezer burn and the absorption of freezer odors. Plastic containers like those shown in the image are perfect, but any freezer-safe container with a tight-fitting lid will work. Press a piece of plastic wrap directly onto the surface of the ice cream before sealing the lid; this creates an extra barrier against air and moisture, significantly reducing the formation of ice crystals. Homemade ice cream, due to fewer stabilizers, generally lasts well for about 1-2 weeks in the freezer. After this time, it may start to become icier or lose some of its fresh flavor. There is no reheating for ice cream, as it is a frozen dessert. However, if your ice cream is too hard to scoop directly from the freezer, simply let it sit on the counter at room temperature for 5-10 minutes. This will allow it to soften slightly, making it perfectly scoopable and enjoyable. Avoid microwaving to soften, as this can create uneven melting and an undesirable texture.
Frequently Asked Questions
Why is my homemade ice cream icy instead of creamy?
Icy ice cream is a common issue and usually points to one of a few factors: the ice cream base wasn’t chilled enough before churning, there wasn’t enough fat in the mixture (always use heavy cream and whole milk!), or the ice cream wasn’t churned long enough. Too much water content, often from fruit purees that haven’t been reduced, can also contribute to iciness. Ensure your base is thoroughly cold, use full-fat dairy, and churn until it reaches a thick, soft-serve consistency.
Can I make this recipe without an ice cream maker?
Yes, absolutely! The no-churn method outlined in the instructions is perfect for those without an ice cream maker. It involves whipping heavy cream to stiff peaks and gently folding it into a sweetened condensed milk mixture. This creates a wonderfully creamy texture without the need for churning. Just remember to be gentle when folding to maintain the airiness of the whipped cream.
How can I prevent freezer burn on my ice cream?
Freezer burn occurs when air comes into contact with the ice cream, causing moisture to evaporate and ice crystals to form. To prevent this, always store your ice cream in an airtight container. Additionally, press a layer of plastic wrap directly onto the surface of the ice cream before putting on the lid. This creates a protective barrier that seals out air and helps maintain its creamy texture and fresh flavor for longer.
What are the best types of containers for storing homemade ice cream?
Clear plastic rectangular or square containers with tight-fitting lids, similar to those shown in the image, are excellent choices. Their shape minimizes air pockets, and the clear material allows you to easily see your delicious flavors. Any freezer-safe container made of plastic, glass, or stainless steel with an airtight seal will work well. Just ensure it’s specifically designed for freezer use to prevent cracking.