
Introduction
Imagine a treat that delivers an irresistible crunch, a satisfying chew, and a rich chocolatey embrace, all without ever needing to turn on your oven. That’s the magic of homemade no-bake crunch bars! These delightful confections are the ultimate answer to your sweet cravings when time is short or the weather is too hot for baking. They’re incredibly easy to whip up, making them a fantastic project for beginner cooks, busy parents, or anyone looking for a quick and delicious indulgence. Forget those store-bought versions; crafting your own means you control the ingredients, ensuring a fresher, healthier-ish, and utterly customizable snack or dessert.
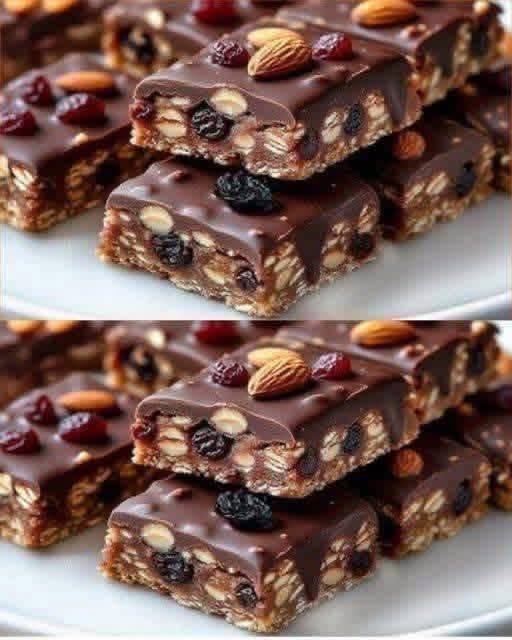
What makes these no-bake crunch bars so special? It’s the harmonious blend of textures and flavors. You start with a robust, nutty, and oat-filled base that provides that essential satisfying crunch. This base is held together by a simple, sweet binder that requires no baking whatsoever. Then, a luscious layer of melted chocolate cascades over the top, creating a smooth, rich finish that perfectly complements the textured base. Finally, a sprinkle of extra nuts and dried fruits adds visual appeal and an extra pop of flavor and chewiness, elevating these bars from simple treats to something truly extraordinary. They’re the perfect grab-and-go snack, a delightful addition to any lunchbox, or a surprisingly elegant dessert to share with friends and family.
This recipe is designed for pure convenience and maximum deliciousness. With minimal prep and no oven time, you’ll be enjoying these crunchy, chewy, chocolate-coated delights in no time. The simple process involves just a few steps: melting, mixing, pressing, and chilling. The visual appeal is undeniable, with the glossy chocolate topping studded with vibrant fruits and crunchy nuts. Whether you’re a seasoned baker or a kitchen novice, these no-bake homemade crunch bars are guaranteed to become a beloved staple in your repertoire, offering a guilt-free (or at least guilt-reduced!) way to satisfy your sweet tooth.
Nutritional Information
Per serving (approximate values):
- Calories: 280
- Protein: 6g
- Carbohydrates: 35g
- Fat: 15g
- Fiber: 4g
- Sodium: 80mg
Ingredients
- 1 cup (2 sticks / 226g) unsalted butter or vegan butter alternative
- 1 cup (200g) packed light brown sugar
- 1/2 cup (120ml) honey or maple syrup
- 1 teaspoon vanilla extract
- 1/2 teaspoon sea salt
- 4 cups (320g) rolled oats (certified gluten-free if needed)
- 1 cup (120g) mixed chopped nuts (almonds, peanuts, cashews)
- 1/2 cup (75g) dark raisins
- 1/2 cup (80g) semi-sweet chocolate chips or chopped chocolate
- 1 tablespoon coconut oil (optional, for chocolate topping)
- 1/4 cup (35g) dried cranberries, for garnish
- 2 tablespoons sliced almonds, for garnish
Instructions
- Line a 9×13 inch baking pan with parchment paper, leaving an overhang on the sides to easily lift the bars out later. Lightly grease the parchment paper if desired.
- In a large saucepan, melt the butter (or vegan butter alternative) over medium heat. Once melted, stir in the brown sugar, honey (or maple syrup), vanilla extract, and sea salt.
- Bring the mixture to a gentle simmer, stirring constantly, and cook for 2-3 minutes until the sugar has dissolved and the mixture is well combined and slightly thickened. Remove from heat.
- Add the rolled oats, mixed chopped nuts, and raisins to the saucepan with the wet mixture. Stir vigorously with a sturdy spoon or spatula until all the dry ingredients are thoroughly coated and evenly distributed.
- Transfer the oat mixture to the prepared baking pan. Using the back of a spoon, a spatula, or a piece of parchment paper, firmly and evenly press the mixture into the pan. Ensure it’s tightly packed and level across the entire surface. This crucial step helps the bars hold their shape.
- In a microwave-safe bowl, combine the semi-sweet chocolate chips (or chopped chocolate) and the optional coconut oil. Microwave in 30-second intervals, stirring well after each, until the chocolate is completely melted and smooth. Alternatively, melt the chocolate in a double boiler over simmering water.
- Pour the melted chocolate evenly over the pressed oat base in the pan. Use an offset spatula or the back of a spoon to spread it edge to edge, creating a smooth, even layer.
- Immediately after spreading the chocolate, sprinkle the dried cranberries and sliced almonds over the top. Gently press them down slightly so they adhere to the melting chocolate.
- Place the pan in the refrigerator and chill for at least 2-3 hours, or until the bars are completely firm and the chocolate topping is set. This step is essential for clean cuts.
- Once thoroughly chilled and firm, use the parchment paper overhangs to carefully lift the entire slab of crunch bars out of the pan and onto a cutting board.
- Using a sharp, warm knife (you can warm it under hot water and wipe dry), cut the slab into desired bar sizes. For best results, wipe the knife clean between cuts to prevent chocolate smearing.
- Serve immediately or store for later enjoyment.
Cooking Tips and Variations
For the best results, always use fresh ingredients. Stale oats or nuts can affect the overall flavor and texture. When melting the chocolate, do so gently to avoid burning it; low and slow is key. If your chocolate seems too thick, a teaspoon of coconut oil or a neutral oil can help thin it out for a smoother pour. For clean cuts, ensure the bars are thoroughly chilled. A warm, clean knife also helps; run it under hot water, wipe it dry, and then slice. Repeat this for each cut. To make these bars extra crunchy, you can lightly toast the oats and nuts before adding them to the mixture, allowing them to cool completely first.
The beauty of these no-bake crunch bars lies in their versatility. Feel free to swap out the nuts: peanuts, cashews, pecans, or walnuts would all be delicious. For dried fruits, apricots, chopped dates, or even candied ginger can add a unique twist. Don’t limit yourself to semi-sweet chocolate; dark chocolate will provide a more intense flavor, while milk chocolate offers a sweeter, creamier finish. You could also try white chocolate or even peanut butter chips for a different topping. To boost the flavor, consider adding a pinch of cinnamon or a dash of almond extract to the base mixture. A sprinkle of flaky sea salt over the chocolate topping before it sets can also enhance the flavors beautifully. For a vegan version, ensure you use plant-based butter and dairy-free chocolate. For gluten-free, simply opt for certified gluten-free rolled oats, which are readily available.
Storage and Reheating
These no-bake crunch bars are best stored in an airtight container in the refrigerator. Layer them between sheets of parchment paper to prevent sticking. Stored this way, they will maintain their freshness and texture for up to 1 week. If you prefer them to be firmer, keep them chilled until just before serving. While they don’t require reheating, some people enjoy allowing them to sit at room temperature for 10-15 minutes before eating to slightly soften the chocolate and make them easier to bite into. This also allows the flavors to open up a bit more. Avoid leaving them out at room temperature for extended periods, especially in warm climates, as the chocolate topping can soften and become messy. These bars also freeze beautifully for longer storage; wrap individual bars tightly in plastic wrap and then place them in a freezer-safe bag or container for up to 3 months. Thaw in the refrigerator or at room temperature for a quick treat.
Frequently Asked Questions
Can I use quick oats instead of rolled oats?
While quick oats can technically be used, rolled oats are highly recommended for this recipe. Rolled oats provide a heartier texture and more substantial chew, which is key to the “crunch” in these bars. Quick oats tend to absorb more liquid and can result in a more mushy or dense bar rather than the desired chewy and crunchy consistency.
My chocolate topping isn’t setting, what went wrong?
The most common reason for a chocolate topping not setting is not chilling the bars long enough. Ensure they are refrigerated for at least 2-3 hours, or even longer, until the chocolate is completely firm to the touch. If your kitchen is very warm, it might take even longer. Additionally, using too much coconut oil or another thinning agent with the chocolate can sometimes prevent it from setting as firmly, so use it sparingly.
Can I make these bars without honey/maple syrup?
Honey or maple syrup acts as a crucial binder in this recipe, helping to hold the oats and nuts together without baking. While you could experiment with other liquid sweeteners like agave nectar, altering the binder significantly might change the texture and require adjustments to other ingredients. It’s best to stick to honey or maple syrup for reliable results.