
Introduction
There are few culinary delights as universally adored as perfectly fried chicken. That golden-brown, shatteringly crisp crust giving way to incredibly juicy, tender meat is a symphony of textures and flavors that speaks to the soul. And when it comes to classic comfort food, our Crispy Buttermilk Fried Chicken Drumsticks reign supreme. This isn’t just any fried chicken; it’s a testament to simple ingredients transformed into an extraordinary meal, guaranteed to become a new family favorite. Get ready to elevate your home cooking with a dish that consistently delivers on its promise of deliciousness.
What’s the secret weapon behind this irresistible recipe? The magic of buttermilk. This tangy liquid isn’t just for baking; it’s a tenderizing superstar, breaking down the chicken’s fibers while infusing it with a subtle, zesty flavor that you just can’t get with plain milk. Paired with a generously seasoned flour dredge, every drumstick emerges from the hot oil with an unbelievably crunchy exterior that locks in all the succulent juices. We’ve fine-tuned the spice blend to strike the perfect balance, ensuring a flavorful punch without overpowering the natural taste of the chicken.
This recipe focuses on drumsticks for a reason: they’re economical, easy to handle, and cook up beautifully with a fantastic meat-to-bone ratio that keeps them moist. Whether you’re planning a casual weeknight dinner, a backyard barbecue, or a picnic in the park, these crispy buttermilk fried chicken drumsticks are sure to be a showstopper. So, roll up your sleeves, gather your ingredients, and prepare to create a homemade masterpiece that will have everyone asking for seconds. This isn’t just cooking; it’s crafting a memory, one delicious bite at a time.
Nutritional Information
Per serving (approximate values for 1 drumstick):
- Calories: 390 kcal
- Protein: 28g
- Carbohydrates: 20g
- Fat: 21g
- Fiber: 1g
- Sodium: 650mg
Ingredients
- 8-10 large chicken drumsticks (about 3-3.5 lbs total), skin on
- 2 cups buttermilk
- 1 tablespoon hot sauce (optional, for extra kick in marinade)
- 3 cups all-purpose flour
- 2 tablespoons smoked paprika
- 1 tablespoon garlic powder
- 1 tablespoon onion powder
- 1 tablespoon black pepper, freshly ground
- 2 teaspoons cayenne pepper (adjust to taste)
- 2 teaspoons dried oregano
- 1 teaspoon dried thyme
- 1 tablespoon salt, plus more for seasoning
- 1 teaspoon baking powder (for extra crispiness)
- 6-8 cups vegetable oil, peanut oil, or canola oil for frying (enough to submerge chicken halfway)
Instructions
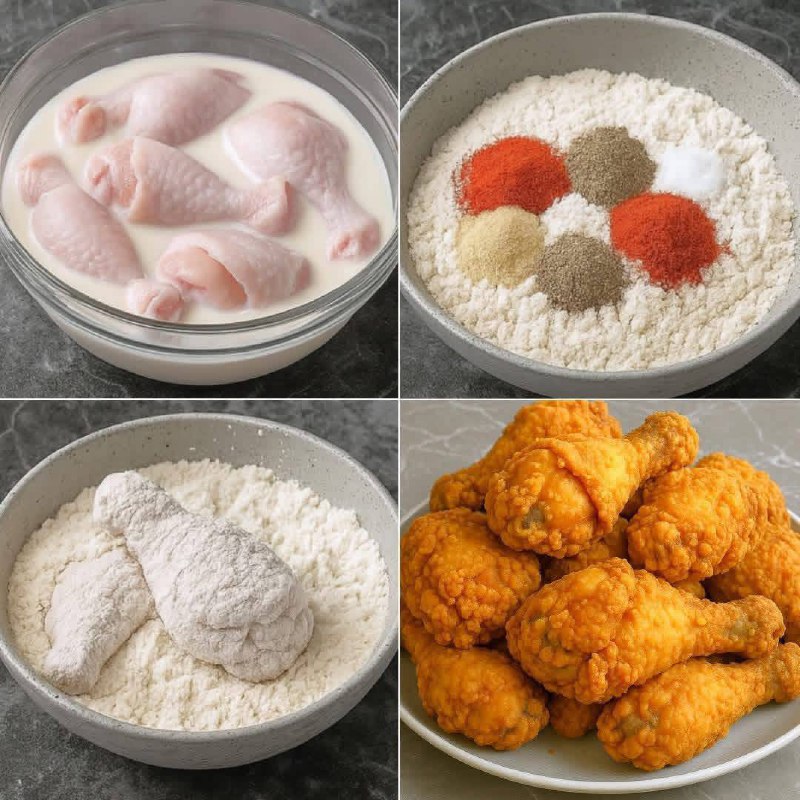
- Prepare the Chicken and Marinade: Pat the chicken drumsticks thoroughly dry with paper towels. Trim any excess skin or fat if desired. In a large bowl or a resealable plastic bag, combine the buttermilk and hot sauce (if using). Add the dried drumsticks, ensuring they are fully submerged in the buttermilk. Cover or seal and refrigerate for at least 4 hours, or preferably overnight (up to 24 hours) for maximum tenderness and flavor.
- Prepare the Dry Dredge: In a large, shallow dish or a sturdy resealable plastic bag, combine the all-purpose flour, smoked paprika, garlic powder, onion powder, black pepper, cayenne pepper, dried oregano, dried thyme, salt, and baking powder. Whisk or shake thoroughly to ensure all the spices are evenly distributed throughout the flour mixture. This is your flavorful dredging station.
- Set Up for Frying: Choose a heavy-bottomed pot or a deep Dutch oven that is wide enough to fry 3-4 drumsticks at a time without overcrowding. Pour the frying oil into the pot, ensuring it’s at least 3-4 inches deep. Attach a deep-fry thermometer to the side of the pot, making sure the tip doesn’t touch the bottom. Begin heating the oil over medium-high heat to reach a steady temperature of 350°F (175°C).
- Dredge the Chicken: One by one, remove a chicken drumstick from the buttermilk marinade, allowing any excess to drip off briefly. Place the drumstick into the seasoned flour mixture. Press the flour mixture firmly onto all surfaces of the chicken, ensuring it’s completely and thickly coated. For an extra crispy crust, you can double dredge: after the first flour coating, dip the drumstick back into the buttermilk for a quick dip, then back into the flour mixture, pressing firmly again. Place the dredged drumsticks on a wire rack set over a baking sheet while you dredge the remaining pieces. This allows the coating to adhere better.
- Fry the Chicken: Once the oil reaches 350°F (175°C), carefully lower 3-4 dredged drumsticks into the hot oil using tongs. Do not overcrowd the pot, as this will lower the oil temperature and result in greasy, soggy chicken. Fry the chicken for about 6-8 minutes per side, turning occasionally, until it is a deep golden brown and the internal temperature reaches 165°F (74°C) at the thickest part of the meat (avoiding the bone). This will typically take 15-20 minutes total, depending on the size of the drumsticks and the oil temperature.
- Drain and Serve: As each batch of chicken finishes cooking, remove it from the oil and place it on a clean wire rack set over a baking sheet to drain excess oil. Do not place on paper towels directly, as this can steam the bottom and make it less crispy. Sprinkle lightly with a pinch of extra salt immediately after removing from the oil. Monitor the oil temperature between batches, allowing it to return to 350°F (175°C) before adding more chicken. Serve hot and enjoy your perfectly crispy buttermilk fried chicken drumsticks!
Cooking Tips and Variations
Achieving the perfect crispy and juicy fried chicken is a combination of technique and patience. First and foremost, do not skip the marinating step. The buttermilk is crucial for both tenderizing the meat and providing that subtle tang, making the chicken incredibly flavorful and moist. Aim for at least 4 hours, but an overnight soak truly makes a difference. When dredging, be generous and press the flour mixture onto the chicken firmly. This creates a thick, craggy crust that becomes wonderfully crispy when fried. For an even more robust crunch, consider a double dredge: coat in flour, dip briefly back into the buttermilk, then coat again in flour. This builds up layers of deliciousness.
Oil temperature is paramount. Invest in a good deep-fry thermometer and maintain a steady 350°F (175°C). If the oil is too cool, the chicken will absorb too much oil and become greasy; if it’s too hot, the exterior will burn before the inside is cooked through. Fry in batches to prevent overcrowding, which causes the oil temperature to drop significantly. After frying, always drain your chicken on a wire rack, not on paper towels. Paper towels can trap steam, making the bottom soggy. A quick sprinkle of salt immediately after coming out of the oil will enhance the flavor of the crust.
For variations, feel free to experiment with the spice blend in the dredge. Add a pinch of celery salt for a classic Southern flavor, or a touch of dried mustard for extra zing. For a spicier kick, increase the cayenne pepper or add a dash of chipotle powder. You can also experiment with different oils; peanut oil provides a clean, neutral flavor and has a high smoke point, making it excellent for frying. Consider adding a few sprigs of fresh rosemary or thyme to the hot oil for the last minute of frying for a subtle herby aroma that infuses the chicken. This recipe also works beautifully with chicken thighs, just adjust frying time slightly to ensure they cook through.
Storage and Reheating
Proper storage is key to enjoying your fried chicken for days to come. Once your crispy buttermilk fried chicken drumsticks have cooled completely to room temperature, transfer them to an airtight container. You can layer them with parchment paper to prevent sticking, though it’s best to store them in a single layer if possible to maintain crispiness. Place the container in the refrigerator, where the chicken will stay fresh for 3-4 days. While it’s tempting to leave them out, refrigeration is essential for food safety.
When it comes to reheating, avoid the microwave if you want to preserve that delicious crispiness. The microwave will steam the chicken, leaving you with a soft, rubbery crust. The best method for reheating is the oven or an air fryer. Preheat your oven to 375°F (190°C) and place the drumsticks on a wire rack set over a baking sheet. This allows air to circulate around them, helping to re-crisp the skin. Bake for 15-20 minutes, or until heated through and the skin is crispy again. For an air fryer, preheat to 350°F (175°C) and cook for 8-12 minutes, flipping halfway, until hot and crispy. The goal is to bring the internal temperature back up to 165°F (74°C).
You can also freeze leftover fried chicken, though the texture of the crust won’t be as perfect as fresh. To freeze, wrap individual cooled drumsticks tightly in plastic wrap, then place them in a freezer-safe bag or container. They can be stored in the freezer for up to 3 months. To reheat from frozen, you can bake them in a preheated oven at 375°F (190°C) for 30-40 minutes, or until heated through and crispy. Be aware that the crust may not achieve the same level of crispness as freshly made or refrigerated reheated chicken, but it will still be delicious.
Frequently Asked Questions
What kind of oil is best for frying chicken?
For frying chicken, you want an oil with a high smoke point and a neutral flavor. Vegetable oil, canola oil, and peanut oil are all excellent choices. Peanut oil is often preferred for its clean taste and ability to withstand high temperatures without breaking down. Avoid olive oil or butter, as they have lower smoke points and will burn before the chicken is cooked through, imparting an unpleasant flavor.
How can I tell if my fried chicken is cooked through without a thermometer?
While a thermometer is highly recommended for accuracy, you can look for a few visual cues. The chicken should be deeply golden brown on the outside. If you gently pierce the thickest part of the drumstick with a knife or fork, the juices should run clear. If they are pink or cloudy, the chicken needs more time. Also, the meat near the bone should not be raw or bloody. However, for food safety and the best results, an internal temperature of 165°F (74°C) is the gold standard.
Can I make this recipe in an air fryer?
While you can achieve a crispy chicken in an air fryer, it won’t be the same as traditional deep-fried chicken. The crust will be different, and the texture may not be as rich. To adapt, dredge the chicken as instructed, then lightly spray it with oil before air frying. Cook at 375°F (190°C) for about 20-30 minutes, flipping halfway, until golden brown and cooked through. It’s a healthier alternative but offers a distinct experience from the deep-fried version.
Why is my fried chicken soggy instead of crispy?
Several factors can lead to soggy fried chicken. The most common culprit is oil that isn’t hot enough. When the oil temperature drops too low, the chicken absorbs more oil rather than forming a crispy crust. Overcrowding the pot also lowers the oil temperature significantly. Another reason can be not patting the chicken dry enough before marinating or not allowing excess buttermilk to drip off before dredging. Finally, placing hot fried chicken directly on paper towels can trap steam and make the bottom soggy; always use a wire rack for drainage.