
Introduction
Get ready to roll into a world of vibrant color, playful crunch, and irresistible sweetness! Forget everything you thought you knew about sushi, because today we’re diving headfirst into the whimsical world of Fruity Pebbles Sushi. This isn’t your traditional savory seaweed and fish; oh no, this is a dessert masterpiece designed to delight your eyes as much as your taste buds. Imagine a rainbow explosion of sweet, fruity cereal, creamy filling, all wrapped up in a fun-to-eat bite-sized package. It’s an unexpected yet utterly brilliant fusion that takes the beloved breakfast cereal and transforms it into a show-stopping sweet treat that’s perfect for parties, kid-friendly fun, or just a unique craving.
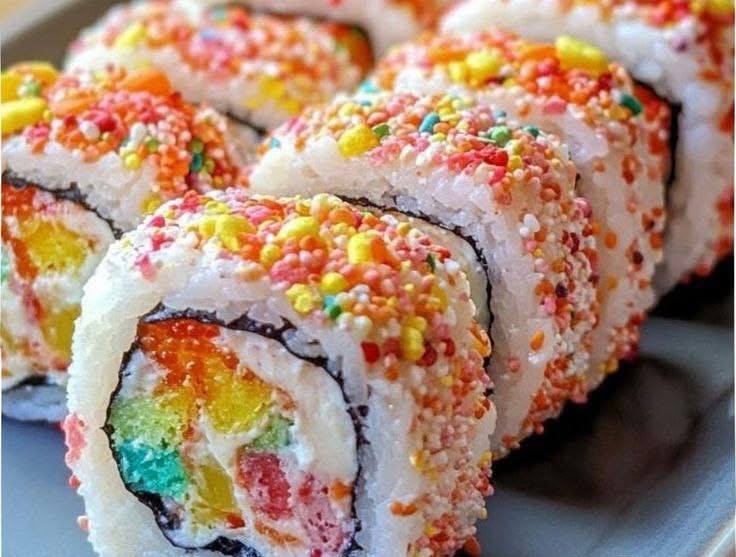
Fruity Pebbles Sushi is more than just a dessert; it’s an experience. Its visual appeal is off the charts, making it an instant hit on any dessert table and a guaranteed Instagram darling. The vibrant hues of the cereal, both inside and out, scream fun and festivity. But beyond its stunning looks, this dessert delivers on flavor and texture. You get the satisfying chewiness of a marshmallow treat, the creamy indulgence of a sweet filling, and the unmistakable fruity crunch of Fruity Pebbles in every single bite. It’s a no-bake wonder that promises big smiles and even bigger flavor, proving that sometimes the most unconventional combinations lead to the most delightful discoveries.
Whether you’re a seasoned dessert enthusiast looking for your next creative project, a parent searching for a fun kitchen activity with the kids, or simply someone who loves a unique and delicious sweet treat, this Fruity Pebbles Sushi recipe is calling your name. It’s surprisingly simple to assemble, requiring no special cooking skills beyond a willingness to have some fun. So, gather your ingredients, unleash your inner culinary artist, and prepare to create a dessert that breaks all the rules in the most delicious way possible. Let’s get rolling!
Nutritional Information
Per serving (approximate values):
- Calories: 280
- Protein: 3g
- Carbohydrates: 45g
- Fat: 10g
- Fiber: 1g
- Sodium: 180mg
Ingredients
- 6 cups Fruity Pebbles cereal, divided
- 10 ounces mini marshmallows
- 4 tablespoons unsalted butter
- 1/4 teaspoon salt
- 1/2 cup cream cheese, softened
- 1/4 cup powdered sugar
- 1 teaspoon vanilla extract
- 2 tablespoons heavy cream or milk
- Food coloring (red, orange, yellow, green, blue, purple)
- 2 sheets nori (seaweed sheets), optional but recommended for authentic look
- Cooking spray or vegetable oil for hands
Instructions
- Prepare the Fruity Pebbles “Rice” Base: In a large microwave-safe bowl, combine the mini marshmallows and unsalted butter. Microwave on high for 60-90 seconds, stirring halfway through, until the marshmallows are puffed and the butter is melted. Stir until smooth and completely combined.
- Add 4 cups of the Fruity Pebbles cereal to the marshmallow mixture. Stir quickly and thoroughly with a buttered spatula or spoon until the cereal is evenly coated.
- Prepare the Cream Cheese Filling: In a separate medium bowl, beat the softened cream cheese with an electric mixer until smooth. Add the powdered sugar, vanilla extract, and heavy cream (or milk) and beat until light, fluffy, and well combined.
- Divide the cream cheese mixture evenly into 6 small bowls. Add a drop or two of food coloring to each bowl (red, orange, yellow, green, blue, purple) and stir until each portion is vibrantly colored. You can adjust the intensity of the color by adding more drops as needed.
- Assemble the Sushi Rolls: Lay one sheet of nori (if using) flat on a bamboo sushi mat. If not using nori, you can skip this step and use plastic wrap directly on the mat. Lightly grease your hands with cooking spray or butter to prevent sticking.
- Take about half of the Fruity Pebbles “rice” mixture (from step 2) and press it evenly onto the nori sheet, leaving about a 1-inch border at the top edge of the nori. The layer should be about 1/4 to 1/2 inch thick. If not using nori, press the “rice” mixture directly onto a sheet of plastic wrap placed on your sushi mat.
- Create the Rainbow Center: Along the bottom edge of the Fruity Pebbles “rice” layer (the edge closest to you), spoon small, thin lines of each colored cream cheese filling. Start with one color, then add the next color directly beside it, creating a rainbow strip across the entire length of the “rice.” This strip should be about 1-inch thick.
- Roll the Sushi: Using the bamboo mat (or plastic wrap), carefully lift the edge closest to you and begin to roll the sushi tightly, pressing gently to create a compact cylinder. Continue rolling until you reach the end, ensuring the seam is at the bottom.
- Coat with Fruity Pebbles: Take the remaining 2 cups of Fruity Pebbles cereal and spread them out on a clean, flat surface or a shallow baking dish. Carefully transfer the rolled sushi log onto the cereal. Gently roll the log back and forth, pressing lightly, until it is completely coated in the colorful cereal.
- Repeat steps 5-9 for the second sushi roll.
- Chill the Rolls: Wrap each coated sushi log tightly in plastic wrap. Refrigerate for at least 30-60 minutes to allow the rolls to firm up, which will make slicing much easier and cleaner.
- Slice and Serve: Once chilled, unwrap the sushi logs. Using a very sharp knife (lightly wet the blade between cuts to prevent sticking), slice each log into 1-inch thick “sushi” pieces. Arrange them on a platter and serve immediately.
Cooking Tips and Variations
For the best results with your Fruity Pebbles Sushi, a few key tips can make all the difference. When handling the sticky marshmallow-cereal mixture, lightly greasing your hands with cooking spray or butter is absolutely essential to prevent frustration. This will allow you to press and shape the “rice” layer smoothly without it clinging to your fingers. Another crucial tip for clean, professional-looking slices is to use a very sharp knife. Before each cut, lightly wet the blade with water and wipe it clean. This helps the knife glide through the sticky cereal and creamy filling without squishing the roll or dragging the ingredients. Don’t press down too hard; use a gentle sawing motion. Chilling the rolls for at least 30-60 minutes before slicing is also vital, as it allows the marshmallow and cream cheese to firm up, ensuring your sushi pieces hold their shape beautifully. If you find your “rice” mixture getting too stiff while working, you can microwave it for 10-15 seconds to soften it slightly.
The beauty of Fruity Pebbles Sushi lies in its adaptability, allowing for endless variations to suit your taste or occasion. Instead of the cream cheese filling, you could use marshmallow fluff mixed with food coloring for a lighter, sweeter center. Alternatively, a simple white chocolate ganache or even a buttercream frosting could provide a luxurious filling. For different flavor profiles, consider adding a thin layer of peanut butter or Nutella before adding the colored fillings. If you want to incorporate more crunch or different textures, finely crushed pretzels, mini chocolate chips, or even chopped gummy candies could be mixed into the colored cream cheese. For a fruity twist, small, finely diced fresh berries (like strawberries or raspberries) could be folded into a couple of the colored cream cheese sections, adding a burst of natural flavor and a different kind of sweetness. You could also experiment with different cereals for the outer coating, perhaps a mix of Fruity Pebbles and Cocoa Pebbles for a chocolatey contrast, or even finely crushed cookies for a unique texture. For a truly decadent treat, drizzle the finished sushi pieces with melted white chocolate, dark chocolate, or caramel sauce before serving. The nori sheets are optional; if you prefer to omit them for a purely sweet experience, the “rice” layer can be pressed directly onto plastic wrap. Just remember to use a sushi rolling mat underneath the plastic wrap for easier rolling and shaping.
Storage and Reheating
Fruity Pebbles Sushi is best enjoyed fresh on the day it’s made for optimal crunch and texture. However, if you have leftovers or are preparing it slightly ahead of time, proper storage is key to maintaining its quality. To store, place the individual sushi pieces in an airtight container. You can layer them between sheets of parchment paper to prevent sticking. Store the container in the refrigerator for up to 2-3 days. The Fruity Pebbles coating may soften slightly over time due to moisture from the cream cheese filling, but the flavor will still be delicious. It’s generally not recommended to freeze Fruity Pebbles Sushi, as the texture of both the cereal and the cream cheese filling can degrade significantly upon thawing, becoming soggy or grainy.
Reheating is generally not recommended or necessary for Fruity Pebbles Sushi. This is a no-bake, chilled dessert that is meant to be eaten cold or at room temperature. Heating it would likely melt the cream cheese filling and turn the marshmallow-cereal base into a gooey, less appealing texture, and cause the outer cereal coating to lose its crunch entirely. If you prefer it less cold, simply remove the pieces from the refrigerator about 15-20 minutes before serving to allow them to come closer to room temperature. This will slightly soften the cream cheese filling, enhancing its creamy texture, while still maintaining the integrity of the cereal. Always serve this delightful treat cold or at room temperature for the best experience.
Frequently Asked Questions
Can I make Fruity Pebbles Sushi without a sushi mat?
Yes, you can! While a bamboo sushi mat makes rolling easier and helps create a tighter, more uniform roll, it’s not strictly necessary. You can use a sheet of plastic wrap or even parchment paper placed on a flat surface. Simply lay your nori (or directly your Fruity Pebbles “rice”) on the plastic wrap, add the filling, and then use the plastic wrap to help you lift and roll the sushi tightly. The key is to apply gentle, consistent pressure as you roll to ensure the log holds together.
What can I use if I don’t have nori sheets?
Nori sheets are used primarily for the aesthetic and a slight savory contrast. If you don’t have them or prefer to omit them, you can simply press the Fruity Pebbles “rice” mixture directly onto a sheet of plastic wrap (placed on a sushi mat or flat surface). The roll will still hold together and be delicious, just without the dark green outer layer. The plastic wrap will serve as your rolling aid.
Can I prepare Fruity Pebbles Sushi ahead of time for a party?
You can definitely prepare it ahead, but with a slight caveat. It’s best to assemble and chill the rolls (up to step 11) no more than 24 hours in advance. The outer Fruity Pebbles coating is best applied just a few hours before serving, or even right before slicing, to maintain its maximum crunch. If you coat it too far in advance, the cereal can absorb moisture from the cream cheese and soften. Store the uncoated, chilled rolls wrapped tightly in plastic wrap in the refrigerator, then coat and slice on the day of your event.
How do I prevent the sushi from falling apart when slicing?
The most important steps to prevent your sushi from falling apart are adequate chilling time and using a very sharp, slightly wet knife. Chilling allows the marshmallow and cream cheese to firm up, making the roll more stable. A sharp knife, wiped clean and slightly moistened between each cut, will slice cleanly through the sticky ingredients instead of squishing them. Avoid a dull knife at all costs, as it will tear and distort your beautiful rolls. A gentle sawing motion rather than a forceful downward press also helps.