
Introduction
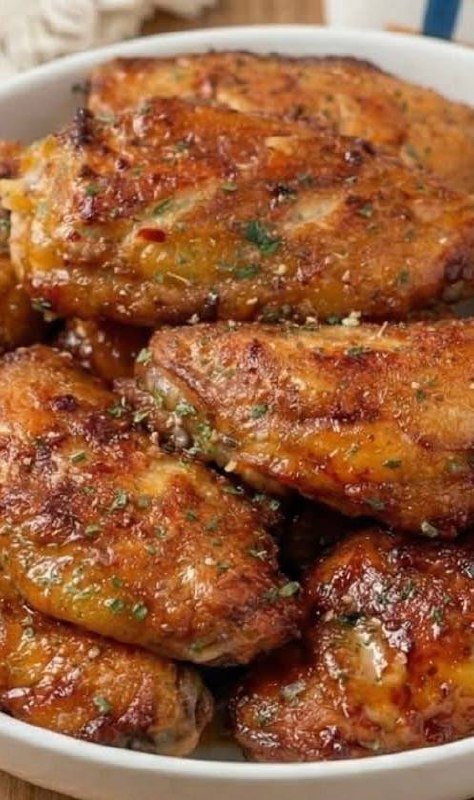
Get ready to elevate your snack game with the ultimate crowd-pleaser: perfect Oven Baked Chicken Wings! Forget the greasy mess of deep-frying and the endless debate over flats or drumettes – this recipe delivers irresistibly crispy skin, incredibly juicy meat, and a flavor-packed glaze that will have everyone reaching for more. Whether you’re hosting a game day party, planning a casual weeknight dinner, or simply craving that savory, satisfying bite, these wings are designed for delicious success with minimal fuss. They’re a healthier alternative to fried versions without sacrificing any of the indulgent taste, making them a guilt-free pleasure you’ll want to make again and again.
What sets these oven-baked wings apart is the ingenious technique that guarantees that coveted crunch without a fryer. We’ll walk you through the simple steps to achieve a beautifully golden-brown exterior and tender interior, all while infusing them with a mouthwatering blend of savory, sweet, and tangy notes. The magic lies in a few key preparation steps and a strategic baking process that renders the fat and crisps the skin to perfection. Plus, the glaze, rich with herbaceous hints and a gorgeous caramelization, adds that final layer of irresistible flavor and a stunning glossy finish that makes them look as good as they taste.
This recipe is not just easy; it’s incredibly versatile, allowing you to customize the flavor profile to your heart’s content. It’s a fantastic foundation for endless wing adventures, but even as is, it promises a truly exceptional experience. So, gather your ingredients, preheat your oven, and prepare to impress yourself and your loved ones with a batch of homemade oven-baked chicken wings that are so good, they might just become your new signature dish. Let’s dive into creating these delectable bites!
Nutritional Information
Per serving (approximate values for 4-6 wings):
- Calories: 350-450
- Protein: 30-40g
- Carbohydrates: 10-15g
- Fat: 20-30g
- Fiber: 1-2g
- Sodium: 500-700mg
Ingredients
- 3 lbs chicken wings, separated into flats and drumettes
- 1 tablespoon olive oil (plus more for baking sheet if not using parchment)
- 1 teaspoon salt
- 1/2 teaspoon black pepper
- 1 teaspoon garlic powder
- 1 teaspoon onion powder
- 1 teaspoon smoked paprika
- 1/2 teaspoon dried parsley (for seasoning wings)
- 1/4 cup honey (or maple syrup)
- 2 tablespoons soy sauce (low sodium preferred)
- 1 tablespoon apple cider vinegar
- 1 teaspoon sriracha or hot sauce (optional, for a kick)
- 1/2 teaspoon dried parsley (for glaze)
- 1/4 teaspoon red pepper flakes (optional, for garnish or extra heat)
- Fresh parsley, chopped (for garnish, optional)
Instructions
- Prepare the Chicken Wings: Begin by thoroughly patting the chicken wings dry with paper towels. This step is absolutely crucial for achieving crispy skin, as excess moisture will steam the wings instead of crisping them. If your wings are whole, use a sharp knife or kitchen shears to separate them at the joint into flats and drumettes. Discard the wing tips or save them for making chicken stock.
- Season the Wings: In a large bowl, drizzle the dried chicken wings with 1 tablespoon of olive oil. Toss to coat evenly. In a small bowl, combine the salt, black pepper, garlic powder, onion powder, smoked paprika, and 1/2 teaspoon of dried parsley. Sprinkle this seasoning mixture over the wings, tossing well to ensure every piece is thoroughly coated.
- Prepare the Baking Sheet: Line a large baking sheet with parchment paper for easy cleanup, or lightly grease it with additional olive oil. For maximum crispiness, place an oven-safe wire rack on top of the prepared baking sheet. This allows air to circulate around the wings, promoting even cooking and preventing the bottoms from getting soggy.
- Arrange Wings for Baking: Arrange the seasoned chicken wings in a single layer on the wire rack, ensuring they are not touching. Overcrowding the pan will lead to steaming rather than crisping, so use two baking sheets if necessary to give the wings enough space.
- Initial Bake: Preheat your oven to 400°F (200°C). Once hot, place the baking sheet with the wings into the oven. Bake for 25 minutes. This initial baking period helps to render some of the fat and start the crisping process.
- Prepare the Glaze: While the wings are baking, prepare the flavorful glaze. In a small saucepan, combine the honey (or maple syrup), soy sauce, apple cider vinegar, sriracha (if using), and 1/2 teaspoon of dried parsley. Whisk everything together until well combined.
- Simmer the Glaze: Place the saucepan over medium-low heat and bring the glaze mixture to a gentle simmer, whisking occasionally. Let it simmer for 3-5 minutes, or until it has slightly thickened and become syrupy. Remove from heat and set aside.
- Apply the Glaze: After the initial 25 minutes of baking, carefully remove the wings from the oven. Using tongs, transfer the partially baked wings to a clean large bowl. Pour about two-thirds of the prepared glaze over the wings. Toss gently to coat each wing evenly with the sticky, flavorful glaze.
- Final Bake and Caramelization: Return the glazed wings to the wire rack on the baking sheet, again arranging them in a single layer. Increase the oven temperature to 425°F (220°C). Bake for an additional 20-25 minutes, or until the wings are deep golden brown, crispy, and the glaze is beautifully caramelized and sticky. For extra crispiness, you can flip them once halfway through this final baking period.
- Check for Doneness: The internal temperature of the thickest part of the chicken should reach 165°F (74°C) when checked with a meat thermometer.
- Rest and Serve: Once baked to perfection, remove the wings from the oven. Let them rest on the wire rack for 5 minutes before serving. This allows the juices to redistribute, ensuring maximum tenderness.
- Garnish and Enjoy: Transfer the wings to a serving platter. Drizzle with the remaining glaze (you may need to gently reheat it if it has thickened too much) and sprinkle with fresh chopped parsley and/or red pepper flakes, if desired. Serve immediately and watch them disappear!
Cooking Tips and Variations
For the crispiest possible skin, beyond just patting them dry, you can try tossing the seasoned wings with 1 teaspoon of baking powder (not baking soda) before baking. The baking powder helps to raise the skin’s pH, breaking down proteins and promoting extra crispness. Just ensure it’s baking powder, as baking soda will leave a metallic taste. Another key tip for crispiness is to avoid overcrowding the baking sheet; giving each wing space allows for proper air circulation and prevents steaming. If you don’t have a wire rack, you can still get crispy wings by flipping them halfway through the baking process, but the rack truly makes a difference. Always preheat your oven thoroughly to ensure an even and consistent cook from the start.
To prevent the wings from sticking to the wire rack, you can lightly spray the rack with non-stick cooking spray before placing the wings. When applying the glaze, do it carefully to ensure an even coating without stripping off the initial crispy layer. If your glaze becomes too thick while waiting, gently warm it in the microwave or on the stovetop for a few seconds to make it pourable again. For the juiciest results, be careful not to overcook the wings. Use a meat thermometer to ensure they reach 165°F (74°C) but don’t go much beyond that. A brief rest after baking also helps keep them tender.
This recipe is a fantastic base for endless flavor variations! For a classic Buffalo wing, skip the honey glaze and instead toss the cooked wings in a mixture of hot sauce and melted butter. For a zesty Lemon Pepper version, season with lemon pepper seasoning before baking and drizzle with fresh lemon juice after. A Garlic Parmesan twist can be achieved by tossing the hot wings with melted butter, minced garlic, and grated Parmesan cheese. For a spicier kick, increase the sriracha in the glaze or add a pinch of cayenne pepper to the dry rub. You can also experiment with different vinegars in the glaze, such as rice vinegar for an Asian-inspired flavor, or balsamic vinegar for a richer, sweeter profile. If you own an air fryer, you can cook these wings in batches at 375°F (190°C) for 20-25 minutes, flipping halfway, then glaze and air fry for another 5-7 minutes until caramelized and crispy.
When serving, these wings are fantastic on their own, but they also pair wonderfully with a variety of dipping sauces. Ranch or blue cheese dressing are classic choices, offering a cool and creamy contrast to the savory wings. For a lighter side, serve them with crunchy celery sticks and carrot sticks. A simple side salad or some seasoned potato wedges would also complement the meal perfectly. Don’t be afraid to get creative with your toppings and garnishes too; a sprinkle of toasted sesame seeds can add a lovely nutty crunch and visual appeal.
Storage and Reheating
To store any leftover oven baked chicken wings, allow them to cool completely to room temperature first. Once cooled, place them in an airtight container. They can be stored in the refrigerator for up to 3-4 days. It’s best to separate them into a single layer if possible, or place parchment paper between layers to prevent them from sticking together. While the skin may lose some of its crispness during refrigeration, the flavor will still be delicious.
For reheating, the best method to bring back some of that crispy texture is to use an oven or an air fryer. Preheat your oven to 350°F (175°C). Arrange the wings in a single layer on a baking sheet lined with parchment paper or on a wire rack set over a baking sheet. Reheat for 10-15 minutes, or until thoroughly heated through and the skin begins to crisp up again. If using an air fryer, preheat it to 350°F (175°C) and reheat the wings for 5-8 minutes, shaking the basket halfway through, until hot and crispy. Microwaving is not recommended as it will make the wings soggy and rubbery, but it can be used in a pinch if crispiness is not a priority, heating in 30-second intervals until warmed through.
Frequently Asked Questions
How do I ensure my chicken wings are extra crispy?
The key to extra crispy wings lies in several steps. First, thoroughly pat the wings dry with paper towels to remove all surface moisture. Moisture creates steam, which prevents crisping. Second, use a wire rack set over a baking sheet; this allows hot air to circulate all around the wings. Third, consider tossing the dry-pat wings with 1 teaspoon of baking powder (not baking soda) before seasoning and baking. Baking powder helps to draw out moisture and creates tiny air bubbles on the skin, contributing to a super crispy texture. Finally, baking at a higher temperature towards the end helps to achieve that desired golden-brown crispness.
Can I prepare the wings ahead of time?
You can certainly do some prep work in advance. You can pat the wings dry and season them up to 24 hours before baking. Store them uncovered in the refrigerator on a wire rack set over a baking sheet. This allows the skin to dry out even further, which can contribute to extra crispiness. You can also prepare the glaze ahead of time and store it in an airtight container in the refrigerator for up to 3-4 days. When ready to bake, simply proceed with the instructions, and gently warm the glaze before tossing the partially baked wings.
What if I don’t have a wire rack for baking?
While a wire rack is highly recommended for optimal crispiness, you can still make delicious oven-baked wings without one. If you don’t have a wire rack, simply arrange the wings directly on a parchment-lined baking sheet in a single layer. To help them crisp up, you’ll need to flip the wings halfway through the initial baking time and again halfway through the final baking time. This ensures both sides get direct contact with the hot baking sheet and allows them to cook more evenly, though they may not be quite as uniformly crispy as those cooked on a rack.