
Introduction
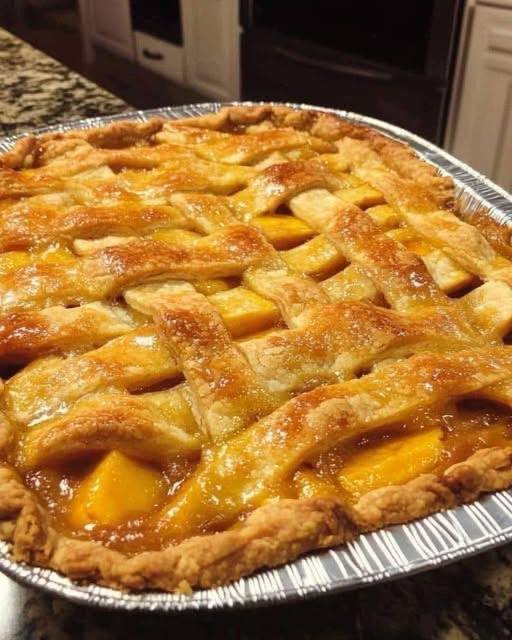
There are some desserts that instantly transport you back to childhood, to warm kitchens filled with the scent of cinnamon and baking fruit, and to the comforting embrace of family. Grandma’s Peach Cobbler Pie is undeniably one of those timeless treasures. This isn’t just any peach pie; it’s the kind that whispers stories of simpler times, of homegrown goodness, and of love baked into every golden, bubbling bite. With its vibrant, sweet peach filling peeking through a beautifully woven lattice crust, this pie is a celebration of summer’s bounty and the art of classic home baking. It’s a dish that embodies pure comfort food – rustic yet elegant, simple yet profoundly satisfying.
What makes a “Grandma’s” recipe so special? It’s often the reliance on straightforward, wholesome ingredients, combined with a seasoned touch that transforms them into something extraordinary. This recipe for Grandma’s Peach Cobbler Pie exemplifies that magic. We’re talking about plump, juicy peaches, whether fresh from the orchard or picked at their peak and frozen, nestled beneath a tender, flaky pie crust. The filling is perfectly balanced with just the right amount of sweetness and a hint of spice, creating a symphony of flavors that is both familiar and utterly delightful. This recipe is designed to be approachable for bakers of all skill levels, ensuring that everyone can experience the joy of pulling a warm, fragrant peach cobbler pie from their oven.
Whether you’re looking for the perfect dessert to grace your holiday table, a show-stopping centerpiece for a summer gathering, or simply a comforting treat to enjoy with a scoop of vanilla ice cream on a quiet evening, this Grandma’s Peach Cobbler Pie is the answer. It’s a recipe that has stood the test of time, cherished for its authentic flavor and heartwarming appeal. The golden-brown lattice top, glistening with a hint of sugar, promises a delightful crunch, while the bubbling, tender peach filling underneath delivers an explosion of sweet, fruity goodness. Get ready to create a masterpiece that will earn you rave reviews and perhaps even start a new family tradition of your own.
Nutritional Information
Per serving (approximate values, based on 8 servings):
- Calories: 420 kcal
- Protein: 4g
- Carbohydrates: 65g
- Fat: 18g
- Fiber: 3g
- Sodium: 250mg
Ingredients
For the Flaky Pie Crust (enough for a double crust, top and bottom)
- 2 ½ cups all-purpose flour, plus more for dusting
- 1 teaspoon salt
- 1 cup (2 sticks) unsalted butter, very cold and cut into ½-inch cubes
- ½ cup ice water, plus 1-2 tablespoons more if needed
For the Sweet Peach Filling
- 6 cups ripe peaches, peeled, pitted, and sliced (about 6-8 medium peaches, or 2 (16-ounce) bags frozen sliced peaches, thawed)
- ¾ cup granulated sugar (adjust to taste based on peach sweetness)
- ¼ cup packed light brown sugar (optional, for deeper flavor)
- 3 tablespoons cornstarch (or ¼ cup all-purpose flour)
- 1 teaspoon ground cinnamon
- ¼ teaspoon ground nutmeg
- ⅛ teaspoon ground ginger (optional, for a subtle warmth)
- 1 tablespoon fresh lemon juice
- 1 teaspoon pure vanilla extract
- 2 tablespoons unsalted butter, cut into small pieces
For the Golden Glaze and Sparkle
- 1 large egg
- 1 tablespoon milk or water
- 1 tablespoon coarse sugar (turbinado or sanding sugar)
Instructions
- Prepare the Pie Crust Dough: In a large mixing bowl, whisk together the flour and salt. Add the cold, cubed butter to the flour mixture. Using a pastry blender, your fingertips, or a food processor, cut the butter into the flour until the mixture resembles coarse crumbs with some pea-sized pieces of butter remaining.
- Gradually add the ice water, 1 tablespoon at a time, mixing gently until the dough just comes together. Be careful not to overmix. The dough should be shaggy but hold together when squeezed. Divide the dough into two equal portions, flatten each into a disk, wrap tightly in plastic wrap, and refrigerate for at least 30 minutes, or up to 2 days. Chilling is crucial for a flaky crust.
- Preheat Oven and Prepare Pie Dish: Preheat your oven to 400°F (200°C). Lightly grease a 9-inch pie plate, or use a disposable aluminum pie plate.
- Roll Out the Bottom Crust: On a lightly floured surface, roll out one disk of chilled pie dough into a 12-inch circle, about ⅛-inch thick. Carefully transfer the dough to the prepared 9-inch pie plate. Trim the edges, leaving about a ½-inch overhang. Place the pie plate in the refrigerator while you prepare the filling.
- Prepare the Peach Filling: In a large bowl, combine the sliced peaches, granulated sugar, brown sugar (if using), cornstarch (or flour), cinnamon, nutmeg, and ginger (if using). Gently toss until the peaches are evenly coated. Add the lemon juice and vanilla extract, and toss again. Taste a small piece of peach and adjust sugar if necessary, depending on the sweetness of your peaches.
- Assemble the Pie: Pour the peach filling into the chilled pie crust, spreading it evenly. Dot the top of the filling with the small pieces of butter.
- Create the Lattice Top: On a lightly floured surface, roll out the second disk of chilled pie dough into a 12-inch circle, about ⅛-inch thick. Using a pastry wheel or a sharp knife, cut the dough into 1-inch wide strips.
- Lay half of the strips parallel across the pie filling, about 1 inch apart. Fold back every other strip about halfway. Place one of the remaining strips perpendicular over the unfolded strips, then unfold the folded strips back over the perpendicular strip.
- Now, fold back the alternating strips (the ones that were not folded back in the previous step). Place another perpendicular strip next to the first, then unfold the strips back. Repeat this weaving process until the entire pie is covered with a lattice pattern.
- Finish the Edges: Trim any excess lattice strips, leaving about a ½-inch overhang. Fold the bottom crust overhang over the lattice strips, then crimp the edges decoratively using your fingers or a fork to seal the pie.
- Apply Glaze and Sugar: In a small bowl, whisk together the egg and milk (or water) to create an egg wash. Brush the egg wash generously over the entire lattice top and crimped edges of the pie. Sprinkle the coarse sugar evenly over the egg-washed crust.
- Bake the Pie: Place the pie on a baking sheet to catch any potential drips. Bake in the preheated oven for 20 minutes at 400°F (200°C).
- Reduce the oven temperature to 375°F (190°C) and continue baking for another 35-45 minutes, or until the crust is deeply golden brown and the filling is bubbling thickly in the center. If the crust starts to brown too quickly, loosely tent the edges with aluminum foil.
- Cool the Pie: Once baked, carefully remove the pie from the oven. Transfer it to a wire rack and let it cool completely for at least 3-4 hours before slicing and serving. This cooling time is essential for the filling to set properly.
- Serve and Enjoy: Serve warm or at room temperature, perhaps with a scoop of vanilla ice cream, a dollop of whipped cream, or a drizzle of crème anglaise.
Cooking Tips and Variations
Achieving a truly spectacular Grandma’s Peach Cobbler Pie relies on a few key techniques and considerations. First and foremost, resist the urge to overwork your pie dough. The less you handle it, the more tender and flaky your crust will be. Keep all your pie crust ingredients, especially the butter and water, as cold as possible. This creates pockets of steam during baking, which results in that desirable flaky texture. If your kitchen is warm, you can even chill your flour before starting. Another crucial tip for preventing a soggy bottom crust, especially with juicy fruit fillings like peaches, is to use a hot baking sheet. Place your pie plate on a preheated baking sheet before putting it in the oven. This helps to conduct heat quickly to the bottom crust, ensuring it cooks thoroughly before the filling has a chance to make it soggy. Additionally, for the best flavor, always opt for ripe peaches. If using fresh, make sure they are soft to the touch and fragrant. If using frozen, thaw them completely and drain any excess liquid before tossing with the other filling ingredients.
To ensure a perfectly cooked filling, bake until you see not just a little bubbling, but a robust boil of the filling in the center of the pie. This indicates that the thickener has fully activated and the peaches are tender. Don’t rush the cooling process; it’s perhaps the hardest part, but allowing the pie to cool for at least 3-4 hours (or even longer) ensures the filling sets properly, preventing it from spilling out when sliced. If your crust edges are browning too quickly during baking, a simple foil shield around the perimeter will protect them while the rest of the pie continues to cook. For a truly golden and sparkly lattice, don’t skimp on the egg wash and coarse sugar; they add both visual appeal and a delightful crunch.
This classic recipe also lends itself beautifully to variations. For a mixed berry cobbler pie, swap out some of the peaches for an equal amount of blueberries, raspberries, or blackberries. Adjust sugar as needed based on the tartness of the berries. You can play with the spice blend too; try adding a pinch of cardamom or a touch more ginger for a different flavor profile. If you’re short on time or prefer a less intricate topping, transform this into a peach crumble pie by skipping the lattice and instead topping the filling with a buttery streusel. For a nuttier flavor, add chopped pecans or walnuts to your crumble topping. Another delightful variation is to add a tablespoon of bourbon or rum to the peach filling for an adult twist. This pie can also be made with other seasonal fruits like apples, cherries, or plums, simply adjusting the sugar and spices to complement the fruit.
Storage and Reheating
Proper storage is key to enjoying your Grandma’s Peach Cobbler Pie for days. Once the pie has cooled completely to room temperature, cover it loosely with aluminum foil or plastic wrap. It can be stored at room temperature for up to 2 days. If you need to store it longer, or if your kitchen is particularly warm, refrigerate the pie. When refrigerated, it will stay fresh for 3-4 days. Be aware that the crust may lose some of its crispness in the refrigerator due to moisture from the filling.
To reheat a whole pie or individual slices, preheat your oven to 300°F (150°C). Place the pie directly on a baking sheet. For a whole pie, warm for 20-30 minutes, or until heated through. For individual slices, 10-15 minutes should suffice. This low and slow reheating method helps to warm the filling without over-browning the crust and can help re-crisp the crust slightly. You can also reheat individual slices in the microwave for 30-60 seconds, but this will soften the crust significantly. For the best texture, oven reheating is recommended. Avoid freezing a baked pie with a lattice top, as the crust texture can suffer significantly upon thawing. However, you can freeze unbaked pies for future baking. Wrap tightly in plastic wrap and then foil, and bake from frozen (adding extra baking time) or thaw overnight in the refrigerator before baking.
Frequently Asked Questions
How do I prevent my pie crust from getting soggy?
To prevent a soggy bottom crust, there are a few essential steps. First, ensure your pie dough is well-chilled before rolling and that you don’t overwork it, which can develop gluten and make it tough rather than flaky. Second, consider blind baking (pre-baking) your bottom crust for about 10-15 minutes before adding the filling, especially if your peaches are particularly juicy. Finally, always place your pie plate on a preheated baking sheet when putting it into the oven. The direct heat from the hot baking sheet helps cook the bottom crust quickly, creating a barrier against the moisture from the fruit filling.
Can I use frozen peaches instead of fresh?
Absolutely! Frozen peaches work wonderfully in this recipe, making it a year-round treat. If using frozen peaches, make sure to thaw them completely before mixing them with the other filling ingredients. Once thawed, gently pat them dry with paper towels to remove any excess moisture. You may also want to slightly increase the amount of cornstarch or flour in the filling by an extra teaspoon or two, as frozen peaches can release more liquid than fresh ones. Otherwise, proceed with the recipe as directed.
Why is my pie filling runny after baking?
A runny pie filling usually means the thickener (cornstarch or flour) didn’t have enough time or heat to fully activate. This often happens if the pie isn’t baked long enough, or if it’s sliced before the filling has completely set. Make sure to bake the pie until the filling is visibly bubbling thickly in the center, not just around the edges. This vigorous bubbling indicates that the thickener has done its job. Also, resist the urge to cut into the pie too soon! Letting it cool for at least 3-4 hours, or even longer, is crucial for the filling to fully set and achieve that perfect sliceable consistency.
What’s the best way to peel fresh peaches?
The easiest way to peel fresh peaches is by blanching them. Bring a large pot of water to a rolling boil. Score a small “X” on the bottom of each peach with a sharp knife. Carefully drop the peaches into the boiling water for 30-60 seconds, or until the skin starts to loosen around the “X.” Immediately transfer the peaches to an ice bath to stop the cooking process. Once cooled, the skins should slip off easily with your fingers or a paring knife. This method works beautifully for ripe peaches and saves a lot of time and effort compared to peeling them raw.