
Amish White Bread
Introduction
Imagine the aroma of freshly baked bread wafting through your home, a scent that instantly conjures feelings of warmth, comfort, and nostalgia. That’s precisely the magic of homemade Amish White Bread. This isn’t just any bread; it’s a testament to simple, wholesome ingredients transformed into something extraordinary. With its incredibly soft crumb, delicate sweetness, and perfectly golden crust, Amish White Bread is a beloved classic that has graced countless tables for generations. It’s the kind of bread that makes every sandwich feel like a gourmet meal and every slice of toast a little bit of heaven.
What makes Amish White Bread so special? It’s its unparalleled tenderness and subtle, comforting flavor. Unlike some rustic loaves, this bread is designed to be pillowy soft, making it ideal for everything from hearty deli sandwiches to delicate tea toasts. Its slight sweetness comes from a touch of sugar, which also helps to activate the yeast and create that beautiful golden-brown crust. This recipe embraces the traditional methods, focusing on quality ingredients and careful technique to produce a loaf that is both incredibly delicious and surprisingly easy to master, even for novice bakers. You’ll be amazed at how a few basic pantry staples can create such a spectacular result.
This recipe for Amish White Bread is more than just a set of instructions; it’s an invitation to experience the joy of baking from scratch. We’ve meticulously crafted it to be foolproof, guiding you through each step with clarity and helpful tips. Whether you’re looking for the perfect sandwich bread, a comforting accompaniment to your favorite soup, or simply a delicious treat to enjoy with butter and jam, this recipe delivers. Prepare to fill your kitchen with an irresistible aroma and your belly with the most delightful homemade bread you’ve ever tasted. Don’t be intimidated – the reward of pulling warm, fragrant loaves from your oven is truly priceless. Let’s get baking!
Nutritional Information
Per serving (approximate values, based on 12 slices per loaf, 2 loaves per recipe):
- Calories: 180
- Protein: 6g
- Carbohydrates: 35g
- Fat: 3g
- Fiber: 1g
- Sodium: 250mg
Ingredients
- 4 ½ teaspoons active dry yeast (two ¼-ounce packets)
- ½ cup warm water (105-115°F / 40-46°C)
- 2 cups warm milk (105-115°F / 40-46°C)
- ½ cup granulated sugar, plus a pinch for yeast activation
- 2 teaspoons salt
- ¼ cup unsalted butter, melted, plus extra for brushing
- 6 to 7 cups all-purpose flour, plus more for dusting
Instructions
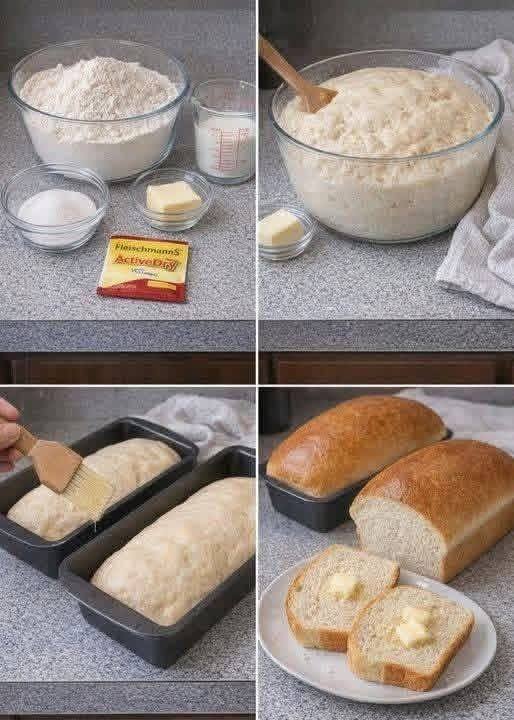
- Activate the Yeast: In a very large mixing bowl, combine the warm water and a pinch of sugar. Sprinkle the active dry yeast over the top. Stir gently and let it sit for 5-10 minutes, or until the mixture becomes foamy. This indicates your yeast is active and ready to go.
- Combine Wet Ingredients: To the activated yeast mixture, add the warm milk, ½ cup granulated sugar, salt, and ¼ cup melted butter. Stir well to combine all the wet ingredients.
- Add Flour Gradually: Begin adding the flour, one cup at a time, mixing well after each addition. Start with 3-4 cups and mix with a sturdy spoon or a stand mixer with a dough hook until the mixture forms a shaggy dough.
- Knead the Dough: Continue adding flour, a little at a time, until the dough comes together and is no longer sticky, but still soft and pliable. You may not need all 7 cups of flour.
- By Hand: Turn the dough out onto a lightly floured surface. Knead for 8-10 minutes, pushing the dough away from you with the heels of your hands, then folding it back over, rotating, and repeating. The dough should become smooth, elastic, and spring back when gently poked.
- With a Stand Mixer: Attach the dough hook. Knead on medium-low speed for 6-8 minutes, or until the dough is smooth, elastic, and pulls away cleanly from the sides of the bowl.
- First Rise (Bulk Fermentation): Lightly grease a large clean bowl with a little oil or melted butter. Place the kneaded dough into the bowl, turning it once to coat the top. Cover the bowl tightly with plastic wrap or a clean kitchen towel. Place in a warm, draft-free spot (like a slightly warmed oven that has been turned off, or near a sunny window) for 1 to 1 ½ hours, or until the dough has doubled in size.
- Prepare Loaf Pans: While the dough is rising, lightly grease two 9×5-inch loaf pans with butter or cooking spray.
- Punch Down and Divide Dough: Once the dough has doubled, gently punch it down to release the air. Turn the dough out onto a lightly floured surface and divide it into two equal portions.
- Shape the Loaves: Take one portion of dough and gently flatten it into a rectangle. Roll the dough tightly from one of the shorter ends towards the other, creating a log shape. Pinch the seam closed along the bottom and tuck the ends under to create a smooth loaf. Repeat with the second portion of dough.
- Second Rise (Proofing): Place each shaped loaf into its prepared pan. Cover the pans loosely with plastic wrap or a clean kitchen towel. Return them to a warm, draft-free spot for another 30-45 minutes, or until the loaves have risen to about 1 inch above the rim of the pans.
- Preheat Oven: About 15-20 minutes before the end of the second rise, preheat your oven to 375°F (190°C).
- Bake the Bread: Place the risen loaves in the preheated oven. Bake for 30-35 minutes, or until the tops are golden brown and the internal temperature reaches 200-210°F (93-99°C) when measured with an instant-read thermometer. If the tops are browning too quickly, you can loosely tent them with aluminum foil for the last 10-15 minutes of baking.
- Brush with Butter (Optional): For an even softer crust and extra flavor, immediately after removing the loaves from the oven, brush the tops generously with a little melted butter.
- Cool Completely: Carefully remove the loaves from the pans after 5-10 minutes and transfer them to a wire rack to cool completely. This is crucial for preventing a soggy bottom and allowing the internal structure of the bread to set properly. Resist the urge to slice into them too soon!
- Serve and Enjoy: Once cooled, slice and serve your delicious homemade Amish White Bread.
Cooking Tips and Variations
Achieving the perfect loaf of Amish White Bread is incredibly rewarding, and a few key tips can elevate your baking experience. First, always ensure your yeast is active. The “foaming” step is vital; if your yeast doesn’t foam, it’s likely dead, and your bread won’t rise. It’s better to start with fresh yeast than to waste a whole batch of ingredients. Secondly, the temperature of your liquids (water and milk) is critical for yeast activation. They should feel comfortably warm to the touch, like a baby’s bath, ideally between 105-115°F (40-46°C). Too hot will kill the yeast, too cold will inhibit its activity.
When it comes to kneading, don’t rush it. Proper kneading develops the gluten, which gives the bread its structure and chew. Whether by hand or mixer, aim for a dough that is smooth, elastic, and springs back when gently poked. Avoid adding too much flour during kneading; a slightly sticky dough is better than a dry, dense one. If your dough is too sticky, add flour a tablespoon at a time. For rising, a warm, draft-free environment is essential. If your kitchen is cool, you can place the covered bowl in a turned-off oven with the light on, which creates a cozy spot for the yeast to work its magic. For a truly golden and soft crust, don’t skip brushing the warm loaves with melted butter straight out of the oven.
Troubleshooting Common Issues:
- Dough not rising: This is almost always a yeast issue. Either the yeast was old/dead, or the liquids were too hot or too cold.
- Dense bread: This can be caused by not enough kneading (poor gluten development), too much flour (dry dough), or not allowing sufficient rise time for both the first and second proofs.
- Crust too hard: Ensure you’re not overbaking. Brushing with butter immediately after baking helps soften the crust significantly.
Variations:
- Honey Amish White Bread: For a deeper flavor and subtle sweetness, replace up to half of the granulated sugar with honey. This will also give the bread a slightly richer color.
- Whole Wheat Blend: While this is a classic white bread, you can experiment by substituting 1 to 2 cups of the all-purpose flour with whole wheat flour. You might need to add a little extra liquid as whole wheat absorbs more moisture. The texture will be slightly denser, but still delicious.
- Soft Dinner Rolls or Buns: Instead of shaping into loaves, divide the dough into 12-16 equal pieces after the first rise. Shape each into a round ball and place them in a greased 9×13-inch baking dish. Allow to proof, then bake at 375°F (190°C) for 18-25 minutes, or until golden brown.
- Herb or Garlic Bread: Mix in 1-2 tablespoons of dried herbs (like Italian seasoning or dried rosemary) or 1-2 teaspoons of garlic powder with the dry ingredients for a savory twist.
Storage and Reheating
Proper storage is key to keeping your homemade Amish White Bread fresh and delicious for as long as possible. Because it doesn’t contain preservatives, it will naturally have a shorter shelf life than store-bought bread, but its fresh taste is well worth it.
Storage:
- Room Temperature (1-3 days): Once completely cooled, store the bread in an airtight container, a large zip-top bag, or wrapped tightly in plastic wrap. If you prefer a softer crust, this method is ideal. For a slightly crisper crust, you can store it in a paper bag, but it will go stale faster. Avoid refrigerating homemade bread, as it tends to dry out and become stale more quickly in the fridge.
- Freezing (up to 3 months): If you won’t be eating the entire loaf within a few days, freezing is an excellent option. Once the bread is completely cool, you can freeze it whole, half, or sliced. For best results, wrap the loaf tightly in plastic wrap, then place it in a freezer-safe bag or aluminum foil. Sliced bread can be frozen in a single layer on a baking sheet, then transferred to a freezer bag, allowing you to pull out individual slices as needed.
Reheating:
- From Room Temperature: Slices can be toasted in a toaster or toaster oven. A whole or partial loaf can be warmed in a preheated oven at 300°F (150°C) for 10-15 minutes, or until warm through.
- From Frozen:
- Slices: Pop frozen slices directly into the toaster.
- Whole/Partial Loaf: For a whole or partial loaf, you can thaw it at room temperature for a few hours, then warm in the oven as above. Alternatively, you can wrap the frozen loaf loosely in foil and bake in a preheated oven at 325°F (160°C) for 20-30 minutes, or until defrosted and warm.
Frequently Asked Questions
What kind of flour is best for Amish White Bread?
For the classic soft and tender crumb of Amish White Bread, all-purpose flour is typically the best choice. Its moderate protein content allows for good gluten development, creating a bread that is both structured and incredibly soft. While bread flour can be used, it might result in a slightly chewier loaf, and whole wheat flour will produce a denser texture. Stick to all-purpose for that authentic Amish feel.
Can I make this recipe without a stand mixer?
Absolutely! This recipe can be made entirely by hand. The kneading process will take a bit longer, usually around 8-10 minutes of active kneading on a lightly floured surface, but it’s a wonderfully tactile experience. Just ensure you knead until the dough is smooth, elastic, and passes the windowpane test (where you can stretch a small piece thin enough to see light through it without tearing).
Why is my bread dense and not fluffy?
Several factors can lead to dense bread. The most common culprits are inactive yeast (check the expiration date and ensure your liquids are the correct temperature), not enough kneading (which means insufficient gluten development), or adding too much flour during the mixing and kneading stages, which results in a dry, heavy dough. Also, not allowing the dough to rise fully during both the first and second proofing stages can lead to a denser crumb.
How do I know when the bread is fully baked?
The best way to tell if your Amish White Bread is fully baked is by its internal temperature. A thermometer inserted into the center of the loaf should read between 200-210°F (93-99°C). Visually, the crust should be a beautiful golden brown, and when you tap the bottom of the loaf, it should sound hollow. If it’s not quite golden enough but the temperature is right, you can leave it in for a few more minutes, keeping a close eye on it.