
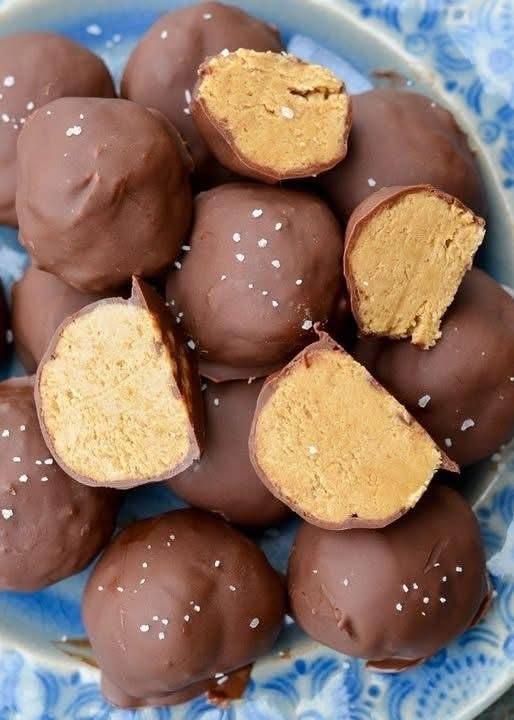
Sweet Peanut Butter Balls
There are some treats that instantly transport you back to childhood, conjuring up memories of holiday platters, bake sales, and simple, unadulterated joy. Sweet Peanut Butter Balls are undoubtedly one of those timeless confections. These delightful bites, often referred to as buckeyes or peanut butter bonbons, perfectly encapsulate the magic of a no-bake dessert: minimal effort, maximum deliciousness. They’re a staple for a reason, beloved by generations for their rich, creamy peanut butter center enveloped in a crisp, decadent chocolate shell. The addition of a sprinkle of flaky sea salt elevates them from merely delicious to utterly irresistible, creating a harmonious balance of sweet and salty that will have everyone reaching for just one more.
What makes these Sweet Peanut Butter Balls so special? It’s their perfect combination of textures and flavors. The interior is a smooth, dense, and intensely peanut buttery dream, a delightful contrast to the snappy, slightly bitter (or sweet, depending on your chocolate choice) exterior. They require absolutely no baking, making them an ideal project for home cooks of all skill levels, from seasoned bakers to complete novices. They’re incredibly versatile, perfect for adorning holiday dessert tables, bringing to potlucks, packaging as thoughtful homemade gifts, or simply indulging a sudden sweet craving on a quiet afternoon. Their crowd-pleasing nature and straightforward preparation make them a go-to recipe whenever you need a guaranteed hit.
This recipe for Sweet Peanut Butter Balls celebrates the classic appeal of this beloved treat while offering a few simple enhancements to ensure the best possible results. We’ll guide you through creating that perfectly smooth peanut butter filling, achieving an even, glossy chocolate coating, and adding that crucial finishing touch of sea salt that truly makes them sing. Get ready to embark on a sweet journey that promises to deliver pure, unadulterated indulgence with every bite. Whether you’re making them for a special occasion or just because, these peanut butter balls are guaranteed to become a cherished part of your recipe repertoire.
Nutritional Information
Per serving (approximate values, based on 30 balls per recipe):
- Calories: 180
- Protein: 4g
- Carbohydrates: 18g
- Fat: 12g
- Fiber: 1g
- Sodium: 80mg
Ingredients
- 1 ½ cups creamy peanut butter (all-natural or conventional, your preference)
- ½ cup unsalted butter, softened to room temperature
- 3 cups powdered sugar (confectioners’ sugar), sifted
- 1 teaspoon vanilla extract (optional, but highly recommended)
- ¼ teaspoon salt (optional, if using unsalted peanut butter)
- 12 ounces semi-sweet chocolate chips, melting wafers, or good quality baking chocolate
- 1 tablespoon coconut oil or vegetable shortening (optional, for smoother chocolate)
- Flaky sea salt, for sprinkling
Instructions
- Prepare the Peanut Butter Filling: In a large mixing bowl, combine the softened butter, creamy peanut butter, sifted powdered sugar, vanilla extract (if using), and salt (if using).
- Using an electric mixer on medium speed, or a sturdy spatula, mix until all ingredients are well combined and a thick, dough-like consistency is achieved. The mixture should be firm enough to roll.
- Form the Balls: Using a small cookie scoop (about 1-inch in diameter) or a tablespoon, scoop out portions of the peanut butter mixture. Roll each portion between your palms to form smooth, uniform balls. Place the formed balls onto a parchment paper-lined baking sheet.
- Chill the Balls: Once all the peanut butter balls are formed, place the baking sheet in the refrigerator for at least 30-60 minutes, or in the freezer for 15-20 minutes. This step is crucial to ensure the balls are firm and hold their shape when dipped into the warm chocolate.
- Melt the Chocolate Coating: In a microwave-safe bowl, combine the chocolate chips (or chopped baking chocolate) and coconut oil/shortening (if using). Microwave on 50% power in 30-second intervals, stirring well after each interval, until the chocolate is completely melted and smooth. Alternatively, melt the chocolate using a double boiler over simmering water, stirring constantly until smooth. Be careful not to let any water or steam get into the chocolate, as this can cause it to seize.
- Dip and Decorate: Remove the chilled peanut butter balls from the refrigerator or freezer. Using a toothpick, a dipping fork, or two regular forks, carefully dip each peanut butter ball into the melted chocolate, ensuring it’s fully coated.
- Lift the ball out of the chocolate, allowing any excess chocolate to drip back into the bowl. Gently tap the fork against the side of the bowl to remove more excess.
- Carefully transfer the chocolate-coated ball back to the parchment paper-lined baking sheet. Immediately sprinkle the top with flaky sea salt before the chocolate sets. Repeat with the remaining peanut butter balls.
- Chill to Set: Once all the balls are dipped and sprinkled, return the baking sheet to the refrigerator for another 20-30 minutes, or until the chocolate coating is completely firm and set.
- Serve and Enjoy: Once set, transfer the Sweet Peanut Butter Balls to an airtight container. They are now ready to be enjoyed!
Cooking Tips and Variations
For the best results, always start with room temperature butter. This ensures it creams smoothly with the peanut butter and powdered sugar, preventing lumps and creating a consistently smooth filling. When mixing the peanut butter filling, avoid overmixing once the powdered sugar is incorporated; mix just until combined to prevent the mixture from becoming too dry. If your peanut butter mixture feels too sticky to roll, add a little more powdered sugar, a tablespoon at a time, until it reaches a manageable consistency. If it’s too dry and crumbly, add a tiny bit more softened butter or a splash of milk. Chilling the peanut butter balls before dipping is non-negotiable. This step firms them up, making them easier to handle and preventing them from falling apart in the warm chocolate. Work in batches if your kitchen is warm, keeping the undipped balls in the refrigerator while you dip others. When melting chocolate, low and slow is the key. Overheating chocolate can cause it to seize, becoming thick and clumpy. The coconut oil or shortening helps create a thinner, smoother coating that’s easier to work with and gives the chocolate a lovely sheen. For a professional finish, you can use a dedicated chocolate dipping tool or simply two forks. Gently tapping the fork on the edge of the bowl helps remove excess chocolate, preventing puddles around the base of your finished balls.
There are endless ways to customize your Sweet Peanut Butter Balls. For a different flavor profile, try using almond butter, cashew butter, or even a blend of nut butters. Just be aware that natural nut butters can sometimes be oilier, so you might need to adjust the amount of powdered sugar slightly. Experiment with different types of chocolate for the coating: milk chocolate for a sweeter, creamier finish; dark chocolate for a more intense, sophisticated flavor; or even white chocolate for a fun, contrasting look. You can also mix in flavor boosters directly into the peanut butter filling. A teaspoon of espresso powder can enhance the chocolate flavor, or a pinch of cinnamon or nutmeg can add a warm, cozy note. For texture, consider adding mini chocolate chips, finely crushed pretzels, or even finely chopped nuts to the peanut butter mixture before rolling. Beyond flaky sea salt, other toppings can include sprinkles for a festive touch, finely chopped toasted nuts, or a drizzle of contrasting melted chocolate. For a vegan-friendly version, simply use a plant-based butter substitute and ensure your chocolate is dairy-free. With these tips and variations, your Sweet Peanut Butter Balls will be a hit every time, perfectly tailored to your taste and occasion.
Storage and Reheating
Sweet Peanut Butter Balls are best stored in an airtight container in the refrigerator. This helps maintain their firm texture and keeps the chocolate coating from melting or becoming sticky. Stored properly, they will remain fresh and delicious for up to 2-3 weeks. You can also freeze them for longer storage. Place the set peanut butter balls in a single layer on a parchment-lined baking sheet and freeze until solid. Once frozen, transfer them to a freezer-safe airtight container or bag, separating layers with parchment paper to prevent sticking. They can be kept in the freezer for up to 2-3 months. To enjoy frozen peanut butter balls, simply transfer them from the freezer to the refrigerator for a few hours, or let them sit at room temperature for 15-30 minutes until thawed to your desired consistency. Reheating is not necessary or recommended for these no-bake treats; they are best enjoyed chilled or at room temperature.
Frequently Asked Questions
Why did my chocolate seize when melting?
Chocolate seizing (becoming thick, grainy, and unworkable) is usually caused by even a tiny amount of water or steam coming into contact with the chocolate while it’s melting. Ensure your bowl and utensils are completely dry, and when using a double boiler, make sure the water is simmering gently and not boiling vigorously, which can create steam. Overheating chocolate can also cause it to seize; always melt slowly on low heat.
Can I use natural peanut butter?
Yes, you can use natural peanut butter, but be aware that its consistency can vary. If using natural peanut butter, especially the “stir” kind, make sure it’s well-stirred and not too oily. You might need to adjust the amount of powdered sugar slightly to achieve the desired firm, rollable dough consistency. If it’s too wet, add more powdered sugar; if too dry, a tiny bit more softened butter.
How can I make these vegan?
To make these Sweet Peanut Butter Balls vegan, simply substitute the unsalted butter with a high-quality plant-based butter alternative that’s suitable for baking. For the chocolate coating, ensure you choose a dairy-free or vegan chocolate. Many brands offer dark chocolate or specific vegan chocolate chips that work wonderfully.