
Introduction
Life is busy, and sometimes, the sweet tooth strikes when time is scarce. That’s where this incredible 5-minute dessert comes to the rescue! Imagine a dessert so effortlessly creamy, so satisfyingly crunchy, and so unbelievably quick to assemble that it feels like magic. This isn’t just a recipe; it’s a revelation for anyone who loves a delicious treat but doesn’t have hours to spend in the kitchen. Whether you’re a busy parent, a student craving something sweet, or simply someone who appreciates instant gratification, this dessert is about to become your new best friend. It’s the perfect antidote to those sudden cravings, a delightful pick-me-up that requires minimal effort but delivers maximum pleasure.
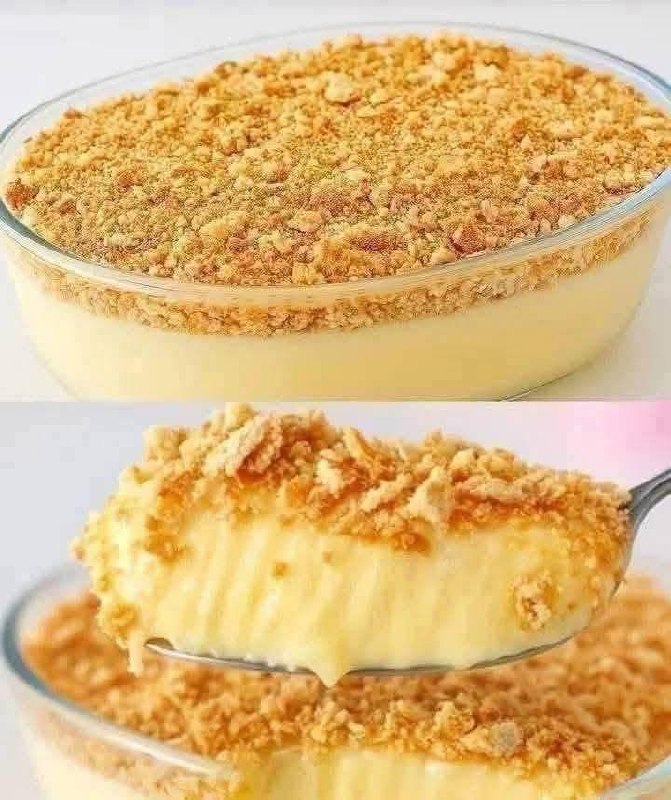
What makes this dessert truly special is its irresistible combination of textures and flavors. You get a luscious, velvety smooth base that melts in your mouth, perfectly contrasted by a golden, crumbly topping that provides that satisfying crunch with every bite. The simplicity of its preparation belies the depth of its deliciousness. It’s a testament to the fact that sometimes, the most extraordinary treats come from the most straightforward ingredients and methods. Plus, it’s wonderfully versatile, allowing you to easily customize it to your personal preferences and whatever you have on hand in your pantry. You’ll find yourself coming back to this recipe again and again, not just for its speed, but for its sheer, unadulterated deliciousness.
The secret to its lightning-fast preparation lies in its no-bake nature and the use of readily available ingredients. There’s no oven preheating, no complicated techniques, and no fancy equipment required. Just a few simple steps, a bit of mixing, and a quick assembly, and you’re on your way to dessert heaven. It’s the kind of dessert that looks impressive enough for guests, yet is easy enough to whip up for a solo indulgence after a long day. Get ready to discover your new go-to sweet treat, a homemade dessert that genuinely never gets old.
Nutritional Information
Per serving (approximate values):
- Calories: 380-450
- Protein: 7-10g
- Carbohydrates: 45-55g
- Fat: 18-25g
- Fiber: 2-4g
- Sodium: 200-300mg
Ingredients
- 1 ½ cups whole milk (or preferred milk alternative)
- ¼ cup granulated sugar
- 3 tablespoons cornstarch
- 1 teaspoon vanilla extract
- Pinch of salt
- 12-14 digestive biscuits or graham crackers (approximately 150g), finely crushed
- 3 tablespoons unsalted butter, melted
Instructions
- In a medium saucepan, whisk together the cold milk, granulated sugar, cornstarch, and pinch of salt until the cornstarch is fully dissolved and there are no lumps.
- Place the saucepan over medium heat, stirring constantly with a whisk. Continue to cook, stirring, until the mixture thickens significantly and comes to a gentle boil. This should take about 3-5 minutes. The mixture should be thick enough to coat the back of a spoon.
- Remove the saucepan from the heat and stir in the vanilla extract. Pour the creamy mixture into a bowl or individual serving dishes.
- Cover the surface of the creamy mixture directly with plastic wrap to prevent a skin from forming. This is crucial for a smooth texture.
- Refrigerate for at least 1-2 hours, or until thoroughly chilled and set. While the assembly is quick, the chilling time is essential for the base to firm up and reach its optimal creamy consistency.
- While the creamy base chills, prepare the crunchy topping. In a separate bowl, combine the finely crushed digestive biscuits or graham crackers with the melted butter. Mix well until the crumbs are evenly coated and resemble wet sand.
- Once the creamy base is perfectly chilled and set, remove the plastic wrap. Spoon or sprinkle the buttery crumb topping generously over the top of the creamy base just before serving to ensure maximum crunch.
- Serve immediately and enjoy your delicious 5-minute dessert!
Cooking Tips and Variations
For the ultimate creamy texture, ensure you whisk the milk and cornstarch thoroughly before heating to prevent lumps. As the mixture heats, continuous stirring is key to a smooth, lump-free pudding. Don’t rush the thickening process; let it come to a gentle boil for a minute or two to ensure the cornstarch is fully activated. The chilling time, while not part of the “5 minutes” assembly, is absolutely crucial for the base to set and achieve that perfect spoonable consistency. For an even richer base, you can substitute ½ cup of the milk with heavy cream.
To achieve the best crunchy topping, make sure your biscuits or crackers are finely crushed. A food processor works wonders for this, but a Ziploc bag and a rolling pin will also do the trick. If you prefer a less buttery topping, you can reduce the melted butter to 2 tablespoons, or even omit it entirely for a drier, crumbly texture. Remember to add the topping just before serving to maintain its crispness; if added too early, it can become soggy in the refrigerator.
The beauty of this dessert lies in its adaptability. For a chocolate lover’s dream, whisk in 2 tablespoons of unsweetened cocoa powder along with the cornstarch for a chocolate creamy base, or fold in 1/4 cup of melted dark chocolate at the end. For a fruity twist, consider adding a layer of fresh berries (strawberries, raspberries, or blueberries) between the creamy base and the crumb topping, or swirl in a tablespoon of fruit jam into the creamy mixture. A squeeze of lemon zest or orange zest added to the creamy base can also brighten the flavor profile wonderfully.
Beyond digestive biscuits, explore other crunchy topping possibilities. Crushed shortbread cookies offer a buttery richness, while gingersnaps provide a spicy kick. You could also use crushed Oreos (with or without the cream filling), Biscoff cookies, or even a blend of chopped nuts like pecans or walnuts for an added layer of flavor and texture. For a healthier option, consider a granola topping. A sprinkle of cinnamon or nutmeg in the crumb mixture can also add a warm, inviting aroma and taste.
Presentation matters, even for a quick dessert! Serve this in elegant clear glass bowls or individual ramekins to showcase the beautiful layers. For a communal dessert, a larger trifle dish works wonderfully. You can garnish with a fresh mint leaf, a dusting of cocoa powder, or a few whole berries for an extra touch of sophistication. This dessert is also fantastic for meal prepping; prepare the creamy base and store it in individual jars, then add the crumb topping right before you’re ready to eat.
Storage and Reheating
This dessert is best enjoyed freshly assembled, especially to maintain the crunch of the topping. However, the creamy base can be stored separately without the topping. Once the creamy base has chilled and set, cover it tightly with plastic wrap, ensuring the wrap touches the surface of the pudding to prevent a skin from forming. Store it in the refrigerator for up to 3-4 days. The crushed biscuit topping, if prepared with butter, can be stored in an airtight container at room temperature for up to 5-7 days. If you’ve used a dry crumb topping without butter, it will also keep well in an airtight container at room temperature.
When you’re ready to enjoy, simply retrieve the chilled creamy base from the refrigerator and spoon or sprinkle the fresh crumb topping over it. This dessert is not suitable for reheating, as the creamy base is designed to be served chilled, and reheating would alter its delicate texture and consistency significantly. If you have any leftovers of the fully assembled dessert, they can be stored in the refrigerator for up to 2 days, though the topping may lose some of its crispness over time. For the best experience, assemble individual portions as needed.
Frequently Asked Questions
Can I make this dessert dairy-free or gluten-free?
Absolutely! To make this dessert dairy-free, simply substitute the whole milk with your favorite unsweetened plant-based milk, such as almond milk, soy milk, or oat milk. Ensure your chosen milk alternative thickens well with cornstarch. For the topping, use a dairy-free butter alternative for melting. To make it gluten-free, opt for certified gluten-free digestive biscuits or graham crackers for the crumb topping. The rest of the ingredients are typically naturally gluten-free.
What can I do if my creamy base doesn’t thicken?
If your creamy base isn’t thickening, it’s usually due to insufficient cooking time or too low heat. Return the saucepan to medium heat and continue whisking constantly. Ensure the mixture comes to a gentle boil and continues to simmer for at least 1-2 minutes while stirring. The cornstarch needs heat to activate its thickening properties. If after a few more minutes it still hasn’t thickened, you can whisk in another half tablespoon of cornstarch (mixed with a tablespoon of cold milk to prevent lumps) and continue cooking.
Can I prepare the creamy base ahead of time?
Yes, the creamy base is perfect for making ahead! You can prepare it up to 2-3 days in advance. Once cooked, pour it into your serving dishes or a single container, cover the surface directly with plastic wrap, and refrigerate until thoroughly chilled and set. This allows you to simply prepare the crumb topping and assemble the dessert in minutes right before serving, making it an ideal choice for entertaining or busy schedules.
How can I make this dessert less sweet?
If you prefer a less sweet dessert, you can easily reduce the amount of granulated sugar in the creamy base. Start by reducing it by 1-2 tablespoons and taste test. The sweetness of the crumb topping can also be adjusted by using unsweetened biscuits or reducing the amount of butter, which sometimes carries residual sweetness. You can also balance the sweetness with a pinch more salt in the creamy base, which enhances other flavors without adding more sugar, or by adding a bright element like lemon zest.