
Introduction
Get ready to experience apple pie like never before! This isn’t just any apple pie; it’s a “Tasty Apple Pie” that will tantalize your taste buds with its unique creamy filling and beautifully arranged apples. Forget dry, crumbly fillings – our version boasts a luscious, custard-like interior that perfectly complements the tender, slightly tart apples and flaky pastry crust. It’s a delightful twist on a classic, offering a sophisticated yet comforting dessert that’s surprisingly straightforward to make.
What makes this particular apple pie so special is its elegant presentation and its incredible flavor profile. The thinly sliced apples are meticulously arranged, creating a stunning visual appeal that will impress any guest. But beyond its beauty, the magic truly lies in the harmonious blend of sweet, creamy custard and the natural sweetness of the apples, all nestled within a perfectly baked golden crust. This recipe is designed to be approachable for home bakers of all skill levels, ensuring a show-stopping dessert without the fuss.
Whether you’re looking for the perfect autumn treat, a comforting dessert for a family gathering, or simply a delicious way to enjoy fresh apples, this Tasty Apple Pie is your answer. Its rich texture, balanced sweetness, and inviting aroma make it an instant favorite. Prepare to be enchanted by each spoonful of this extraordinary apple pie, a true testament to simple ingredients creating something truly spectacular.
Nutritional Information
Per serving (approximate values):
- Calories: 350
- Protein: 5g
- Carbohydrates: 45g
- Fat: 18g
- Fiber: 3g
- Sodium: 200mg
Ingredients
- 1 refrigerated pie crust (9-inch), or homemade pastry for a single crust pie
- 4 medium apples (about 1.5 lbs), such as Honeycrisp, Granny Smith, or Braeburn, peeled, cored, and thinly sliced
- 1/2 cup granulated sugar, plus 2 tablespoons for sprinkling
- 1/4 cup all-purpose flour
- 1/2 teaspoon ground cinnamon
- 1/4 teaspoon ground nutmeg
- 1/4 teaspoon salt
- 2 large eggs
- 1 cup heavy cream
- 1 teaspoon vanilla extract
- 2 tablespoons unsalted butter, melted
- 1 tablespoon lemon juice (optional, to prevent apple browning)
- Powdered sugar, for dusting
Instructions
- Preheat your oven to 375°F (190°C). If using a refrigerated pie crust, let it sit at room temperature for 10-15 minutes. Unroll the pie crust and carefully fit it into a 9-inch pie dish with a fluted edge. Crimp the edges decoratively. If making homemade crust, prepare and roll out your dough, then fit it into the pie dish.
- In a large bowl, toss the thinly sliced apples with 2 tablespoons of granulated sugar and the lemon juice (if using). The lemon juice helps prevent the apples from browning and adds a touch of brightness. Ensure the slices are evenly coated.
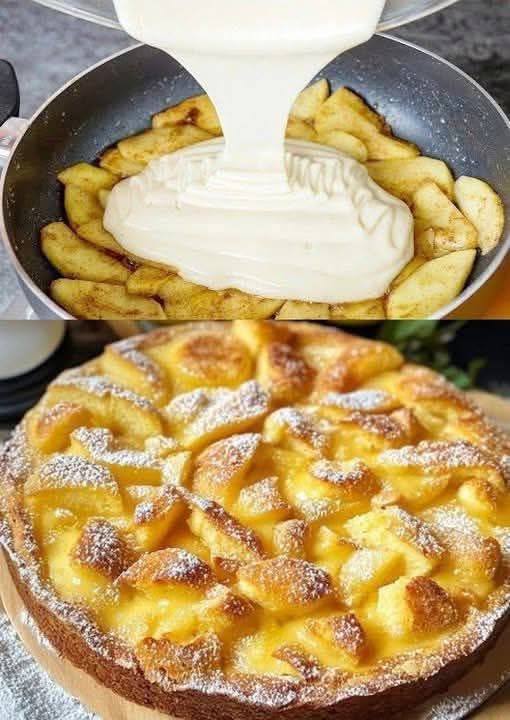
- Arrange the apple slices decoratively in the pie crust. You can start from the outer edge, overlapping the slices slightly and working your way towards the center, creating a beautiful spiral pattern. Try to keep the apple slices relatively flat to ensure even cooking and a neat appearance.
- In a medium bowl, whisk together the remaining 1/2 cup granulated sugar, all-purpose flour, ground cinnamon, ground nutmeg, and salt. This dry mixture will prevent lumps when adding the wet ingredients.
- In another bowl, whisk the eggs, heavy cream, and vanilla extract until well combined and smooth. This forms the creamy custard base for your pie.
- Gradually whisk the dry sugar-flour mixture into the wet egg-cream mixture until a smooth batter forms. Make sure there are no lumps of flour remaining.
- Carefully pour the creamy custard mixture over the arranged apples in the pie crust. Make sure the custard seeps between all the apple slices, filling the gaps.
- Drizzle the melted butter evenly over the top of the pie. This will contribute to a golden crust and a rich flavor.
- Place the pie on a baking sheet to catch any potential drips and transfer it to the preheated oven. Bake for 50-60 minutes, or until the crust is golden brown, the filling is set (a knife inserted into the center comes out clean), and the apples are tender. If the crust edges start to brown too quickly, you can cover them loosely with aluminum foil.
- Once baked, remove the pie from the oven and let it cool on a wire rack for at least 2-3 hours before slicing and serving. This cooling time is crucial for the custard to fully set, ensuring clean, beautiful slices.
- Just before serving, dust generously with powdered sugar for a final elegant touch.
Cooking Tips and Variations
For the best results with this Tasty Apple Pie, selecting the right apples is key. A mix of apple varieties, such as Honeycrisp for sweetness and Granny Smith for tartness, creates a more complex and balanced flavor profile. Ensure your apples are thinly and uniformly sliced; this allows them to cook evenly and contributes to the pie’s elegant presentation. To prevent the apple slices from oxidizing and turning brown while you’re arranging them, toss them with a tablespoon of lemon juice immediately after slicing. When arranging the apples, take your time to create a visually appealing pattern, as this is a hallmark of this particular pie. Don’t overcrowd the crust, but ensure a good layer of apples for texture and flavor.
The custard filling is the heart of this pie, so ensuring its smoothness is paramount. Whisk the dry ingredients thoroughly before incorporating them into the wet ingredients to prevent lumps. Pour the custard slowly and evenly over the apples, making sure it seeps into all the crevices. During baking, keep an eye on the crust edges; if they brown too quickly, a pie shield or a makeshift foil ring will protect them. The pie is done when the custard is set and no longer jiggly in the center, and a thin knife inserted comes out clean. Cooling is perhaps the most critical step for this pie; resist the urge to cut into it too soon. Allowing it to cool completely, ideally for at least 2-3 hours, ensures the custard fully sets, resulting in clean, perfect slices.
For variations, you can experiment with different spices. A pinch of ground cardamom or allspice can add an interesting warmth to the filling. To enhance the crust, consider brushing it with an egg wash before baking for extra shine, or sprinkling it with coarse sugar for a delightful crunch. If you’re feeling adventurous, a thin layer of almond cream or frangipane spread on the bottom of the crust before adding the apples can introduce a sophisticated nutty flavor. For a richer, more decadent pie, you could lightly sauté the apple slices in a tablespoon of butter with a sprinkle of brown sugar for a few minutes before arranging them in the crust; this will deepen their flavor and slightly soften them. Always remember to adjust baking times slightly if making significant alterations to account for changes in moisture or density. This recipe is wonderfully adaptable, allowing you to personalize it to your taste.
Storage and Reheating
To store your leftover Tasty Apple Pie, allow it to cool completely to room temperature. Once cool, cover the pie loosely with plastic wrap or aluminum foil. It can be stored at room temperature for up to 1 day. For longer storage, transfer the covered pie to the refrigerator, where it will keep well for up to 3-4 days. It’s generally not recommended to freeze this type of custard-based pie, as the texture of the filling can become grainy or separate upon thawing.
When you’re ready to enjoy a slice of chilled pie, you can serve it cold directly from the refrigerator, which is delightful on a warm day. If you prefer your apple pie warm, individual slices can be reheated in a microwave for 30-60 seconds, or until just warm through. Be careful not to overheat, as this can make the custard rubbery. For a crisper crust, you can reheat slices in a toaster oven or conventional oven at 300°F (150°C) for about 10-15 minutes, or until warmed through. Covering the edges with foil can prevent them from over-browning during oven reheating. Avoid reheating the entire pie multiple times, as this can dry it out.
Frequently Asked Questions
Can I use a store-bought pie crust for this recipe?
Absolutely! Using a store-bought refrigerated pie crust is a fantastic time-saver and works perfectly for this recipe. Just make sure it’s a 9-inch crust and follow the package instructions for handling and baking. It will still yield a delicious and beautiful pie.
What type of apples are best for this pie?
For the best flavor and texture, a combination of sweet and tart apples is ideal. Good choices include Honeycrisp, Granny Smith, Braeburn, Fuji, or Golden Delicious. Using a mix ensures a more complex taste profile and prevents the pie from becoming overly sweet or too tart.
How can I prevent the pie crust from getting soggy?
To help prevent a soggy bottom crust, you can lightly brush the bottom of the unbaked pie crust with a thin layer of egg white before adding the filling. Alternatively, a sprinkle of fine breadcrumbs or crushed cornflakes on the bottom of the crust can act as a barrier. Also, ensure your oven is preheated to the correct temperature so the crust begins to cook immediately upon entering the oven.
Can I make this pie ahead of time for an event?
Yes, this pie is an excellent make-ahead dessert. You can bake it a day in advance and store it at room temperature, or up to 3-4 days in the refrigerator. The flavors often meld and deepen overnight, making it even more delicious. Just dust with powdered sugar right before serving for the freshest look.