
Introduction
Prepare to revolutionize your snack game with these incredible Crispy Pork Belly Bites! Imagine succulent, melt-in-your-mouth pork belly, encased in a shatteringly crisp skin, all brought to life with just three simple ingredients. This isn’t just a recipe; it’s a culinary revelation, proving that gourmet flavor doesn’t have to come with a complicated ingredient list or an endless cooking process. Perfect for appetizers, a rich side dish, or even the star of a casual meal, these bites are guaranteed to disappear faster than you can say “more, please!”
Crispy pork belly has long been a beloved indulgence in cuisines worldwide, celebrated for its irresistible combination of textures and rich, savory flavor. But often, home cooks shy away from making it, fearing a complex process. Our 3-Ingredient Perfection recipe strips away all the intimidation, focusing on fundamental techniques that guarantee a show-stopping result every single time. We’re talking about achieving that coveted crackling skin and tender, juicy meat with minimal effort, making it accessible even for novice cooks.
The magic truly lies in the simplicity. By choosing quality pork belly and a complementary glaze, we unlock an explosion of flavor that belies the short ingredient list. These bites are not just easy; they’re incredibly versatile, pairing beautifully with a myriad of dipping sauces or enjoyed simply on their own. Get ready to impress your family and friends with a dish that tastes like it came from a five-star restaurant, but was effortlessly created in your own kitchen.
Nutritional Information
Per serving (approximate values, based on 4 servings of 1.5 lbs pork belly):
- Calories: 750 kcal
- Protein: 45g
- Carbohydrates: 15g
- Fat: 60g
- Fiber: 0g
- Sodium: 850mg
Ingredients
- 1.5 lbs (approximately 680g) skin-on pork belly, preferably a thick cut
- 2 tablespoons coarse sea salt (or kosher salt)
- 1/2 cup your favorite sweet and savory glaze (e.g., hoisin sauce, teriyaki glaze, or a mix of soy sauce and honey)
Instructions
- Prepare the Pork Belly: Begin by thoroughly patting the skin-on pork belly dry with paper towels. This step is crucial for achieving crispy skin. Using a sharp knife or a scoring tool, score the skin in a crosshatch pattern, making sure not to cut too deeply into the meat. The cuts should be about ½ inch apart. If the skin is very thick, you can prick it all over with a sharp fork or a meat tenderizer tool.
- Season the Skin: Rub the coarse sea salt generously all over the scored skin, ensuring it gets into all the crevices. Do not season the meat side at this stage. Place the seasoned pork belly, skin-side up, on a wire rack set over a baking sheet. This allows air to circulate around the skin.
- Refrigerate for Drying: Place the baking sheet with the pork belly in the refrigerator, uncovered, for at least 8 hours, or preferably overnight (up to 24 hours). This prolonged drying time is the secret to getting that ultra-crispy crackling. The skin needs to be as dry as possible.
- Preheat Oven: When ready to cook, preheat your oven to 300°F (150°C).
- First Bake (Low and Slow): Remove the dried pork belly from the refrigerator. Do not wipe off the salt. Place the baking sheet with the pork belly (still on the wire rack) into the preheated oven. Bake for 1 hour and 30 minutes to 2 hours. This low and slow cooking renders much of the fat and begins the crisping process without burning the skin.
- Increase Heat for Crisping: After the initial low-temperature bake, increase the oven temperature to 400°F (200°C). Continue to bake for another 30-45 minutes, or until the skin has puffed up and is beautifully golden brown and crackling. Keep a close eye on it during this stage to prevent burning. If certain spots are browning too quickly, you can loosely cover them with a small piece of aluminum foil.
- Apply the Glaze: Once the skin is gloriously crispy, remove the pork belly from the oven. Carefully brush your chosen sweet and savory glaze generously over the meat sides and edges of the pork belly. You can also brush a thin layer over the crispy skin if desired, but be mindful that too much moisture on the skin can soften it.
- Final Bake (Glazing): Return the glazed pork belly to the oven for another 10-15 minutes, or until the glaze is caramelized and slightly sticky. Watch it closely to ensure the glaze doesn’t burn.
- Rest and Cut: Remove the pork belly from the oven and let it rest on a cutting board for 10-15 minutes. This allows the juices to redistribute, ensuring tender and moist meat.
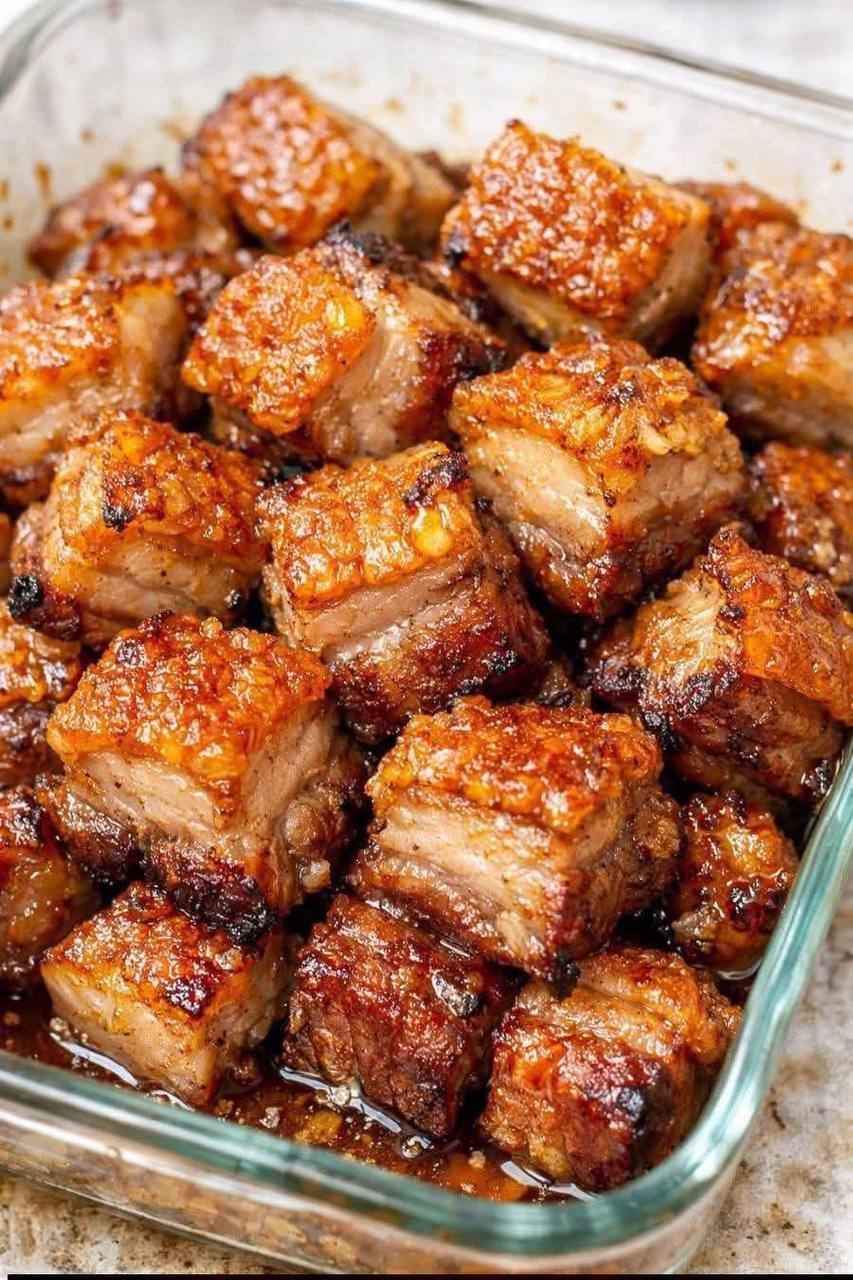
- Slice into Bites: Once rested, carefully cut the pork belly into bite-sized cubes or strips. The crispy skin might require a bit of force to cut through, so use a sturdy, sharp knife.
- Serve Immediately: Serve your Crispy Pork Belly Bites hot and enjoy the incredible contrast of textures and flavors!
Cooking Tips and Variations
Achieving truly crispy pork belly is an art, but with these tips, you’ll master it in no time. First and foremost, the drying process in the refrigerator is non-negotiable. The drier the skin, the crispier your crackling will be. Don’t skip this step, and if you can leave it for the full 24 hours, even better. When scoring the skin, aim for even, shallow cuts; going too deep can cause the meat to dry out. If you don’t have a scoring tool, a very sharp chef’s knife or even a utility knife can work, but be careful.
For an extra boost of crispiness, some chefs recommend pouring a kettle of boiling water over the skin of the pork belly before patting it dry and salting. This helps to open up the pores of the skin. If you try this, make sure to pat it exceptionally dry afterward. During the high-heat crisping stage, if you find the skin isn’t crackling evenly, you can finish it under the broiler for a few minutes. Keep a very close eye on it, as the broiler can burn quickly. Rotate the baking sheet for even browning.
Regarding variations, the glaze is where you can truly make this recipe your own. Instead of a pre-made glaze, you can whisk together your own. A classic blend of soy sauce, honey, rice vinegar, and a touch of ginger and garlic powder makes a fantastic homemade option. For a spicier kick, add a dash of sriracha or chili flakes to your glaze. If you prefer a more savory profile, a simple blend of fish sauce, lime juice, and brown sugar can be delightful. You can also experiment with different herbs and spices in your dry rub for the initial seasoning – think five-spice powder, paprika, or even a touch of brown sugar mixed with the salt for a sweet-savory crust.
Another popular variation is to add a bed of aromatics (like sliced onions, garlic, and ginger) under the pork belly during the initial slow cook. This infuses the meat with extra flavor as it cooks. You can also experiment with different types of salt; smoked salt can add a wonderful depth to the skin. If you’re short on time, an air fryer can also produce incredibly crispy pork belly. Preheat your air fryer to 350°F (175°C). Cut the pork belly into desired bite-sized pieces *before* cooking. Cook for 20-30 minutes, flipping halfway, until crispy and cooked through. You’ll still want to dry the skin and rub with salt beforehand for best results, but the drying time can be reduced. Glaze in the last 5-10 minutes of air frying.
For those who prefer a less sweet profile, skip the glaze altogether and simply season the meat side with salt and pepper after cooking, or serve with a savory dipping sauce on the side. A simple garlic aioli, a spicy mayonnaise, or a tangy vinegar-based sauce would all complement the richness of the pork belly beautifully. Don’t be afraid to experiment with different flavor combinations to find your perfect Crispy Pork Belly Bites!
Storage and Reheating
Storing leftover Crispy Pork Belly Bites properly is key to maintaining their deliciousness, though it’s important to note that the skin will inevitably lose some of its crispness once refrigerated. To store, allow the pork belly bites to cool completely to room temperature. Transfer them to an airtight container and store in the refrigerator for up to 3-4 days. It’s best to store them in a single layer if possible, or with parchment paper between layers, to prevent them from sticking together.
Reheating pork belly bites to regain some of their crispiness requires a bit of care. Avoid the microwave at all costs, as it will make the skin rubbery and the meat tough. The best method for reheating is in an oven or an air fryer. Preheat your oven to 375°F (190°C). Place the pork belly bites on a wire rack set over a baking sheet (this helps air circulate and crisp the bottom). Heat for 10-15 minutes, or until heated through and the skin has re-crisped to your liking. Keep a close eye on them to prevent burning. If using an air fryer, preheat to 350°F (175°C) and cook for 5-8 minutes, checking frequently, until hot and crispy.
If you’re planning to make a larger batch, you can also freeze cooked pork belly. After cooking and cooling, cut the pork belly into individual bites. Arrange them in a single layer on a baking sheet and freeze until solid. Once frozen, transfer the bites to a freezer-safe bag or container, removing as much air as possible. They can be stored in the freezer for up to 2-3 months. To reheat from frozen, you can follow the oven or air fryer instructions, adding about 5-10 minutes to the cooking time, or until heated through and crispy. Be aware that previously frozen pork belly might not achieve the exact same level of crispiness as freshly cooked, but it will still be delicious.
Frequently Asked Questions
What kind of pork belly should I buy for this recipe?
For the best results, look for skin-on pork belly. A thicker cut, around 1.5 to 2 inches thick, is ideal as it provides a good meat-to-fat ratio and allows for plenty of rendering without drying out the meat. You can often find this at butcher shops or specialty grocery stores. If your grocery store only has thinner cuts, that will also work, but keep an eye on cooking times as they may be slightly shorter.
Can I make this recipe without the glaze?
Absolutely! The glaze adds a wonderful sweet and savory caramelized flavor, but the crispy pork belly itself is incredibly delicious on its own. If you prefer a more purely savory or unadorned flavor, simply omit the glazing step. You can then serve the crispy pork belly bites with a dipping sauce on the side, such as a spicy mayo, a tangy soy-ginger sauce, or even just a squeeze of lime juice for brightness.
My pork belly skin isn’t getting crispy, what went wrong?
The most common reason for non-crispy skin is insufficient drying. Ensure you pat the skin thoroughly dry and refrigerate it uncovered for at least 8 hours, ideally overnight. Moisture is the enemy of crispiness! Other factors could be not enough salt (which helps draw out moisture), not scoring the skin deeply enough, or not cooking at a high enough temperature at the end. Make sure your oven is accurately preheated, and don’t be afraid to use the broiler for a few minutes at the very end to achieve that perfect crackle, but watch it carefully to prevent burning.
Can I prepare the pork belly ahead of time?
Yes, you can definitely do some prep work in advance. The initial drying and salting step in the refrigerator can be done up to 24 hours ahead of time. This is actually beneficial for achieving the crispiest skin. You can also score the pork belly and apply the salt, then wrap it tightly and refrigerate for a day or two before beginning the drying process. However, for the best results, the cooking itself should be done just before serving to ensure maximum crispiness and tenderness.