
Introduction
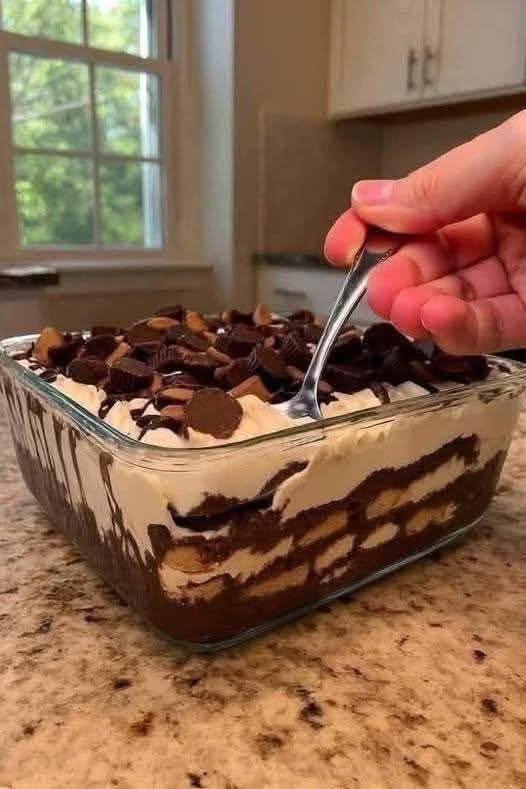
Today, we’re diving into a dessert that’s as beautiful to look at as it is delicious to eat: the ultimate chocolate layered dessert! Imagine spoonfuls of creamy chocolate, fluffy whipped goodness, and tender cookie crumbles, all stacked high in a decadent tower of pure bliss. This isn’t just any dessert; it’s a showstopper that promises to impress with its elegant presentation and rich, comforting flavors. Perfect for gatherings, celebrations, or simply treating yourself, this no-bake wonder is about to become your new go-to.
What makes this chocolate layered dessert truly special is its incredible ease of preparation combined with its irresistible taste. Forget complicated baking steps or hours spent in the kitchen; this recipe champions simplicity without sacrificing an ounce of flavor or visual appeal. Each layer brings its own unique texture and taste, creating a harmonious symphony of chocolatey goodness that melts in your mouth. From the satisfying crunch of the cookie base to the smooth indulgence of the chocolate pudding and the airy lightness of the whipped topping, every bite is a delightful journey.
Whether you’re a seasoned dessert enthusiast or a beginner looking for a foolproof recipe to wow your friends and family, this chocolate layered dessert is designed for success. It’s incredibly versatile, allowing for easy substitutions and creative additions to match your personal preferences. The best part? It’s a no-bake marvel, meaning more time enjoying and less time stressing. Get ready to assemble a dessert that looks like it came straight from a gourmet bakery, but tastes like pure homemade love.
Nutritional Information
Per serving (approximate values):
- Calories: 420
- Protein: 7g
- Carbohydrates: 55g
- Fat: 20g
- Fiber: 3g
- Sodium: 280mg
Ingredients
- 1 ½ cups chocolate wafer cookies (or graham crackers), finely crushed
- ½ cup unsalted butter, melted
- 2 (3.9 ounce) packages instant chocolate pudding mix
- 4 cups cold milk (dairy or non-dairy, such as almond milk)
- 1 (8 ounce) package cream cheese, softened
- 1 cup powdered sugar
- 1 (12 ounce) container frozen whipped topping (like Cool Whip), thawed, divided
- ½ cup mini chocolate chips (optional, for garnish or an extra layer)
- 2 tablespoons cocoa powder (for dusting, optional)
- Chocolate syrup, for drizzling (optional)
- Chopped chocolate candy (e.g., chocolate squares, peanut butter cups), for garnish (optional)
Instructions
- Prepare the Cookie Crust: In a medium bowl, combine the finely crushed chocolate wafer cookies (or graham crackers) with the melted butter. Mix until well combined and the crumbs are moistened. Press this mixture evenly into the bottom of a 9×13 inch baking dish. For a cleaner edge, you can use the bottom of a glass or a measuring cup to firm up the crust. Place the dish in the refrigerator to chill while you prepare the next layers, for at least 15 minutes.
- Make the Cream Cheese Layer: In a large mixing bowl, using an electric mixer, beat the softened cream cheese until smooth and creamy, about 2-3 minutes. Gradually add the powdered sugar, beating until fully incorporated and the mixture is light and fluffy. Gently fold in about half (approximately 6 ounces) of the thawed whipped topping until no streaks remain. This creates a light, airy, and slightly tangy layer that perfectly balances the rich chocolate.
- Spread the Cream Cheese Layer: Carefully spread the cream cheese mixture evenly over the chilled cookie crust in the baking dish. Return the dish to the refrigerator to chill for another 15-20 minutes, allowing this layer to firm up a bit before adding the pudding. This step helps prevent the layers from mixing together.
- Prepare the Chocolate Pudding: In a separate large bowl, whisk together the two packages of instant chocolate pudding mix with the cold milk. Whisk continuously for about 2-3 minutes, or until the pudding starts to thicken. Make sure there are no lumps. Allow the pudding to sit for 5 minutes to set completely.
- Add the Pudding Layer: Once the pudding has set, carefully spoon and spread it evenly over the cream cheese layer in the baking dish. Be gentle to avoid disturbing the cream cheese layer underneath. Return the dish to the refrigerator for at least 30 minutes to allow the pudding to firm up further. This is crucial for clean layers.
- Top with Whipped Topping: Once the pudding layer is firm, gently spread the remaining half of the thawed whipped topping over the chocolate pudding layer. Ensure an even coating across the entire surface of the dessert.
- Garnish and Chill: If desired, sprinkle with mini chocolate chips, a dusting of cocoa powder, a drizzle of chocolate syrup, or chopped chocolate candy for an extra touch of decadence and visual appeal. Cover the dish loosely with plastic wrap.
- Final Chill: Refrigerate the chocolate layered dessert for at least 4 hours, or preferably overnight. This extended chilling time is essential for all the layers to set properly, allowing the flavors to meld beautifully and ensuring easy, clean slices.
- Serve: Once thoroughly chilled, slice the dessert into squares and serve cold. Enjoy your magnificent creation!
Cooking Tips and Variations
For an even richer cookie crust, consider using chocolate sandwich cookies (like Oreos) and crushing them, including the cream filling. If using graham crackers, a touch of cinnamon can add a warm, subtle flavor. To make the crust softer and more cake-like, you can lightly brush the pressed cookie crumbs with a tablespoon or two of milk before chilling. This helps them absorb moisture and creates a more cohesive, tender base.
Don’t be afraid to experiment with different pudding flavors! Vanilla, white chocolate, or even a coffee-flavored pudding can offer a delightful twist. For a truly gourmet experience, you can make homemade chocolate mousse instead of instant pudding. Simply fold in whipped cream into cooled melted chocolate and egg yolks, then egg whites, for a light and airy chocolate layer. You can also elevate the cream cheese layer by adding a teaspoon of vanilla extract or a hint of almond extract for extra depth of flavor.
To add more texture and flavor dimensions, consider incorporating a layer of finely chopped nuts (like pecans or walnuts) above the cream cheese layer. A thin layer of caramel sauce or peanut butter can also be drizzled between the pudding and whipped topping for a decadent surprise. For a fruity contrast, fresh raspberries or sliced strawberries can be scattered over the whipped topping just before serving, adding a burst of color and tartness.
When folding the whipped topping into the cream cheese mixture, be gentle to maintain its airy texture. Overmixing can deflate the whipped topping, resulting in a denser layer. For a more stable whipped topping that won’t weep, you can stabilize homemade whipped cream by adding a teaspoon of unflavored gelatin dissolved in a tablespoon of hot water before whipping. This is especially helpful if you plan to make the dessert a day or two in advance.
For a beautiful presentation, wipe the knife clean with a warm, damp cloth between each slice. This will ensure clean, sharp edges for every piece. If you’re serving this for a party, individual parfaits can be made by layering the ingredients in clear glasses or jars. This not only looks elegant but also makes serving a breeze.
Don’t limit yourself to just chocolate chips for garnish! Shaved chocolate curls, a light dusting of powdered sugar, or even edible glitter can elevate the dessert’s appearance. A few fresh mint leaves can also provide a pop of color and a refreshing aroma. Remember, the key is to have fun and customize this recipe to your heart’s content!
Storage and Reheating
This chocolate layered dessert is best enjoyed chilled. Store any leftovers in the baking dish, tightly covered with plastic wrap, in the refrigerator. Proper sealing is important to prevent the dessert from absorbing odors from other foods in the fridge and to keep the layers fresh and moist. When stored correctly, this dessert will remain delicious for up to 3-4 days.
Due to its no-bake nature and the components (like whipped topping and pudding), this dessert is not suitable for freezing, as freezing and thawing can significantly alter its texture, making it watery and less appealing. It’s also not meant to be “reheated” in the traditional sense; it should always be served cold directly from the refrigerator.
If you’re preparing this dessert in advance for an event, it’s perfectly fine to assemble it a day or even two days beforehand. The extended chilling time actually allows the flavors to meld beautifully and the layers to set even more firmly, resulting in an even better taste and texture upon serving. Just ensure it remains well-covered in the refrigerator until ready to slice and serve.
Frequently Asked Questions
Can I use homemade whipped cream instead of store-bought whipped topping?
Absolutely! Homemade whipped cream can be used for a fresher, richer flavor. To make it, whip 2 cups of heavy cream with 1/2 cup powdered sugar and 1 teaspoon vanilla extract until stiff peaks form. If you’re concerned about stability, especially if making ahead, you can add a stabilizer like a small amount of unflavored gelatin dissolved in hot water before whipping.
What if my cookie crust is too crumbly or too hard?
If your cookie crust is too crumbly, you might need a little more melted butter to bind it. Add it a tablespoon at a time and mix until the crumbs hold together when pressed. If it’s too hard, you might have packed it too tightly. For a softer crust, as mentioned in tips, you can lightly brush it with a tablespoon or two of milk before chilling to help it absorb moisture and become more tender.
Can I use sugar-free pudding or sugar substitutes?
Yes, you can certainly use sugar-free instant chocolate pudding mix and sugar substitutes (like erythritol or stevia-based sweeteners) in the cream cheese layer to reduce the sugar content. Just follow the package directions for the sugar-free pudding. Be aware that the texture might be slightly different, but the overall flavor profile will still be delicious.
How far in advance can I make this dessert?
This dessert is a fantastic make-ahead option! You can comfortably assemble it 1-2 days in advance. In fact, an overnight chill often improves the dessert, allowing the flavors to fully develop and the layers to set perfectly, making for cleaner slices and a more cohesive texture. Just ensure it’s tightly covered with plastic wrap to maintain freshness and prevent it from drying out or absorbing other food odors in the refrigerator.