
Introduction
There are some desserts that transcend trends, remaining eternally beloved for their classic charm and irresistible flavor. The Chocolate Vanilla Marble Cake is undoubtedly one of them. This stunning cake, with its mesmerizing swirls of rich chocolate and delicate vanilla batter, isn’t just a treat for the taste buds; it’s a feast for the eyes. Each slice reveals a unique, artistic pattern, making it a delightful surprise every time.
Perfect for any occasion, from a casual afternoon tea to a festive birthday celebration, this marble cake offers the best of both worlds. You don’t have to choose between chocolate and vanilla when you can have both, beautifully intertwined in a moist, tender crumb. Its comforting familiarity and elegant appearance make it a go-to recipe for bakers of all skill levels, promising a delicious outcome that everyone will adore.
The magic of a marble cake lies in its simplicity and its ability to create something truly special from two distinct flavors. It’s a testament to how a little creativity in the kitchen can elevate a simple cake into a masterpiece that brings smiles and satisfaction with every single bite.
Nutritional Information
Per serving (approximate values):
- Calories: 380
- Protein: 5g
- Carbohydrates: 50g
- Fat: 18g
- Fiber: 2g
- Sodium: 280mg
Ingredients
- 2 ½ cups (300g) all-purpose flour, spooned and leveled
- 1 tablespoon baking powder
- ½ teaspoon salt
- 1 cup (226g) unsalted butter, softened
- 1 ¾ cups (350g) granulated sugar
- 4 large eggs, at room temperature
- 1 teaspoon vanilla extract
- 1 cup (240ml) whole milk, at room temperature
- ½ cup (60g) unsweetened cocoa powder, high-quality
- ¼ cup (60ml) warm water
Instructions
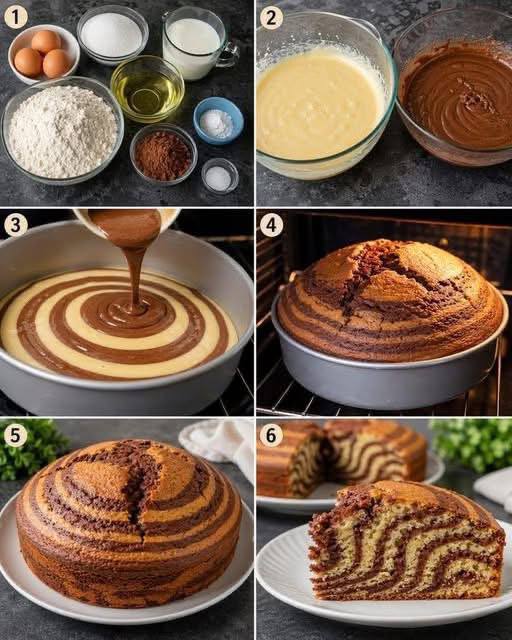
- Preheat your oven to 350°F (175°C). Grease and flour a 9×13 inch baking pan, or two 9-inch round cake pans. You can also line the bottom with parchment paper for easier removal.
- In a medium bowl, whisk together the all-purpose flour, baking powder, and salt. Set aside.
- In a large bowl, using an electric mixer, cream together the softened unsalted butter and granulated sugar on medium-high speed until the mixture is light, fluffy, and pale in color, about 3-5 minutes.
- Add the eggs one at a time, beating well after each addition. Make sure each egg is fully incorporated before adding the next. Scrape down the sides of the bowl as needed.
- Stir in the vanilla extract into the butter and sugar mixture.
- With the mixer on low speed, gradually add the dry ingredients to the wet ingredients in three additions, alternating with the whole milk. Begin and end with the flour mixture. Mix until just combined, being careful not to overmix the batter. Overmixing can lead to a tough cake.
- Divide the batter evenly into two separate bowls.
- In one bowl, stir in ¼ cup of the warm water. This will be your vanilla batter.
- In the second bowl, add the ½ cup of unsweetened cocoa powder. Gradually add the remaining ¼ cup of warm water, mixing until the cocoa powder is fully incorporated and the chocolate batter is smooth. If the chocolate batter seems too thick, you can add another tablespoon of warm water until it matches the consistency of the vanilla batter.
- Spoon alternating dollops of vanilla and chocolate batter into the prepared baking pan. Start with a dollop of vanilla, then chocolate, and continue alternating until all the batter is used.
- Once all the batter is in the pan, take a butter knife or a skewer and gently swirl it through the batters to create the marble pattern. Do not overmix or over-swirl, as this will blend the colors too much and you’ll lose the distinct marble effect. A few gentle passes are sufficient.
- Place the cake pan into the preheated oven.
- Bake for 30-35 minutes for two 9-inch round cakes, or 40-50 minutes for a 9×13 inch pan, or until a wooden skewer or toothpick inserted into the center comes out clean.
- Once baked, remove the cake from the oven and let it cool in the pan on a wire rack for 10-15 minutes.
- After cooling slightly in the pan, carefully invert the cake onto the wire rack to cool completely before frosting or serving.
Cooking Tips and Variations
For the perfect Chocolate Vanilla Marble Cake every time, attention to a few key details can make all the difference. Firstly, ensure all your cold ingredients, especially the butter and eggs, are at room temperature. This allows them to emulsify properly, creating a smooth, homogenous batter that traps air efficiently, resulting in a lighter, fluffier cake. Cold ingredients can lead to a lumpy batter and a denser cake. When creaming butter and sugar, take your time; this step is crucial for incorporating air, which gives the cake its delicate texture. Beat until the mixture is truly light and fluffy, almost pale in color, not just combined.
When incorporating dry ingredients and milk, alternate additions and mix on low speed until just combined. Overmixing develops the gluten in the flour, leading to a tough and chewy cake rather than a tender one. Stop mixing as soon as no streaks of flour are visible. For the marbling effect, resist the urge to over-swirl. The goal is distinct swirls of chocolate and vanilla, not a muddy blend. A few gentle passes with a knife or skewer through the dolloped batter are enough to create that beautiful, defined pattern. A clean toothpick inserted into the center coming out with just a few moist crumbs, not wet batter, indicates perfect doneness. Overbaking is the quickest way to a dry cake.
To prevent your cake from sticking, always grease and flour your pan thoroughly. For extra insurance, you can line the bottom of the pan with parchment paper. This makes for easy release and a perfectly intact cake. If you find your cake bakes unevenly, consider using cake strips, which are wet fabric strips wrapped around the pan. These insulate the sides of the pan, causing the cake to bake more evenly and preventing doming in the center. Allow the cake to cool in the pan on a wire rack for 10-15 minutes after baking before attempting to invert it. This short cooling period allows the cake to firm up slightly, making it less prone to breaking when removed from the pan.
For variations, consider adding a teaspoon of espresso powder to the chocolate batter to deepen its flavor, making it even richer and more complex without making it taste like coffee. You could also fold in mini chocolate chips into either or both batters for an added texture and chocolate boost. For a citrus twist, add lemon or orange zest to the vanilla batter. To make it a festive holiday cake, incorporate a hint of almond extract into the vanilla batter and perhaps a touch of peppermint extract into the chocolate batter for a mint chocolate marble cake. For a richer, more decadent experience, substitute half of the milk with sour cream or plain yogurt; the acidity tenderizes the cake and adds moisture. You can also experiment with different types of cocoa powder, such as Dutch-processed for a darker color and milder chocolate flavor, or natural cocoa powder for a more intense chocolate punch. For an extra special touch, drizzle a simple chocolate ganache or a vanilla glaze over the cooled cake.
Storage and Reheating
Proper storage is essential to keep your Chocolate Vanilla Marble Cake fresh and delicious for as long as possible. Once the cake has completely cooled to room temperature, it should be stored in an airtight container. This prevents it from drying out and absorbing odors from other foods. If the cake is frosted, especially with a cream cheese or whipped cream frosting, it will need to be refrigerated. However, if it’s unfrosted or frosted with a buttercream that doesn’t contain perishable ingredients, it can be stored at room temperature for up to 3-4 days.
When storing at room temperature, make sure the cake is covered well. A cake dome or a large container works perfectly. For refrigeration, place the cake in an airtight container or wrap it tightly with plastic wrap. Refrigerated cake will stay fresh for up to a week. Before serving refrigerated cake, it’s best to allow it to come to room temperature for about 30 minutes to an hour. This enhances its flavor and texture, as cold cake can sometimes taste a bit dry and have a muted flavor.
For longer storage, marble cake freezes beautifully. Wrap individual slices or the entire unfrosted cake tightly in plastic wrap, then an additional layer of aluminum foil. This double layer protects against freezer burn. Frozen cake can be stored for up to 2-3 months. To thaw, simply transfer the cake from the freezer to the refrigerator overnight, or let it sit at room temperature for a few hours. If you’ve frozen individual slices, they will thaw more quickly. Avoid microwaving the cake to thaw or reheat, as this can alter its texture, making it rubbery or dry.
Frequently Asked Questions
Why did my marble pattern disappear or become muddy?
The most common reason for a lost or muddy marble pattern is over-swirling the batter. When you mix too much after spooning the two batters into the pan, the distinct colors blend together rather than creating beautiful swirls. Aim for just a few gentle passes with a knife or skewer; you want to create patterns, not fully mix the batters.
Can I make this cake in advance?
Absolutely! This Chocolate Vanilla Marble Cake is an excellent make-ahead dessert. You can bake the cake up to 2-3 days in advance and store it unfrosted at room temperature in an airtight container. If you plan to freeze it, bake it, let it cool completely, then wrap it tightly and freeze for up to 2-3 months. Thaw it overnight in the refrigerator before frosting and serving.
What kind of cocoa powder should I use?
You can use either natural unsweetened cocoa powder or Dutch-processed cocoa powder for this recipe, but they will yield slightly different results. Natural cocoa powder is more acidic and will react with the baking soda to create a lighter texture and a sharper chocolate flavor. Dutch-processed cocoa powder is less acidic, resulting in a darker color and a smoother, milder chocolate taste. Both work well, so choose based on your preference for chocolate flavor intensity and color. High-quality cocoa powder will always enhance the cake’s flavor.