
Introduction
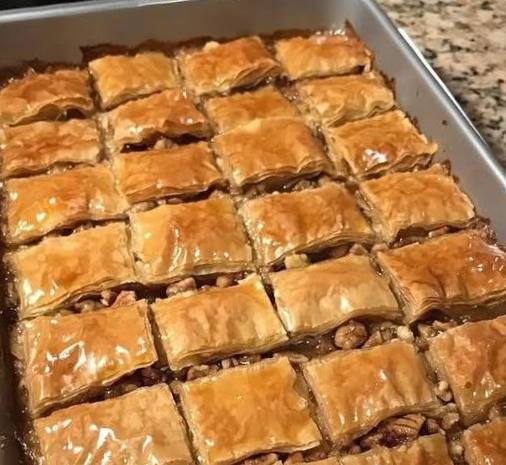
There are few desserts that capture the heart quite like baklava. Imagine a symphony of textures and flavors: layer upon layer of delicate, papery-thin phyllo dough, brushed generously with golden butter, cradling a rich, fragrant mixture of finely chopped nuts. Baked to a glorious golden brown perfection, it emerges from the oven crisp and inviting, only to be lovingly drenched in a sweet, aromatic syrup that seeps into every crevice, transforming it into a moist, sweet, and utterly irresistible treat. This isn’t just a dessert; it’s an experience, a celebration of culinary heritage that has graced tables across the Mediterranean and Middle East for centuries, evolving with regional nuances but always retaining its core magic.
Homemade baklava, in particular, possesses an unparalleled allure. While store-bought versions can be pleasant, nothing compares to the freshness, the customizable sweetness, and the sheer pride of crafting this masterpiece in your own kitchen. The aroma alone as it bakes will fill your home with warmth and anticipation, hinting at the crispy, flaky layers and the rich, nutty filling that awaits. This isn’t a quick dessert, but every moment invested in its creation is rewarded tenfold with a pastry that’s far superior in taste and texture. Get ready to embark on a culinary journey that promises to delight your senses and impress anyone lucky enough to share a piece of your homemade baklava.
Nutritional Information
Per serving (approximate values, assuming 36 servings from a 9×13 pan):
- Calories: 350-400
- Protein: 5-7g
- Carbohydrates: 40-50g
- Fat: 20-30g
- Fiber: 2-4g
- Sodium: 100-150mg
Ingredients
For the Baklava:
- 1 pound (450g) phyllo dough, thawed according to package instructions (approx. 20-25 sheets)
- 1 ½ cups (340g) unsalted butter, melted and clarified (or use ghee)
- 4 cups (about 1 pound or 450g) walnuts, finely chopped (or a mix of walnuts and pistachios)
- 1 tablespoon ground cinnamon
- ¼ teaspoon ground cloves (optional, but recommended for authentic flavor)
- Pinch of salt
For the Sugar Syrup:
- 2 cups (400g) granulated sugar
- 1 ½ cups (360ml) water
- 2 tablespoons fresh lemon juice (prevents crystallization and adds brightness)
- 1 cinnamon stick (optional)
- 2-3 whole cloves (optional)
- 1 teaspoon orange blossom water or rose water (optional, for aromatic finish)
Instructions
- Prepare the Syrup (Important First Step): In a medium saucepan, combine the sugar, water, lemon juice, cinnamon stick, and whole cloves (if using). Bring to a boil over medium-high heat, stirring until the sugar dissolves. Once boiling, reduce the heat to low and simmer gently for 10-15 minutes without stirring. The syrup should thicken slightly but remain pourable. Remove from heat, stir in the orange blossom or rose water (if using), and set aside to cool completely. The syrup MUST be cool when pouring over hot baklava.
- Prepare the Nut Filling: In a medium bowl, combine the finely chopped walnuts, ground cinnamon, ground cloves (if using), and a pinch of salt. Mix well to ensure the spices are evenly distributed throughout the nuts.
- Clarify the Butter (or use Ghee): If using unsalted butter, melt it slowly in a saucepan over low heat. As it melts, milk solids will separate and settle at the bottom, and foam will rise to the top. Skim off the foam. Carefully pour the clear, golden butterfat (ghee) into a separate bowl, leaving the milk solids behind. This clarified butter is essential for making crispy, non-soggy baklava. You should have about 1 ¼ to 1 ½ cups of clarified butter. Keep it warm but not hot, as you will be brushing with it.
- Preheat Oven and Prepare Pan: Preheat your oven to 325°F (160°C). Lightly brush the bottom and sides of a 9×13 inch (23×33 cm) baking pan with some of the clarified butter.
- Prepare the Phyllo Dough: Carefully unroll the thawed phyllo dough. Place it on a clean, dry surface. Keep the phyllo sheets you’re not currently working with covered with a lightly damp kitchen towel to prevent them from drying out and becoming brittle.
- Layer the Bottom Phyllo Sheets: Lay one sheet of phyllo dough into the prepared baking pan. Gently brush the entire surface with clarified butter. Repeat this process with 7-8 more sheets of phyllo, brushing each layer generously with butter. Don’t worry if the phyllo tears a little; subsequent layers will cover it. This creates your sturdy base.
- Add Half the Nut Filling: Evenly sprinkle half of the nut mixture over the buttered phyllo layers.
- Layer the Middle Phyllo Sheets: Place another 5-6 sheets of phyllo dough over the nut layer, brushing each sheet generously with clarified butter as you go.
- Add the Remaining Nut Filling: Evenly sprinkle the remaining half of the nut mixture over these buttered phyllo layers.
- Layer the Top Phyllo Sheets: Place the remaining 8-10 sheets of phyllo dough on top of the nut mixture, brushing each layer with clarified butter. Ensure the very top layer is thoroughly coated with butter. Trim any excess phyllo that hangs over the edges of the pan so that it’s flush with the sides.
- Score the Baklava (Crucial Step): Using a sharp knife, carefully cut the baklava into diamond or square shapes. Do not cut all the way through to the bottom of the pan yet, just score the top layers. For diamonds, make diagonal cuts across the pan, then make another set of diagonal cuts in the opposite direction. For squares, make straight cuts down the length, then straight cuts across the width. This helps with even baking and syrup absorption.
- Final Butter Application: Pour any remaining clarified butter evenly over the scored baklava. This helps create a beautiful golden crust and ensures maximum flakiness.
- Bake the Baklava: Place the baking pan in the preheated oven. Bake for 50-70 minutes, or until the baklava is deeply golden brown and sounds hollow when tapped lightly. The exact baking time can vary depending on your oven, so keep an eye on it. If the top starts to brown too quickly, you can loosely tent it with foil.
- Drench with Syrup: Immediately upon removing the hot baklava from the oven, slowly and evenly pour the completely cooled syrup over the entire surface. You will hear a satisfying sizzling sound. Ensure the syrup is distributed over all the cuts.
- Rest and Absorb: Let the baklava cool completely at room temperature, undisturbed, for at least 4-6 hours, or ideally overnight. This resting period is crucial for the baklava to fully absorb the syrup and for the layers to become perfectly moist and flavorful, while maintaining a slight crispness.
- Final Cut and Serve: Once completely cooled and the syrup has been absorbed, use a sharp knife to cut all the way through the scored lines to separate the individual pieces. Serve at room temperature.
Cooking Tips and Variations
Achieving baklava perfection is all about technique and good ingredients. Here are some tips to ensure your homemade baklava is absolutely divine:
- Phyllo Dough Handling is Key: Phyllo dough dries out incredibly fast. Always keep the unused sheets covered with a lightly damp (not wet!) kitchen towel while you’re working. If it dries, it will crack and shatter. Take one sheet out at a time.
- Clarified Butter (Ghee) is Your Best Friend: While melted butter works, clarified butter (ghee) is superior. It removes the milk solids, which can burn and make the baklava soggy. Ghee provides a cleaner, richer flavor and promotes incredible crispness and a beautiful golden color. You can buy ghee or easily make your own by melting unsalted butter and skimming off the foam and pouring off the clear butterfat.
- Don’t Be Shy with Butter: Each layer needs a good brush of butter. This is what creates those distinct, flaky layers. Don’t skimp!
- Finely Chop Your Nuts: For the best texture, the nuts should be finely chopped, almost like coarse sand, but not powdery. Too chunky and the layers won’t hold together as well; too fine and you lose some of that satisfying crunch. You can pulse them in a food processor, but be careful not to turn them into nut butter.
- Toasting Nuts for Deeper Flavor: For an even richer, nuttier flavor, lightly toast your chopped walnuts or pistachios in a dry pan over medium heat for a few minutes before mixing with cinnamon. Let them cool completely before using.
- The Syrup Temperature Rule: This is non-negotiable for perfectly crispy baklava. You must pour COLD syrup over HOT baklava, or HOT syrup over COLD baklava. For this recipe, we cool the syrup completely and pour it over the baklava immediately after it comes out of the oven. This temperature difference causes a thermal shock that helps the phyllo retain its crispness while absorbing the sweet liquid.
- Patience with Resting Time: Do not rush the resting period. Baklava needs several hours, or even overnight, to fully absorb the syrup and for the flavors to meld beautifully. Cutting into it too soon will result in a less flavorful and potentially less crisp pastry.
- Spice it Up: Don’t underestimate the power of spices. Cinnamon and cloves are traditional, but you can also experiment with a pinch of nutmeg, cardamom, or even a tiny bit of allspice in your nut mixture or syrup for a unique twist.
- Nut Variations: While walnuts are classic, feel free to use pistachios for a vibrant green color and distinct flavor, or a mix of walnuts, almonds, and pistachios. Each nut offers a slightly different texture and taste profile.
- Aromatic Syrups: Beyond orange blossom or rose water, consider adding a strip of orange or lemon peel to your syrup as it simmers for an extra layer of citrusy brightness.
- Individual Portions: For a more elegant presentation, you can bake baklava in smaller tart pans or even muffin tins for individual servings, adjusting baking time accordingly.
Storage and Reheating
Proper storage is crucial to maintain the crispness and deliciousness of your homemade baklava.
Storing at Room Temperature:
- Once fully cooled and the syrup has absorbed, baklava can be stored at room temperature in an airtight container for up to 5-7 days.
- Ensure the container is truly airtight to prevent the phyllo from becoming stale or absorbing moisture from the air, which can make it soft.
- Avoid refrigeration if possible, as the cold can cause the phyllo to become chewy and the syrup to crystallize slightly. However, if you live in a very hot and humid climate, or if you plan to store it for longer, refrigeration might be necessary.
Storing in the Refrigerator:
- If you must refrigerate (e.g., for longer storage up to 2-3 weeks, or due to warm climate), place the baklava in an airtight container.
- Be aware that refrigeration can slightly alter the texture, making the phyllo a bit chewier and the syrup thicker.
Freezing Baklava:
- Baklava freezes surprisingly well!
- Arrange individual pieces in a single layer on a baking sheet and freeze until solid.
- Once frozen, transfer the pieces to a freezer-safe airtight container or heavy-duty freezer bag, separating layers with parchment paper to prevent sticking.
- It can be frozen for up to 2-3 months.
- To thaw, simply remove from the freezer and let it come to room temperature on the counter for a few hours.
Reheating Baklava (Optional):
- Baklava is traditionally served at room temperature, and it’s often at its best this way.
- If you prefer it slightly warm, or if you’re trying to revive some crispness, you can gently warm it.
- Place individual pieces on a baking sheet and heat in a preheated oven at 250°F (120°C) for about 5-10 minutes, just until warmed through. Be careful not to overheat, as this can dry it out.
- Avoid microwaving baklava, as it will make the phyllo soggy and chewy.
Frequently Asked Questions
Why did my baklava turn out soggy instead of crispy?
Soggy baklava is a common issue, and it’s usually due to one of two main reasons: not enough butter between the phyllo layers, or incorrect syrup temperature. Each phyllo layer needs to be generously brushed with clarified butter (ghee) to create those distinct, crispy layers. If you skimp on butter, the layers will stick together and become dense. The other critical factor is the syrup temperature: ensure your syrup is completely cold when you pour it over the hot baklava (or vice versa). This temperature shock helps the phyllo retain its crispness while absorbing the sweetness. Lastly, ensure you bake your baklava long enough, until it’s a deep golden brown, indicating proper cooking and crisping of the phyllo.
Can I make baklava ahead of time?
Absolutely! Baklava is one of those rare desserts that actually tastes better the next day, after it has had ample time to rest and fully absorb the syrup. You can prepare it up to 5-7 days in advance if stored properly at room temperature in an airtight container. For longer storage, it freezes exceptionally well for up to 2-3 months. Just thaw it at room temperature before serving. Making it ahead of time makes it a perfect dessert for entertaining, as it frees you up on the day of your event.
What kind of nuts are best for baklava?
While this recipe uses walnuts, which are a classic choice and widely available, the “best” nuts often depend on regional preference. In many Middle Eastern countries, pistachios are incredibly popular, providing a vibrant green color and a distinct, rich flavor. Almonds are also used, sometimes in combination with walnuts or pistachios. You can use a single type of nut or create a blend. The most important thing is that the nuts are fresh and finely chopped, not ground into a powder, to provide texture and flavor without being too chunky.
My phyllo dough keeps tearing. What am I doing wrong?
Phyllo dough is notoriously delicate, but tearing is usually a sign that it’s too dry. The key is to keep the unused sheets covered with a lightly damp (not wet!) kitchen towel at all times. Work quickly but gently. If you’re working with frozen phyllo, ensure it’s completely thawed in the refrigerator overnight, then brought to room temperature for about an hour before using. If it’s still tearing, try using slightly more butter on your brush, as the moisture from the butter can help, or simply accept minor tears – they will be hidden by subsequent layers anyway!