
Introduction
Scrambled eggs. Sounds simple, right? Yet, how many times have you ended up with rubbery, dry, or inconsistent curds instead of the creamy, fluffy, and perfectly cooked breakfast staple you crave? Fear not, fellow food lovers! The quest for the perfect scrambled egg ends here. This guide will transform your breakfast routine, guaranteeing a plate of golden, tender eggs that are anything but basic.
The secret to truly exceptional scrambled eggs isn’t a magical ingredient or a complex technique, but rather a few simple, often overlooked principles. We’re talking about temperature control, proper whisking, and knowing exactly when to pull them off the heat. Forget those frantic, high-heat scrambles that leave you with sad, overcooked bits. We’re embracing a gentle, patient approach that yields consistently delightful results, making every bite a testament to culinary perfection.
Whether you’re a breakfast aficionado, a brunch enthusiast, or just looking to elevate your everyday morning meal, this recipe is your new go-to. Prepare to impress yourself and anyone lucky enough to share your table with these unbelievably delicious, perfectly scrambled eggs. Let’s dive in and unlock the secrets to breakfast bliss!
Nutritional Information
Per serving (approximate values):
- Calories: 220
- Protein: 13g
- Carbohydrates: 1g
- Fat: 18g
- Fiber: 0g
- Sodium: 250mg
Ingredients
- 3 large fresh eggs
- 1 tablespoon whole milk or heavy cream (optional, for extra creaminess)
- 1/2 tablespoon unsalted butter
- Pinch of salt, to taste
- Pinch of freshly ground black pepper, to taste
Instructions
- Prepare Your Eggs: Crack the 3 large eggs into a medium-sized bowl. If using, add the 1 tablespoon of whole milk or heavy cream.
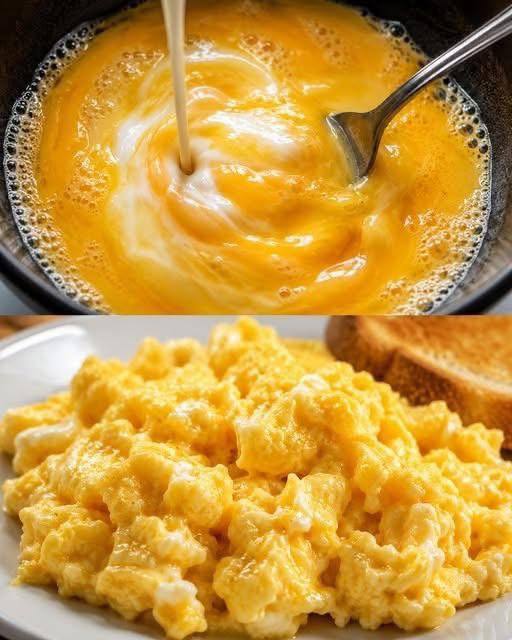
- Whisk Thoroughly: Using a fork or a small whisk, thoroughly beat the eggs until the yolks and whites are completely combined and the mixture is a uniform pale yellow. You want to incorporate a bit of air, so whisk vigorously for about 30-60 seconds.
- Season the Eggs: Add a pinch of salt and a pinch of freshly ground black pepper to the egg mixture. Whisk briefly again to distribute the seasoning.
- Heat the Pan: Place a non-stick skillet (preferably 8-inch) over medium-low heat. This is crucial for preventing overcooking.
- Melt the Butter: Add the 1/2 tablespoon of unsalted butter to the skillet. Allow it to melt completely and coat the bottom of the pan. The butter should be shimmering but not browning.
- Pour the Eggs: Once the butter is melted and the pan is warm, pour the egg mixture into the skillet. Do not stir immediately. Let the eggs sit undisturbed for about 30-60 seconds, allowing the edges to just begin to set.
- Begin Gentle Stirring: Using a heat-resistant rubber spatula, gently push the cooked egg from the edges of the pan towards the center, tilting the pan to allow the uncooked egg to flow underneath. Continue this gentle pushing and folding motion.
- Continue Cooking Low and Slow: Keep the heat on medium-low. The goal is to cook the eggs slowly and evenly. Resist the urge to crank up the heat, as this will lead to dry, tough eggs.
- Look for Soft Curds: As you continue to gently fold and push, the eggs will begin to form soft, creamy curds. They should still look moist and slightly wet.
- Remove from Heat While Still Moist: This is perhaps the most important step for perfect scrambled eggs. When the eggs are mostly set but still look glossy and have some visible moisture (they should not be completely dry), remove the pan from the heat immediately. Remember, carryover cooking will continue to cook the eggs even after they are off the burner.
- Serve Immediately: Transfer the perfectly scrambled eggs to a plate and serve immediately. They are best enjoyed hot and fresh.
Cooking Tips and Variations
Achieving truly perfect scrambled eggs is an art, but one that’s easily mastered with a few key techniques and considerations. Here are some essential tips to elevate your scramble, along with exciting variations to keep things fresh and flavorful.
Tips for Success:
- Low and Slow is the Way to Go: This cannot be stressed enough. High heat will cook the eggs too quickly, resulting in rubbery, dry curds. Medium-low heat allows for gentle cooking, creating those desirable soft, creamy textures. Patience is a virtue when it comes to scrambled eggs.
- Don’t Overcrowd the Pan: For best results, stick to cooking 2-4 eggs at a time in an 8-inch non-stick skillet. If you’re cooking for a crowd, cook in batches rather than trying to cram too many eggs into one pan. Overcrowding lowers the pan temperature and can lead to uneven cooking.
- Use a Non-Stick Pan: A good quality non-stick pan is your best friend here. It ensures the eggs don’t stick, making cleanup easy and allowing for those perfect, undisturbed curds to form.
- Season at the Right Time: While some chefs advocate for seasoning eggs after cooking, adding salt and pepper to the raw egg mixture before cooking helps to distribute the flavor evenly throughout. Salt also helps to break down the proteins slightly, contributing to a more tender texture.
- Don’t Stir Constantly: While gentle stirring is necessary, don’t stir the eggs constantly. Allow them to set for periods, then gently fold. This technique creates larger, softer curds rather than tiny, fragmented pieces.
- Remove from Heat Early: Always pull the eggs off the heat when they are still slightly moist and glossy. They will continue to cook from the residual heat of the pan (carryover cooking). If you wait until they look perfectly done in the pan, they will be overcooked by the time they reach your plate.
- The Dairy Debate: Adding a splash of whole milk, heavy cream, or even half-and-half is optional but highly recommended for an extra creamy and rich texture. The fat in the dairy helps to tenderize the cooked eggs.
- Fresh Eggs Make a Difference: Fresher eggs tend to have firmer whites and yolks, which contribute to a better overall texture and flavor.
Variations and Additions:
- Cheesy Scramble: Stir in 1-2 tablespoons of shredded cheese (cheddar, Gruyere, Monterey Jack, or goat cheese are excellent choices) during the last minute of cooking, just as the eggs are starting to set. The cheese will melt beautifully into the warm curds.
- Herby Freshness: Finely chop fresh herbs like chives, parsley, dill, or tarragon and stir them into the egg mixture before cooking, or sprinkle them over the finished eggs for a burst of fresh flavor and color.
- Veggie Boost: Sauté finely diced vegetables like bell peppers, onions, spinach, mushrooms, or cherry tomatoes in a separate pan until tender. Add them to the eggs during the last minute of cooking, folding them in gently. Make sure the veggies are cooked through and any excess moisture is evaporated to avoid watery eggs.
- Spicy Kick: A pinch of red pepper flakes, a dash of hot sauce, or finely diced jalapeños (sautéed first) can add a wonderful spicy element to your scramble.
- Protein Power-Up: Cooked and crumbled bacon, diced ham, or sautéed sausage can be folded into the eggs during the last minute of cooking for a heartier meal.
- Gourmet Touch: For a luxurious twist, consider adding a tiny drizzle of truffle oil or a sprinkle of smoked paprika after the eggs are cooked.
- Mediterranean Inspired: Crumble feta cheese and chopped Kalamata olives into the eggs during the last minute of cooking, and serve with a sprinkle of oregano.
- Southwestern Style: Top your finished scrambled eggs with a dollop of salsa, a spoonful of black beans, and a sprinkle of cilantro.
Experiment with these tips and variations to discover your favorite way to enjoy perfectly scrambled eggs. The possibilities are endless, and each adaptation offers a unique and delicious experience!
Storage and Reheating
While scrambled eggs are undeniably best enjoyed fresh off the pan, sometimes you might have leftovers or want to prepare them in advance. Proper storage and reheating techniques can help maintain their quality, though it’s important to manage expectations – they won’t be quite as fluffy as when first made.
Storage:
- Cool Completely: Before storing, allow the scrambled eggs to cool down to room temperature. This helps prevent condensation from forming inside the container, which can make the eggs soggy.
- Airtight Container: Transfer the cooled scrambled eggs to an airtight container. This protects them from absorbing odors from other foods in the refrigerator and prevents them from drying out.
- Refrigerate Promptly: Store the container in the refrigerator within two hours of cooking.
- Shelf Life: Properly stored scrambled eggs can be kept in the refrigerator for 3-4 days. While technically safe beyond that, the quality and texture will significantly degrade.
- Freezing (Not Recommended): Freezing scrambled eggs is generally not recommended. The texture changes dramatically upon thawing, often becoming rubbery and watery. If you must freeze them, ensure they are slightly undercooked before freezing, and vacuum-seal them for best results, but be prepared for a compromised texture.
Reheating:
The key to reheating scrambled eggs is to do it gently and avoid overcooking, which will lead to a dry, rubbery texture.
- Stovetop (Recommended):
- Place a non-stick skillet over medium-low heat.
- Add a tiny pat of butter or a splash of milk (about 1 teaspoon per serving) to the pan. This helps to reintroduce some moisture and prevent sticking.
- Add the cold scrambled eggs to the pan.
- Gently break up any large clumps with your spatula.
- Stir slowly and constantly, allowing the eggs to heat through evenly. Do not let them sit untouched for too long.
- Cook for 2-4 minutes, or until just heated through. Remove from heat as soon as they are warm, as they will continue to firm up.
- Microwave:
- Place the scrambled eggs in a microwave-safe dish.
- Add a very small splash of milk or water (about 1/2 teaspoon per serving) and stir it in. This helps to create some steam and prevent drying.
- Cover the dish loosely with a lid or microwave-safe plastic wrap, leaving a small vent.
- Heat on medium power (50-70%) for 30-second intervals, stirring gently after each interval.
- Continue heating until just warmed through. Be careful not to overheat, as this will make them tough. Total time usually ranges from 1-2 minutes depending on the quantity and microwave power.
Remember, reheated scrambled eggs will never be quite as fluffy and tender as freshly made ones, but with these methods, you can certainly enjoy them without too much compromise on taste and texture.
Frequently Asked Questions
Why are my scrambled eggs always rubbery?
The most common culprit for rubbery scrambled eggs is cooking them at too high a heat or cooking them for too long. High heat causes the egg proteins to seize up quickly, expelling moisture and resulting in a tough texture. Always cook scrambled eggs over medium-low heat and remove them from the pan when they are still slightly moist and glossy, as they will continue to cook from residual heat.
Should I add milk or water to my scrambled eggs?
Adding a small amount of whole milk, heavy cream, or even half-and-half can contribute to a creamier, richer texture. The fat in the dairy helps to tenderize the eggs. While some recipes suggest water, it primarily serves to create steam, which can make the eggs a bit fluffier but might also dilute the flavor. For the creamiest results, milk or cream is generally preferred over water.
When should I season my scrambled eggs with salt?
It’s best to season your scrambled eggs with salt and pepper *before* cooking. Adding salt to the raw egg mixture helps to distribute the flavor evenly and can even contribute to a slightly more tender texture by interacting with the egg proteins. Waiting until after cooking often results in unevenly seasoned eggs.
How do I know when my scrambled eggs are perfectly done?
Perfectly done scrambled eggs should be mostly set but still look moist, glossy, and have some visible wetness. The curds should be soft and creamy, not dry or crumbly. The moment you see them reach this stage, remove them from the heat immediately. They will continue to cook slightly from the residual heat of the pan, so taking them off a little early is key to avoiding overcooking.