
Introduction
Are you craving that irresistible crunch and savory flavor of KFC fried chicken but wishing for a healthier, homemade alternative? Look no further! This recipe for Air Fryer KFC Style Chicken Legs is about to become your new favorite way to enjoy crispy chicken without the deep-fried guilt. We’re talking juicy, tender chicken on the inside, encased in a perfectly seasoned, golden-brown crust that rivals your favorite fast-food joint, all thanks to the magic of your air fryer. Say goodbye to excessive oil and hello to a lighter, yet equally delicious, experience.
This isn’t just a simple air fryer chicken recipe; it’s a journey to recreate that iconic “KFC” taste and texture right in your own kitchen. We’ll dive into the secrets of a flavorful buttermilk soak, a perfectly seasoned dry dredge that mimics those eleven herbs and spices, and the optimal air frying techniques to achieve maximum crispiness. The beauty of using an air fryer is its ability to circulate hot air rapidly, creating that desired crispy exterior with dramatically less oil than traditional frying. It’s a game-changer for anyone who loves fried chicken but wants a more wholesome option.
Get ready to impress your family and friends with these fantastic Air Fryer KFC Style Chicken Legs. They’re incredibly easy to make, offer a fantastic flavor profile, and provide a satisfying crunch that will make you forget all about the drive-thru. Whether you’re planning a weeknight dinner, a casual get-together, or simply satisfying a craving, this recipe delivers on taste, texture, and convenience. Let’s get cooking and bring the deliciousness of homemade, “KFC” inspired chicken to your table!
Nutritional Information
Per serving (approximate values):
- Calories: 350
- Protein: 35g
- Carbohydrates: 25g
- Fat: 12g
- Fiber: 1g
- Sodium: 650mg
Ingredients
- 8 chicken drumsticks (about 2.5-3 lbs total), skin on
- 1.5 cups buttermilk
- 1 large egg
- 1 tablespoon hot sauce (optional, for extra kick)
- 2 cups all-purpose flour
- 1/2 cup plain breadcrumbs (panko for extra crispiness)
- 2 teaspoons salt
- 1.5 teaspoons freshly ground black pepper
- 1 teaspoon paprika
- 1 teaspoon garlic powder
- 1 teaspoon onion powder
- 1/2 teaspoon cayenne pepper (adjust to taste for spice)
- 1/2 teaspoon dried thyme
- 1/2 teaspoon dried oregano
- 1/4 teaspoon ground ginger
- 1/4 teaspoon dry mustard powder
- Cooking spray or light oil spray (e.g., avocado or olive oil)
Instructions
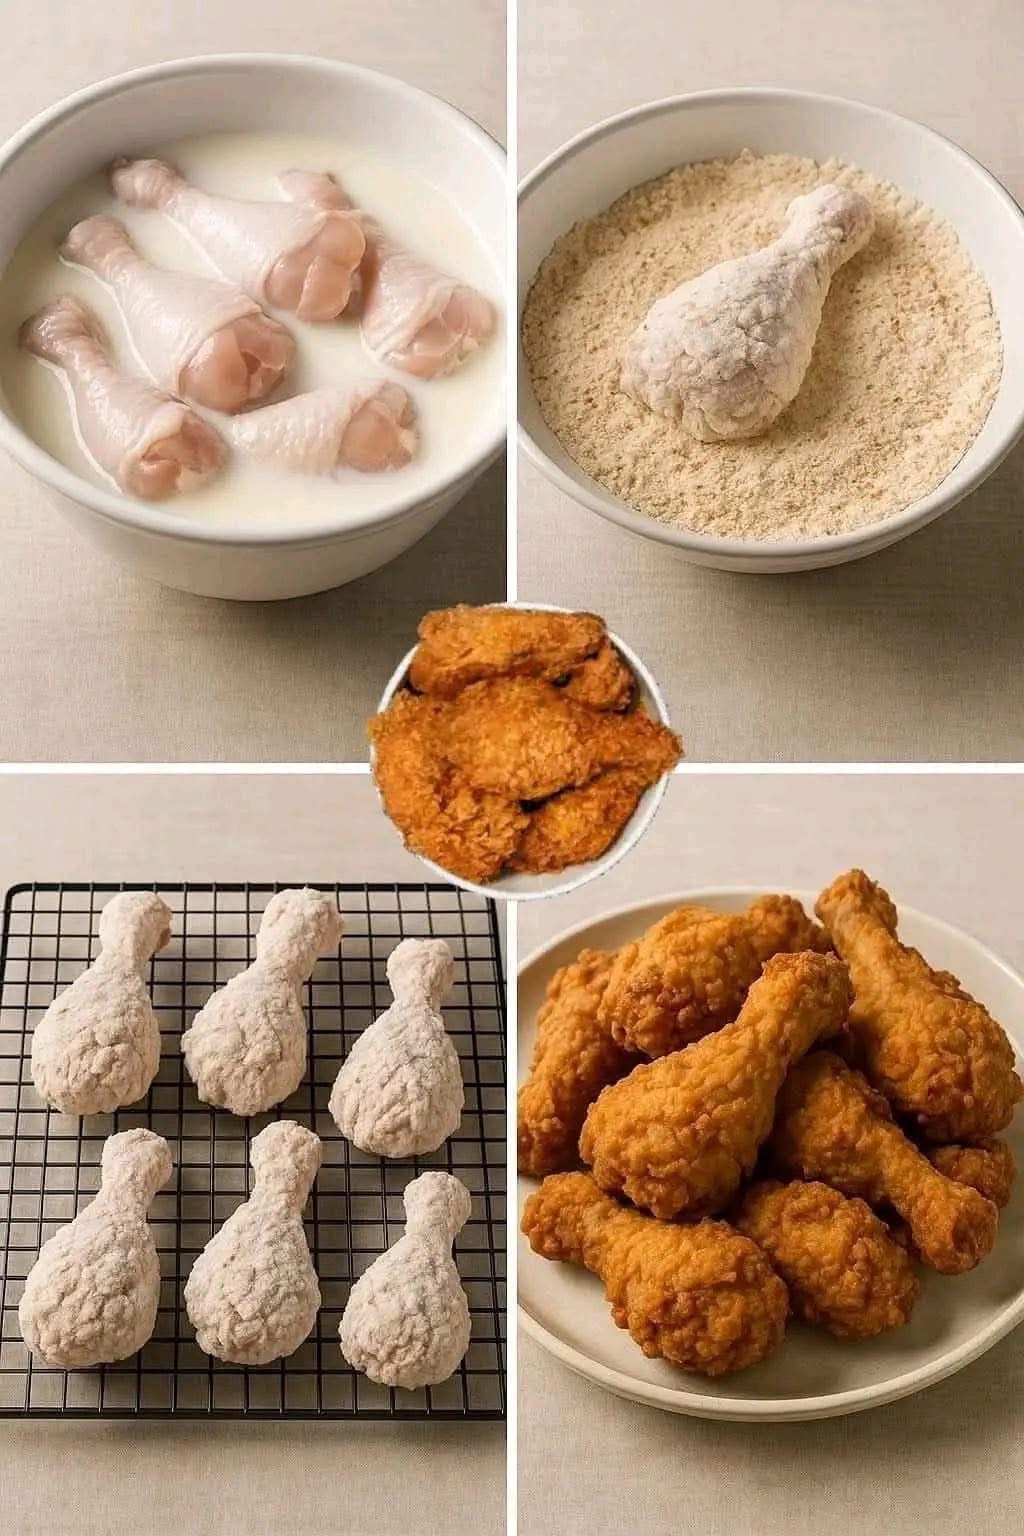
- Prepare the Chicken and Wet Dredge:Begin by patting the chicken drumsticks thoroughly dry with paper towels. This is a crucial step for ensuring the coating adheres well. In a large bowl, whisk together the buttermilk, egg, and optional hot sauce until well combined. Submerge the dried chicken drumsticks into the buttermilk mixture, ensuring they are fully coated. Cover the bowl and refrigerate for at least 30 minutes, or ideally 2-4 hours, or even overnight, to tenderize the chicken and infuse flavor.
- Prepare the Dry Dredge: In a separate shallow dish or another large bowl, combine the all-purpose flour, breadcrumbs, salt, black pepper, paprika, garlic powder, onion powder, cayenne pepper, dried thyme, dried oregano, ground ginger, and dry mustard powder. Whisk all the dry ingredients together thoroughly until they are evenly distributed. This is your “KFC” spice blend, so make sure it’s well mixed.
- Dredge the Chicken: Working with one chicken drumstick at a time, remove it from the buttermilk mixture, allowing any excess liquid to drip off. Transfer the chicken to the dry dredge mixture. Generously coat the chicken on all sides, pressing the flour mixture firmly onto the chicken to ensure a thick and even layer. Don’t be shy; really press the coating on. Place the dredged chicken drumstick on a wire cooling rack set over a baking sheet. Repeat this process with the remaining chicken drumsticks.
- Allow Coating to Set: Once all the chicken drumsticks are dredged, let them rest on the wire rack for at least 15-30 minutes at room temperature. For even better results and to minimize coating falling off, you can refrigerate them for up to an hour. This resting period allows the coating to hydrate and adhere firmly to the chicken, which is key for a crispy, intact crust in the air fryer.
- Preheat the Air Fryer: While the chicken rests, preheat your air fryer to 375°F (190°C) for 5-7 minutes. Preheating is important for achieving an immediate crisp and even cooking.
- Arrange Chicken in Air Fryer: Lightly spray the inside of your air fryer basket with cooking spray. Carefully place the breaded chicken drumsticks in a single layer in the air fryer basket, ensuring not to overcrowd it. Overcrowding will lead to steaming instead of frying, resulting in soggy chicken. You will likely need to cook the chicken in batches. Lightly spray the tops of the chicken drumsticks with cooking spray to help with browning and crispiness.
- Air Fry the Chicken: Air fry the chicken drumsticks at 375°F (190°C) for 25-30 minutes.
- Flip and Continue Cooking: After 15 minutes, carefully flip the chicken drumsticks to ensure even crisping and browning on all sides. Continue air frying for the remaining 10-15 minutes, or until the chicken is golden brown, crispy, and cooked through.
- Check for Doneness: The chicken is done when it reaches an internal temperature of 165°F (74°C) when measured with an instant-read meat thermometer inserted into the thickest part of the drumstick, avoiding the bone. The coating should be deeply golden and very crispy.
- Rest and Serve: Once cooked, remove the chicken from the air fryer and transfer it back to the wire cooling rack for a few minutes. Allowing the chicken to rest for 5-10 minutes helps the juices redistribute throughout the meat, resulting in a more tender and juicy final product. Serve hot and enjoy your homemade “KFC” style chicken legs!
Cooking Tips and Variations
To truly master these Air Fryer KFC Style Chicken Legs, attention to detail makes all the difference. The very first step of patting your chicken dry is non-negotiable; moisture on the surface prevents the coating from sticking properly. When it comes to the buttermilk soak, don’t rush it. The longer the chicken soaks, the more tender and flavorful it will become, as the lactic acid in the buttermilk breaks down the proteins and the flavors penetrate deeper into the meat. For an extra punch of flavor, consider adding a teaspoon of a smoky spice like smoked paprika or chipotle powder to your dry dredge. This gives a subtle depth that complements the other spices beautifully. If you’re a fan of serious heat, increase the cayenne pepper or add a pinch of ghost pepper powder, but do so cautiously! For an even crispier coating, some people swear by a double dredge: after the first dry dredge, dip the chicken back into the wet dredge (briefly!) and then into the dry dredge again, pressing firmly each time. This creates a thicker, more craggy crust. When arranging the chicken in the air fryer, remember the golden rule: never overcrowd. Air needs to circulate freely around each piece for optimal crisping. If your air fryer is small, cook in multiple batches. A light spray of oil on the breaded chicken before cooking and halfway through can significantly enhance browning and crispness, giving it that “fried” look without the deep-frying mess. Finally, always use a meat thermometer to ensure your chicken is cooked to a safe internal temperature of 165°F (74°C). This guarantees food safety and perfectly cooked, juicy chicken every time.
Beyond drumsticks, this versatile recipe can be adapted to other chicken cuts. Chicken thighs work wonderfully with the same method and cooking temperature, though they might require a few extra minutes (around 28-35 minutes total) due to their thicker nature. For chicken wings, reduce the cooking time to about 20-25 minutes, flipping halfway. Boneless, skinless chicken breasts or tenders can also be used, but be mindful of overcooking them, as they dry out quickly. Reduce the cooking time to 15-20 minutes for breasts, ensuring they reach 165°F. For a gluten-free variation, substitute the all-purpose flour with a 1:1 gluten-free flour blend that contains xanthan gum. Ensure your breadcrumbs are also gluten-free. For a spicier kick, you can add a pinch of red pepper flakes to the buttermilk soak or increase the amount of cayenne pepper in the dry dredge. For a smoky twist, incorporate a teaspoon of smoked paprika into the spice blend. Experiment with different dried herbs like rosemary or sage for a unique flavor profile. You can also vary the type of breadcrumbs; panko breadcrumbs will give you an even lighter, crispier texture than regular breadcrumbs. Don’t be afraid to customize the spice blend to your personal preference; think about other spices you love, like cumin or coriander, and add a small amount to see how it transforms the flavor.
Storage and Reheating
Leftover Air Fryer KFC Style Chicken Legs are a delicious treat and can be stored easily. Once the chicken has cooled completely to room temperature, transfer it to an airtight container. You can layer the chicken with parchment paper if you have multiple pieces to prevent them from sticking together. Store the container in the refrigerator for up to 3-4 days. For longer storage, you can freeze the cooked chicken. Place the cooled chicken in a single layer on a baking sheet and freeze until solid (about 2-3 hours). Once frozen, transfer the chicken to a freezer-safe bag or container, removing as much air as possible to prevent freezer burn. Frozen chicken will maintain its quality for up to 2-3 months.
Reheating the chicken properly is key to retaining its crispiness. The best method for reheating is usually the air fryer itself. If reheating from the refrigerator, preheat your air fryer to 350°F (175°C). Place the chicken in a single layer in the air fryer basket and cook for 8-12 minutes, flipping halfway, or until heated through and crispy. If reheating from frozen, do not thaw the chicken first. Place the frozen chicken directly into a preheated air fryer at 325°F (160°C) and cook for 15-20 minutes, flipping halfway, until thoroughly heated and crispy. You may need to increase the temperature to 350°F for the last few minutes to ensure maximum crispness. Alternatively, you can reheat in a conventional oven. Preheat the oven to 375°F (190°C). Place the chicken on a wire rack set over a baking sheet and bake for 15-20 minutes (from refrigerated) or 25-30 minutes (from frozen) until hot and crispy. Avoid reheating in the microwave, as this will make the coating soggy and diminish the texture.
Frequently Asked Questions
How do I ensure the coating sticks to the chicken and doesn’t fall off in the air fryer?
The key to a well-adhered coating lies in a few crucial steps. First, ensure your chicken is patted completely dry before going into the wet dredge. Any excess moisture on the raw chicken can prevent the coating from sticking. Second, when applying the dry dredge, press the flour mixture firmly onto the chicken from all sides to create a thick, even layer. Finally, and perhaps most importantly, allow the breaded chicken to rest on a wire rack for at least 15-30 minutes (or even longer in the fridge) before air frying. This resting period allows the moisture from the chicken and the wet dredge to hydrate the dry coating, creating a paste-like bond that helps it adhere better during cooking.
Can I make this recipe spicier or milder?
Absolutely! The spice level is entirely customizable. To make it spicier, you can increase the amount of cayenne pepper in the dry dredge. You could also add a pinch of red pepper flakes to the buttermilk soak or a dash of your favorite hot pepper powder for an extra kick. For a milder version, simply reduce or omit the cayenne pepper from the dry dredge. You can also experiment with other seasoning adjustments, such as adding more black pepper for a peppery flavor or a touch of smoked paprika for a deeper, smoky note without increasing the heat.
What if I don’t have buttermilk?
No buttermilk? No problem! You can easily make a homemade buttermilk substitute. For 1.5 cups of buttermilk, simply measure out 1.5 cups of regular milk (dairy or non-dairy works) and stir in 1.5 tablespoons of white vinegar or lemon juice. Let the mixture sit for 5-10 minutes until it slightly thickens and curdles. This acidified milk will work wonderfully in place of traditional buttermilk for tenderizing the chicken and helping the coating adhere.
My chicken isn’t getting as crispy as I’d like. What am I doing wrong?
Several factors can affect crispiness. First, ensure you’re not overcrowding your air fryer basket. Air fryers work by circulating hot air, and if the basket is too full, the chicken will steam rather than crisp. Cook in batches if necessary. Second, make sure your air fryer is fully preheated before adding the chicken, as this helps achieve an immediate crisp. Third, a light spray of cooking oil (like avocado or olive oil spray) on the breaded chicken before cooking and when flipping can significantly aid in browning and crisping. Also, ensure you’re cooking at the correct temperature for the recommended time and flipping the chicken halfway through to expose all sides to the circulating hot air.
Conclusion
And there you have it – your very own batch of incredibly crispy, juicy, and flavor-packed Air Fryer KFC Style Chicken Legs! This recipe proves that you don’t need a deep fryer or a trip to the drive-thru to enjoy that iconic fried chicken experience. With a little preparation and the magic of your air fryer, you can achieve a “fried” chicken that’s not only healthier but also bursting with homemade flavor and a satisfying crunch that will have everyone reaching for more.
We’ve walked through every step, from the tenderizing buttermilk soak and the secret “KFC” spice blend to the crucial dredging and air frying techniques that guarantee perfection. You’ve learned the importance of patting chicken dry, letting the coating set, and never overcrowding your air fryer basket. These small details add up to a big difference in the final result, transforming simple chicken drumsticks into a culinary masterpiece that tastes just like your favorite fast-food classic, but with a fraction of the oil.
So, what are you waiting for? It’s time to put these tips and tricks to the test. Gather your ingredients, fire up your air fryer, and get ready to create a meal that’s sure to become a regular in your rotation. Your taste buds (and your waistline!) will thank you. Don’t forget to share your delicious creations and let us know how your Air Fryer KFC Style Chicken Legs turned out in the comments below. Happy cooking!