
Introduction
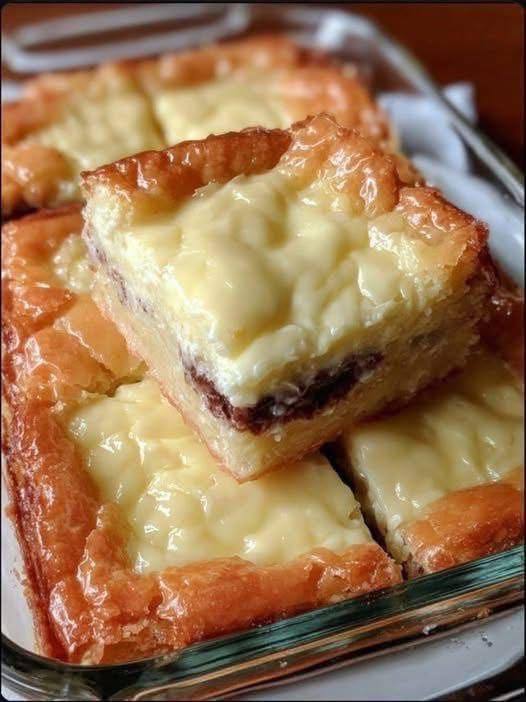
Prepare to meet your new favorite dessert: Chewy Gooey Bars! These aren’t just any bars; they’re a symphony of textures and flavors, designed to deliver ultimate comfort with every single bite. Imagine a perfectly tender, slightly chewy base, topped with a luscious, impossibly gooey cream cheese filling that melts in your mouth. It’s the kind of treat that makes you close your eyes and savor the moment, a delightful blend of rich, sweet, and utterly satisfying.
What makes these bars truly special is their irresistible combination of textures. The base provides a sturdy yet yielding foundation, while the star of the show is undeniably that decadent, creamy, and wonderfully gooey layer. It’s a dessert that manages to be both elegant and incredibly approachable, perfect for potlucks, celebrations, or simply a quiet evening indulgence. And the best part? They’re surprisingly easy to make, even for novice bakers, promising impressive results with minimal fuss.
These Chewy Gooey Bars are more than just a recipe; they’re an experience. They evoke memories of homemade goodness and spread joy wherever they’re served. Whether you’re a fan of classic cream cheese desserts or simply looking for a new go-to treat that everyone will adore, these bars are guaranteed to become a cherished addition to your baking repertoire. Get ready to bake up a batch of pure happiness!
Nutritional Information
Per serving (approximate values):
- Calories: 380
- Protein: 5g
- Carbohydrates: 45g
- Fat: 21g
- Fiber: 1g
- Sodium: 220mg
Ingredients
- For the Crust:
- 1 cup (2 sticks) unsalted butter, softened
- 1/2 cup granulated sugar
- 1/4 cup packed light brown sugar
- 1 teaspoon vanilla extract
- 2 large eggs
- 2 1/4 cups all-purpose flour
- 1 teaspoon baking powder
- 1/2 teaspoon salt
- For the Gooey Filling:
- 1 (8-ounce) package full-fat cream cheese, softened
- 1 cup (2 sticks) unsalted butter, melted
- 4 cups powdered sugar, sifted
- 1 teaspoon vanilla extract
- 1/2 teaspoon almond extract (optional, but recommended)
- 2 large eggs
- 1/4 cup all-purpose flour
- 1/2 cup semi-sweet chocolate chips (optional, for a chocolate layer)
Instructions
- Prepare the Crust: Preheat your oven to 350°F (175°C). Line a 9×13 inch baking pan with parchment paper, leaving an overhang on the sides to easily lift the bars out later. Grease the parchment paper lightly with cooking spray.
- In a large bowl, cream together the softened butter, granulated sugar, and light brown sugar with an electric mixer until light and fluffy, about 2-3 minutes.
- Beat in 1 teaspoon of vanilla extract and 2 large eggs, one at a time, mixing well after each addition until fully incorporated.
- In a separate medium bowl, whisk together the 2 1/4 cups all-purpose flour, baking powder, and salt.
- Gradually add the dry ingredients to the wet ingredients, mixing on low speed until just combined. Be careful not to overmix.
- Press the dough evenly into the prepared 9×13 inch baking pan. Use your hands or the back of a spoon to create an even layer.
- Bake the crust for 15-18 minutes, or until it’s set and lightly golden at the edges. Remove from the oven and set aside while you prepare the filling. Do not turn off the oven.
- Prepare the Gooey Filling: In a large bowl, using an electric mixer, beat the softened cream cheese until smooth and creamy, about 1-2 minutes.
- Pour in the melted butter and continue to beat until well combined and smooth.
- Gradually add the sifted powdered sugar, mixing on low speed until fully incorporated and smooth. Scrape down the sides of the bowl as needed.
- Beat in 1 teaspoon of vanilla extract and the optional 1/2 teaspoon of almond extract until combined.
- Add the 2 large eggs, one at a time, beating well after each addition until just incorporated.
- Finally, add the 1/4 cup all-purpose flour and mix on low speed until just combined. Do not overmix the filling; overmixing can make it less gooey.
- Assemble and Bake: If adding a chocolate layer, sprinkle the 1/2 cup semi-sweet chocolate chips evenly over the partially baked crust.
- Carefully pour the gooey cream cheese filling over the crust (and chocolate chips, if using). Spread it gently with a spatula to create an even layer.
- Return the pan to the oven and bake for an additional 30-35 minutes, or until the edges are set and lightly golden, but the center still has a slight jiggle. The filling will continue to set as it cools.
- Cool and Serve: Remove the pan from the oven and let the bars cool completely on a wire rack at room temperature. This is crucial for the filling to set properly and achieve maximum gooiness.
- Once completely cool (preferably chilled for at least 2-3 hours in the refrigerator, or even overnight), use the parchment paper overhang to lift the entire slab of bars out of the pan.
- Place the slab on a cutting board and cut into 24 squares (or desired size) using a sharp, warm knife. Wipe the knife clean between cuts for neat slices.
- Serve and enjoy the ultimate chewy gooey deliciousness!
Cooking Tips and Variations
To achieve the ultimate chewy gooey texture, precise measurements are key. Always use a kitchen scale for flour and sugar if you want the most consistent results. For the butter, make sure it’s truly softened for the crust and fully melted for the filling. Room temperature ingredients, especially cream cheese and eggs, for the filling will ensure a smooth, lump-free mixture.
One of the best tips for super gooey bars is to avoid overbaking. The center of the filling should still have a slight jiggle when you remove it from the oven. It will continue to set as it cools, transforming into that signature gooey consistency. Overbaking will result in a firmer, more cake-like texture, so keep a close eye on it!
For clean cuts, chilling the bars completely is non-negotiable. If you try to cut them while warm or even just at room temperature, the gooey filling will stick to your knife and create a messy presentation. Pop them in the fridge for at least 2-3 hours, or even overnight, before slicing. A warm, clean knife (run under hot water and wiped dry) will also help immensely.
Want to play with flavors? The possibilities are endless! For a citrusy twist, add 1 tablespoon of lemon or orange zest to the cream cheese filling. For a spiced version, a pinch of cinnamon or nutmeg in the crust or filling can add warmth. You can also experiment with different extracts, like coconut or peppermint. If you’re a chocolate lover, try adding white chocolate chips or even a swirl of melted caramel into the filling before baking.
For an extra layer of decadence, consider a drizzle of melted chocolate or caramel sauce over the cooled bars before serving. A sprinkle of sea salt flakes on top can also beautifully balance the sweetness. You can also press a layer of chopped nuts (like pecans or walnuts) onto the crust before adding the filling for added crunch and flavor.
Always line your pan with parchment paper! This simple step makes removal incredibly easy and ensures your beautiful bars stay intact. Leave an overhang on the sides so you can just lift the entire slab out of the pan once cooled. This also makes cleanup a breeze.
If you prefer a thicker crust, you can increase the crust ingredients by about 25% and use the same pan size. Conversely, for an even gooier ratio, you could slightly decrease the crust and keep the filling the same. Just be mindful that altering ratios might affect baking times slightly.
Storage and Reheating
Once your Chewy Gooey Bars have completely cooled and been cut, store them in an airtight container. They will keep well at room temperature for up to 2 days, especially if your kitchen isn’t too warm. For best results and to maintain their gooey texture, storing them in the refrigerator is recommended. Chilled, they will last for up to 5-7 days. The cold temperature also helps to firm up the filling, making them easier to handle and preventing them from becoming too soft.
When storing in the refrigerator, you can layer them between sheets of parchment paper to prevent sticking. If you’re stacking multiple layers, a piece of parchment between each layer will ensure they don’t fuse together. Always make sure the container is tightly sealed to prevent them from drying out or absorbing odors from other foods in the fridge.
These bars also freeze beautifully! To freeze, place the cut bars in a single layer on a baking sheet and freeze until solid, about 1-2 hours. Once frozen, transfer them to a freezer-safe airtight container or heavy-duty freezer bag. They can be stored in the freezer for up to 2-3 months. Freezing them individually first prevents them from sticking together in the container, so you can grab just one or two at a time.
To reheat from the refrigerator, you can simply bring them to room temperature for about 15-30 minutes for a softer texture, or enjoy them chilled straight from the fridge. If you prefer them slightly warm and extra gooey, you can microwave individual bars for 10-15 seconds. Be careful not to overheat, as this can cause the filling to become too liquidy.
To reheat from the freezer, transfer the desired number of bars to the refrigerator and let them thaw overnight. Alternatively, you can thaw them at room temperature for 1-2 hours. If you want them warm, follow the microwaving instructions above after thawing. Avoid reheating frozen bars directly in the microwave for extended periods, as this can lead to uneven heating and a less desirable texture.
Frequently Asked Questions
Why are my gooey bars not gooey?
The most common reason for bars not being gooey enough is overbaking. The center of the filling should still have a slight jiggle when you remove the pan from the oven. The filling will continue to set as it cools. Another factor can be using low-fat cream cheese; full-fat cream cheese is essential for that rich, gooey texture. Overmixing the filling can also incorporate too much air, making it more cake-like.
Can I make these Chewy Gooey Bars ahead of time?
Absolutely! These bars are an excellent make-ahead dessert. In fact, they taste even better the next day after the flavors have had a chance to meld and the filling has fully set. You can bake them up to 2-3 days in advance and store them in an airtight container in the refrigerator. This makes them perfect for parties, potlucks, or busy weeknights.
What kind of pan is best for baking these bars?
A standard 9×13 inch metal baking pan is ideal for this recipe. Metal pans conduct heat evenly, which is crucial for the crust to bake through properly. Lining the pan with parchment paper, allowing for an overhang on the sides, is highly recommended. This makes it incredibly easy to lift the entire slab of bars out of the pan once cooled, making cutting a breeze and ensuring a clean presentation.
Can I add nuts or other mix-ins to the bars?
Yes, you can! For added texture and flavor, you can sprinkle 1/2 to 1 cup of chopped pecans, walnuts, or almonds over the crust before pouring the gooey filling. Chocolate chips (white, milk, or dark) are also a popular addition, either mixed into the filling or sprinkled over the crust. Just be mindful that too many mix-ins can alter the overall texture, so don’t go overboard.