
Introduction
Step aside, store-bought candy bars! Get ready to discover the magic of homemade Chocolate Coconut Bars – a delightful, no-bake treat that’s remarkably easy to make and utterly irresistible. If you’re a fan of those iconic Mounds bars, but crave a fresher, more customizable experience, then you’ve found your new favorite recipe. These bars feature a sweet, tender, and moist coconut filling, generously coated in a rich layer of melted chocolate. They strike the perfect balance between creamy coconut and decadent chocolate, creating a symphony of textures and flavors that will transport your taste buds straight to a tropical paradise with every bite.
What makes these Chocolate Coconut Bars truly special isn’t just their incredible taste, but also their simplicity. This is a no-bake recipe, meaning you won’t need to turn on your oven, making it perfect for hot summer days or when you’re looking for a quick dessert fix. It’s a fantastic project for beginner bakers or a fun activity to do with kids, as the steps are straightforward and forgiving. Plus, the satisfaction of creating such a delicious treat from scratch is immensely rewarding. You’ll be amazed at how easily you can replicate and even improve upon a classic candy bar right in your own kitchen.
Beyond their ease and deliciousness, these bars are incredibly versatile. While the core recipe is a pure celebration of chocolate and coconut, there are endless possibilities for customization, allowing you to tailor them to your exact preferences. Whether you prefer dark chocolate, milk chocolate, or even white chocolate, or if you want to add a hint of almond for an Almond Joy-like twist, this recipe serves as the perfect canvas. They’re ideal for parties, potlucks, holiday platters, or simply as a well-deserved personal indulgence. Prepare to impress everyone with these homemade delights that taste far more gourmet than their simple preparation suggests!
Nutritional Information
Per serving (approximate values):
- Calories: 280
- Protein: 3g
- Carbohydrates: 35g
- Fat: 17g
- Fiber: 3g
- Sodium: 45mg
Ingredients
- 2 cups (about 160g) shredded sweetened coconut flakes
- 1/2 cup (113g) unsalted butter, softened
- 1/4 cup (60ml) sweetened condensed milk
- 1 teaspoon vanilla extract
- 1/4 teaspoon salt
- 2 cups (340g) chocolate chips (semi-sweet or milk chocolate)
- 1 tablespoon (15ml) coconut oil (optional, for smoother chocolate coating)
Instructions
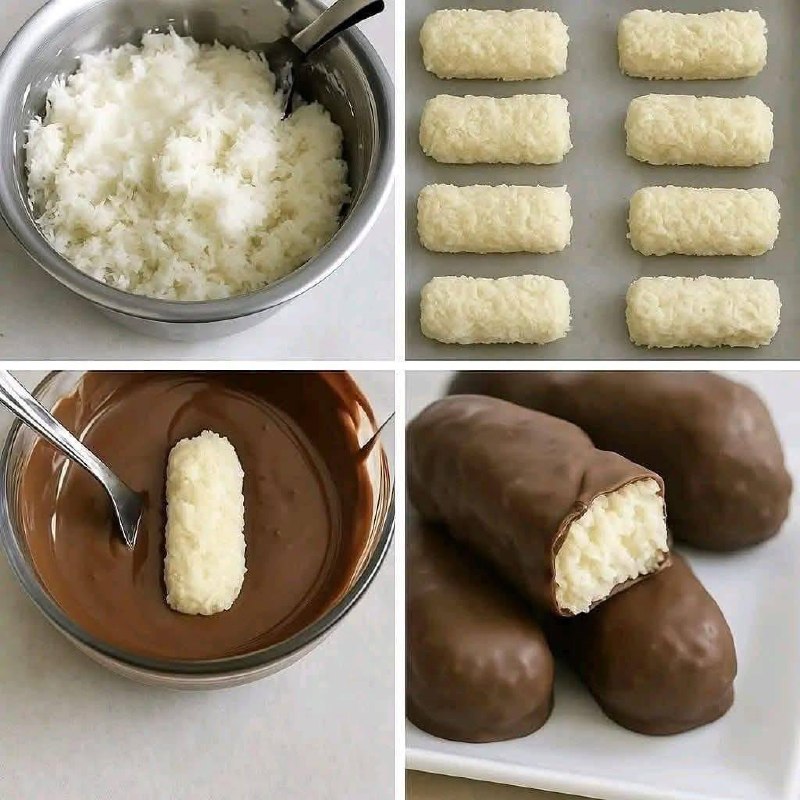
- Prepare the Coconut Mixture: In a large mixing bowl, combine the shredded sweetened coconut flakes, softened unsalted butter, sweetened condensed milk, vanilla extract, and salt.
- Using a sturdy spoon or your hands, mix all the ingredients together until thoroughly combined. The mixture should be moist enough to hold its shape when pressed.
- Form the Bars: Line an 8×8 inch square baking pan with parchment paper, leaving an overhang on the sides to easily lift the bars out later.
- Press the coconut mixture firmly and evenly into the prepared pan. Use the back of a spoon or your hands to ensure it’s tightly packed and has a smooth surface.
- Chill the Coconut Base: Place the pan in the refrigerator for at least 1 hour, or in the freezer for 30 minutes, until the coconut mixture is firm and well-chilled. This step is crucial for easy cutting and dipping.
- Prepare for Dipping: Once the coconut mixture is firm, lift it out of the pan using the parchment paper overhang. Place it on a cutting board.
- Using a sharp knife, cut the coconut slab into approximately 12-16 evenly sized bars. You can make them rectangular, square, or even small bites.
- Melt the Chocolate: In a microwave-safe bowl, combine the chocolate chips and coconut oil (if using). Microwave in 30-second intervals, stirring well after each interval, until the chocolate is completely melted and smooth. Alternatively, you can melt the chocolate using a double boiler method over simmering water.
- Dip the Bars: Place a cooling rack over a sheet of parchment paper or wax paper. This will catch any excess chocolate.
- Working with one coconut bar at a time, carefully drop it into the melted chocolate. Use two forks or a dipping tool to fully submerge the bar.
- Lift the bar out of the chocolate, allowing any excess chocolate to drip off through the tines of the fork. Gently tap the fork against the side of the bowl to remove more excess.
- Set the Chocolate: Carefully place the chocolate-coated bar onto the prepared cooling rack. Repeat with the remaining coconut bars.
- If desired, you can sprinkle a pinch of sea salt on top of the wet chocolate for an extra flavor boost.
- Final Chill: Once all the bars are coated, place the cooling rack (or the parchment-lined sheet pan if you transferred them) back into the refrigerator for at least 30 minutes, or until the chocolate coating is completely set and firm.
- Once set, the Chocolate Coconut Bars are ready to enjoy!
Cooking Tips and Variations
For the best Chocolate Coconut Bars, attention to a few details can make all the difference. Firstly, ensure your butter is truly softened, not melted, for the coconut mixture. This helps it incorporate smoothly and create a consistent texture. When mixing the coconut base, don’t be afraid to use your hands; it’s often the best way to ensure everything is thoroughly combined and tightly packed. The tighter you pack the mixture into the pan, the less likely your bars are to crumble when you cut and dip them. Chilling the coconut base thoroughly is paramount. A well-chilled base will be firm and easy to handle, preventing it from falling apart in the warm chocolate. If your kitchen is warm, consider placing the bars in the freezer for 10-15 minutes before dipping to ensure they are very cold.
When it comes to melting chocolate, low and slow is the way to go. Overheating chocolate can cause it to seize or become grainy. If using a microwave, stir frequently and only heat in short bursts. The coconut oil addition is a secret weapon for a super smooth, glossy chocolate coating that’s easier to work with and sets beautifully. If you don’t have coconut oil, a teaspoon of shortening can also work. For dipping, using two forks or a specific dipping tool will make the process much cleaner and give your bars a more professional finish. After dipping, allow as much excess chocolate to drip off as possible before placing the bars on the cooling rack; this prevents thick puddles of chocolate at the base of your bars.
The beauty of this recipe lies in its versatility. You can easily adapt it to suit your taste preferences. For a different flavor profile, try using dark chocolate for a more intense, less sweet bar, or white chocolate for a creamier, milder option. To turn these into an Almond Joy-like treat, simply mix about 1/2 cup of finely chopped toasted almonds into the coconut mixture before pressing it into the pan. You could also press a whole toasted almond onto the top of each bar before the chocolate sets. For a hint of citrus, add 1 teaspoon of orange or lime zest to the coconut mixture. A tiny pinch of cayenne pepper in the melted chocolate can add a surprising and delightful kick. Toasted coconut flakes, sprinkled on top of the wet chocolate, provide extra texture and visual appeal. For a festive touch, drizzle with contrasting melted chocolate (e.g., white chocolate drizzle on dark chocolate bars) or sprinkle with colorful sprinkles before the chocolate sets. Don’t be afraid to experiment and make these bars truly your own!
Storage and Reheating
These Chocolate Coconut Bars are best stored in an airtight container in the refrigerator. When stored properly, they will maintain their freshness and delicious taste for up to 1-2 weeks. The cool temperature helps keep the chocolate firm and prevents the coconut from drying out. You can also layer the bars between sheets of parchment paper within the container to prevent them from sticking together. While they are delightful straight from the fridge, some people prefer to let them sit at room temperature for about 10-15 minutes before serving to slightly soften the chocolate and enhance the coconut’s creaminess. However, do not leave them out at room temperature for extended periods, especially in warm environments, as the chocolate may melt.
For longer storage, Chocolate Coconut Bars freeze exceptionally well. Place the fully set bars in a single layer on a baking sheet lined with parchment paper and freeze for about an hour, or until solid. Once frozen, transfer the bars to a freezer-safe airtight container or a heavy-duty freezer bag, again layering with parchment paper if needed. They can be stored in the freezer for up to 2-3 months. When you’re ready to enjoy them, simply remove the desired number of bars from the freezer and let them thaw in the refrigerator for a few hours, or at room temperature for about 30-60 minutes, until they are soft enough to eat. There is no need for reheating; they are designed to be enjoyed chilled or at room temperature.
Frequently Asked Questions
Can I use unsweetened coconut for this recipe?
While you can use unsweetened shredded coconut, you will need to adjust the sweetness of the coconut filling. Unsweetened coconut will result in a less sweet bar overall. If using unsweetened, consider adding an extra tablespoon or two of powdered sugar to the coconut mixture, or slightly increasing the amount of sweetened condensed milk, until the desired sweetness is achieved. Keep in mind that the texture might also be slightly different, as sweetened coconut tends to be a bit moister.
My chocolate seized when melting, what happened?
Chocolate seizing usually happens when even a tiny amount of water or steam comes into contact with the melting chocolate. Ensure your bowl and utensils are completely dry. If using a double boiler, make sure the bottom of the chocolate bowl doesn’t touch the simmering water, and no steam escapes into the chocolate. Overheating can also cause chocolate to seize, so melt it slowly and stir frequently. If your chocolate does seize, you might be able to salvage it by stirring in a teaspoon of hot, neutral oil (like vegetable or canola oil) or melted butter, one drop at a time, until it loosens up, but it may not be as smooth as perfectly melted chocolate.
How can I make these bars vegan?
To make these Chocolate Coconut Bars vegan, you’ll need to make a few substitutions. Replace the unsalted butter with a good quality vegan butter alternative (stick form works best). For the sweetened condensed milk, use a vegan sweetened condensed milk, which is often made from coconut milk or oat milk. Finally, ensure your chocolate chips are dairy-free; many dark chocolate varieties are naturally vegan, but always check the label. The coconut oil addition is already vegan and recommended for a smooth coating.
Why did my chocolate coating crack after it set?
Chocolate cracking can occur for a few reasons. One common cause is a significant temperature difference between the chilled coconut bar and the melted chocolate. If the bars are too cold, the chocolate can contract too quickly as it cools, leading to cracks. Another reason could be that the chocolate was overheated, making it brittle. Using a little coconut oil in your melting chocolate helps to make it more pliable and less prone to cracking. Ensure you’re not adding too thick of a chocolate layer, as thicker layers are more susceptible to cracking. Storing the bars in an overly cold refrigerator can also contribute to cracking; try to keep them in the main part of the fridge rather than the coldest drawer.