
Introduction
Imagine this: a warm, fluffy cloud of pure comfort, gently breaking apart to reveal layers of tender, buttery goodness. That’s the magic of a classic buttery biscuit. These golden-brown wonders are more than just a side dish; they’re a culinary hug, a staple of comfort food that transcends generations and geographies. From a hearty breakfast companion to a perfect partner for stews and gravies, or even as a base for sweet shortcakes, the humble biscuit holds a revered place in our hearts and on our tables. There’s something undeniably alluring about homemade biscuits – that irresistible aroma filling your kitchen, the satisfying crunch of the crust giving way to a soft, airy interior, and the rich, creamy taste of real butter melting on your tongue.
This recipe isn’t just about baking; it’s about mastering the art of creating truly exceptional biscuits. We’ll guide you through each step, unraveling the secrets to achieving that coveted flaky texture, that perfect golden hue, and a flavor that will have everyone asking for more. Forget dense, dry, or flat biscuits; with our detailed instructions and pro tips, you’re about to unlock the potential for biscuit perfection right in your own kitchen. Prepare to transform simple pantry staples into a batch of classic buttery biscuits that are so good, they might just steal the show.
The timeless appeal of classic biscuits lies in their simplicity and versatility. They evoke feelings of warmth, family, and home-cooked goodness. While many associate them with Southern cuisine, biscuits have a rich history across various cultures, evolving into the beloved form we know today. Our goal is to empower you to recreate this culinary icon, ensuring every biscuit you bake is a testament to the enduring charm of a truly buttery, flaky, and tender treat.
Nutritional Information
Per serving (approximate values, for one medium biscuit):
- Calories: 250
- Protein: 4g
- Carbohydrates: 28g
- Fat: 14g
- Fiber: 1g
- Sodium: 350mg
Ingredients
- 2 ½ cups (300g) all-purpose flour, plus more for dusting
- 1 tablespoon baking powder
- ½ teaspoon baking soda
- 1 teaspoon granulated sugar (optional, for a hint of sweetness and browning)
- 1 teaspoon salt
- 8 tablespoons (113g) unsalted butter, very cold and cut into ½-inch cubes or grated
- 1 cup (240ml) cold buttermilk (or whole milk with 1 tablespoon lemon juice/vinegar, let sit 5 mins)
- 2 tablespoons unsalted butter, melted (for brushing tops, optional)
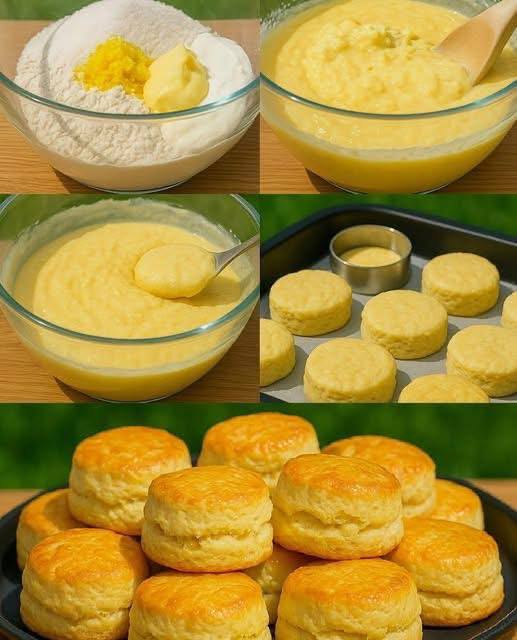
Instructions
- Preheat your oven to 425°F (220°C). Position an oven rack in the middle of the oven.
- In a large mixing bowl, whisk together the flour, baking powder, baking soda, sugar (if using), and salt until well combined. This ensures the leavening agents are evenly distributed, which is crucial for a good rise.
- Add the very cold, cubed or grated butter to the dry ingredients. Using your fingertips, a pastry blender, or two knives, quickly cut the butter into the flour mixture until it resembles coarse crumbs with some pea-sized pieces of butter remaining. The key here is to work quickly to prevent the butter from melting, as cold butter creates steam in the oven, leading to flaky layers. If using grated butter, toss it gently to coat with flour.
- Make a well in the center of the flour and butter mixture. Pour in the cold buttermilk all at once.
- Using a fork or a rubber spatula, gently mix until just combined. The dough will be very wet and shaggy, and it might look like it’s not coming together completely. Avoid overmixing; a shaggy, slightly sticky dough is exactly what you want for tender biscuits. Overmixing develops gluten, which leads to tough biscuits.
- Lightly flour a clean work surface. Turn the wet, shaggy dough out onto the floured surface.
- Gently pat the dough into a rough rectangle about 1-inch thick. Avoid heavy kneading. For extra flakiness, you can perform a “fold.” Fold one third of the dough over the middle, then fold the other third over that (like folding a letter). Gently pat it down again to about 1-inch thickness. You can repeat this folding process once or twice, but don’t overdo it.
- Using a 2-inch round biscuit cutter (or a floured drinking glass), press straight down into the dough to cut out biscuits. Do not twist the cutter, as twisting seals the edges and prevents the biscuits from rising properly.
- Place the cut biscuits on an ungreased baking sheet, arranging them so they are touching or very close together. This encourages them to rise taller and creates softer sides. Gather the scraps, gently press them together (do not knead), and cut out any remaining biscuits.
- Bake for 12-15 minutes, or until the tops are golden brown and the biscuits have risen significantly. The exact baking time will depend on your oven and the size of your biscuits.
- If desired, immediately after removing them from the oven, brush the tops of the hot biscuits with melted butter for extra richness and shine.
- Serve warm and enjoy!
Cooking Tips and Variations
The secret to truly flaky, tender biscuits lies in a few key principles. First and foremost, always use very cold ingredients, especially the butter and buttermilk. Cold butter creates pockets of steam as it melts in the hot oven, which pushes apart the layers of dough, resulting in that desirable flakiness. If your kitchen is warm, you can even chill your flour and mixing bowl for 10-15 minutes before starting. When incorporating the butter, work quickly to prevent it from warming up. A pastry blender is excellent for this, or you can use your fingertips, but be sure to use a light touch. Avoid overmixing the dough at all costs. Overworking the dough develops gluten, which leads to tough, chewy biscuits instead of light, tender ones. Mix until just combined, even if it looks a bit shaggy. For the best rise, always press your biscuit cutter straight down and lift; twisting can seal the edges and inhibit rising. Placing biscuits close together on the baking sheet also helps them rise taller by supporting each other. For a richer flavor and browner crust, brush the tops with a little melted butter or milk before baking.
For variations, consider adding savory elements like shredded sharp cheddar cheese and a pinch of cayenne pepper to the dry ingredients for a cheesy biscuit. Fresh herbs such as chives, rosemary, or thyme can also be finely chopped and mixed in. For a slightly sweeter biscuit, increase the sugar to 2 tablespoons and consider adding a teaspoon of vanilla extract to the buttermilk. You can also make drop biscuits by simply scooping spoonfuls of the wet dough onto the baking sheet if you prefer a more rustic look and don’t want to roll and cut. For a hint of sweetness, a simple glaze made from powdered sugar and a splash of milk or lemon juice can be drizzled over the cooled biscuits.
Storage and Reheating
Homemade biscuits are best enjoyed fresh from the oven, but leftovers can be stored and reheated. To store, allow the biscuits to cool completely. Place them in an airtight container or a resealable plastic bag at room temperature for up to 2-3 days. For longer storage, biscuits can be frozen. Once cooled, place them in a freezer-safe bag or container, separating layers with parchment paper to prevent sticking. They will keep in the freezer for up to 2-3 months.
To reheat biscuits from room temperature, you have a few options. The oven is usually best for restoring some of their original crispness: preheat your oven to 350°F (175°C), place the biscuits on a baking sheet, and heat for 5-7 minutes, or until warmed through. You can also wrap them in foil to keep them soft. For a quicker option, you can microwave them for 20-30 seconds, but be aware they may lose some crispness and can become a bit chewy if over-microwaved. From frozen, you can reheat biscuits directly in a preheated 300°F (150°C) oven, wrapped in foil, for about 15-20 minutes, or until heated through. Alternatively, thaw them overnight in the refrigerator and then reheat as you would room-temperature biscuits.
Frequently Asked Questions
Why are my biscuits tough or dry?
Tough or dry biscuits are usually the result of overworking the dough or not using enough fat/liquid. When you overmix, you develop the gluten in the flour too much, leading to a chewy, tough texture. Ensure you mix just until the ingredients are combined and the dough is shaggy. Also, make sure your butter is very cold and you’re using the correct amount of buttermilk, as that moisture is crucial for tenderness.
Can I use milk instead of buttermilk?
Yes, you can. If you don’t have buttermilk, you can easily make a substitute. For 1 cup of buttermilk, simply pour 1 tablespoon of white vinegar or lemon juice into a measuring cup, then fill the rest of the way with regular milk (whole milk works best) until it reaches the 1-cup line. Let it sit for 5 minutes, during which time it will curdle slightly. This acidified milk acts similarly to buttermilk, reacting with the baking soda to help the biscuits rise and providing a tender crumb.
What’s the trick to getting flaky layers?
The key to flaky layers is using very cold butter and incorporating it properly. The small pieces of cold butter melt in the hot oven, creating steam that pushes the layers of dough apart. Grating the butter or cutting it into very small pieces helps distribute it evenly. Also, avoid overmixing the dough, as this can prevent the layers from forming. The gentle folding technique described in the instructions can also enhance flakiness.
Why did my biscuits not rise?
Several factors can contribute to biscuits not rising. First, check the freshness of your baking powder and baking soda; old leavening agents lose their potency. Second, ensure your oven is preheated to the correct temperature; a hot oven is crucial for a quick rise. Third, make sure you’re not twisting the biscuit cutter, as this seals the edges and prevents them from expanding. Finally, under-mixing (not incorporating the leavening agents evenly) or over-mixing (developing too much gluten) can both negatively impact rise.