
Introduction
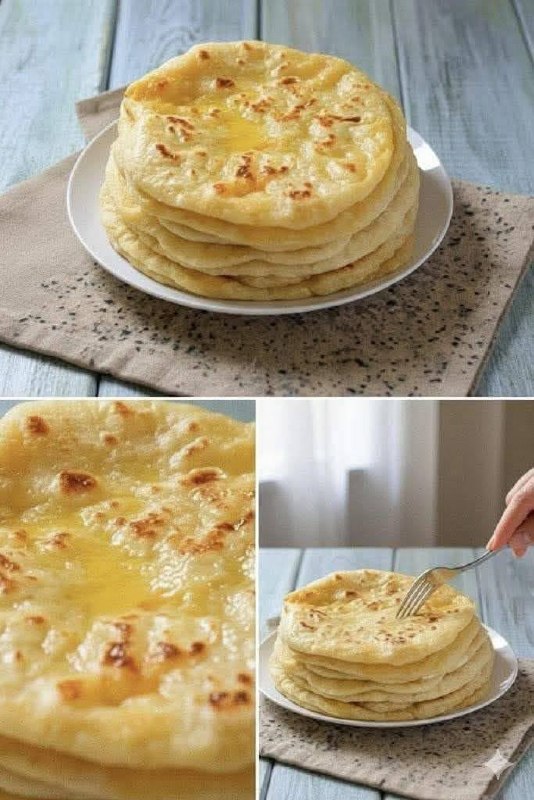
Step into the heart of Turkish culinary tradition with a recipe for a beloved staple: Turkish bread. Often referred to as Bazlama, this soft, slightly chewy flatbread is a cornerstone of Turkish meals, gracing tables from bustling city cafes to serene village homes. Its popularity isn’t just about its delicious taste, but also its incredible versatility, serving as the perfect accompaniment to almost any dish, from hearty stews and vibrant salads to simple dips and cheeses. Imagine tearing into a warm, freshly cooked piece, its subtle aroma filling your kitchen – a truly comforting experience that’s surprisingly easy to achieve at home.
What makes Turkish bread so special? It’s the unique combination of simple ingredients transformed into something extraordinary. Unlike some more complex bread recipes, Bazlama focuses on creating a tender, pillowy texture with a mild, inviting flavor. The addition of yogurt, a common secret ingredient, plays a crucial role in lending the dough its characteristic softness and a slight tangy note that elevates its taste profile. This isn’t just a side dish; it’s an experience, a warm embrace that complements every bite and invites you to savor the moment.
Beyond its deliciousness, Turkish bread offers the satisfaction of homemade baking without the intimidation often associated with yeast breads. This recipe is designed to guide you through each step, ensuring a successful and rewarding baking journey, even if you’re new to bread making. Get ready to impress your family and friends with this authentic taste of Turkey, a bread that truly embodies the warmth and hospitality of Turkish cuisine.
Nutritional Information
Per serving (approximate values):
- Calories: 280
- Protein: 9g
- Carbohydrates: 45g
- Fat: 7g
- Fiber: 2g
- Sodium: 350mg
Ingredients
- 3 cups (360g) all-purpose flour, plus more for dusting
- 1 teaspoon active dry yeast
- 1 teaspoon granulated sugar
- 1 teaspoon salt
- 1 cup (240ml) warm water (105-115°F / 40-46°C)
- 1/2 cup (120g) plain full-fat yogurt (room temperature)
- 2 tablespoons olive oil, plus more for greasing the bowl
- 2 tablespoons unsalted butter, melted (for brushing after cooking)
Instructions
- Activate the Yeast: In a large mixing bowl, combine the warm water, granulated sugar, and active dry yeast. Stir gently and let it sit for 5-10 minutes, or until foamy. This indicates that the yeast is active and ready to work its magic. If it doesn’t foam, your water might have been too hot or too cold, or your yeast may be old; start over with fresh yeast.
- Combine Wet Ingredients: To the activated yeast mixture, add the room temperature plain full-fat yogurt and 2 tablespoons of olive oil. Whisk everything together until well combined. The yogurt contributes significantly to the bread’s tender texture and slight tang.
- Add Dry Ingredients: In a separate bowl, whisk together the all-purpose flour and salt. Gradually add the flour mixture to the wet ingredients, about a cup at a time, mixing with a wooden spoon or a stand mixer with a dough hook on low speed. Continue mixing until a shaggy dough forms.
- Knead the Dough: Turn the dough out onto a lightly floured surface. Knead the dough for 8-10 minutes until it becomes smooth, elastic, and no longer sticky. If using a stand mixer, knead on medium-low speed for 6-8 minutes. The dough should feel soft and pliable. Avoid adding too much extra flour, as this can make the bread tough.
- First Rise (Bulk Fermentation): Lightly grease a clean large bowl with olive oil. Place the kneaded dough in the bowl, turning it once to coat all sides with oil. Cover the bowl tightly with plastic wrap or a clean kitchen towel. Let the dough rise in a warm, draft-free place for 1.5 to 2 hours, or until it has doubled in size. This slow rise is crucial for flavor development and a light texture.
- Divide the Dough: Once the dough has doubled, gently punch it down to release the air. Transfer the dough to a lightly floured surface. Divide the dough into 6-8 equal pieces. The exact number depends on how large you want your individual breads to be. For a typical Bazlama, 6 pieces work well.
- Shape the Dough Balls: Take each piece of dough and gently shape it into a smooth ball. To do this, pull the edges of the dough towards the center and pinch them together at the bottom, then roll the ball gently on the counter with your palm to create a smooth, taut surface.
- Second Rise (Proofing): Arrange the shaped dough balls on a lightly floured surface or a baking sheet lined with parchment paper, leaving some space between them. Cover them loosely with a clean kitchen towel and let them rest for another 20-30 minutes. This second proofing will make them easier to roll and give the bread a better rise during cooking.
- Preheat the Pan: While the dough balls are resting, heat a large cast-iron skillet, non-stick pan, or a griddle over medium-high heat. It’s important for the pan to be hot before adding the bread to ensure a quick cook and beautiful browning. Do not add any oil to the pan at this stage.
- Roll Out the Dough: On a lightly floured surface, take one dough ball and gently roll it out into a circle about 6-8 inches (15-20 cm) in diameter and about 1/4 to 1/3 inch (0.6-0.8 cm) thick. Aim for an even thickness to ensure even cooking. Avoid rolling it too thin, or it will become crispy rather than soft.
- Cook the Bread: Carefully place one rolled-out dough disk into the hot, dry pan. Cook for 2-3 minutes per side. You’ll see bubbles forming on the surface, and the bread will puff up slightly. Once the first side is golden brown and speckled, flip it over and cook the other side until it’s also golden brown and cooked through. The internal temperature should reach about 200°F (93°C).
- Brush with Butter: As each bread finishes cooking, immediately transfer it to a plate and brush generously with melted unsalted butter. The warm bread will absorb the butter, adding incredible flavor and a lovely sheen. Stack the cooked breads on top of each other and cover them with a clean kitchen towel to keep them warm and soft while you cook the remaining pieces.
- Serve Immediately: Turkish bread is best enjoyed warm, straight from the pan. Serve it as a side, with dips, or as a base for your favorite fillings.
Cooking Tips and Variations
Achieving the perfect Turkish bread involves a few key techniques and considerations. The dough consistency is paramount; it should be soft, pliable, and slightly sticky, but not unmanageably so. If your dough is too stiff, it will result in a dense, tough bread. If it’s too wet, it will be difficult to handle. Adjust with small amounts of flour or water as needed during kneading. The resting times for the dough are not merely suggestions; they are crucial for allowing the gluten to develop and the yeast to work its magic, leading to a tender, airy texture. Rushing these steps will compromise the final product.
When it comes to cooking, the pan temperature is critical. A hot pan ensures that the bread cooks quickly, puffs up beautifully, and develops those characteristic golden-brown spots without drying out. If your pan isn’t hot enough, the bread will take longer to cook and may become tough. Conversely, if it’s too hot, the exterior will burn before the interior is cooked through. Medium-high heat is typically ideal. Don’t be afraid to adjust the heat as you cook to maintain an even temperature.
For variations, consider adding finely chopped fresh herbs like parsley or dill to the dough for an aromatic twist. You could also incorporate a pinch of black cumin seeds or nigella seeds for a subtle, earthy flavor. While this recipe focuses on a pan-fried method, you can also cook these on a traditional outdoor saj if you have access to one, or even bake them briefly in a very hot oven (around 450°F/230°C) on a preheated baking steel or stone for a few minutes until puffed and golden. For a richer flavor, some recipes swap a small amount of the water for milk or even a little extra yogurt. Experiment with different flours too; while all-purpose is standard, a small percentage of whole wheat flour can add a nutty depth.
Storage and Reheating
Turkish bread is always best enjoyed fresh and warm, straight from the pan. However, if you find yourself with leftovers, they can be stored quite effectively. To keep them fresh, allow the bread to cool completely before placing it in an airtight container or a resealable plastic bag. Store at room temperature for up to 2-3 days. Storing them uncovered will cause them to dry out and become stale quickly. For longer storage, Turkish bread freezes exceptionally well. Wrap individual pieces tightly in plastic wrap, then place them in a freezer-safe bag or container. They can be frozen for up to 2-3 months.
Reheating is simple and helps to restore much of their original texture. From room temperature, you can gently warm the bread in a dry skillet over medium heat for 1-2 minutes per side until heated through and softened. Alternatively, microwave for 10-20 seconds for a quick reheat, though this can sometimes make them a little chewier. If reheating from frozen, you can place the frozen bread directly into a warm oven (around 350°F/175°C) for 5-7 minutes, or toast it in a toaster oven until warmed through and pliable. Brushing with a little melted butter after reheating also helps to refresh their flavor and texture.
Frequently Asked Questions
What is the difference between Bazlama and Gozleme?
While both are Turkish flatbreads, Bazlama and Gozleme are distinct. Bazlama, which this recipe focuses on, is a thicker, softer, and typically plain leavened bread, often cooked on a griddle and served as a side. Gozleme, on the other hand, is a much thinner, unleavened flatbread that is usually rolled out, filled with various ingredients like cheese, spinach, or minced meat, folded, and then cooked. Think of Bazlama as a plain, fluffy bread and Gozleme as a savory, filled pastry-like bread.
Can I make this Turkish bread recipe without yeast?
While this specific recipe relies on yeast for its characteristic soft and slightly airy texture, you can make a quick, unleavened version of a similar flatbread using baking powder and baking soda as leavening agents, often combined with yogurt. However, the texture and flavor will be different, typically denser and less elastic than a yeast-leavened Bazlama. For an authentic Bazlama experience, yeast is essential.
My dough isn’t rising. What went wrong?
There are a few common reasons why dough might not rise. The most frequent issue is inactive yeast. Ensure your warm water is between 105-115°F (40-46°C); water that’s too hot will kill the yeast, and water that’s too cold won’t activate it. Your yeast might also be old or expired, so always check the date. Another factor could be a cold environment; dough needs a warm, draft-free place to rise properly. Lastly, too much salt can inhibit yeast activity, so be sure to measure accurately.
Can I prepare the dough ahead of time?
Yes, you can prepare the dough for Turkish bread ahead of time. After the first rise, you can punch down the dough, shape it into balls, and then place them in an airtight container or cover them tightly with plastic wrap. Refrigerate for up to 24 hours. When you’re ready to cook, take the dough balls out of the refrigerator and let them come to room temperature for about 30-60 minutes before proceeding with the rolling and cooking steps. This slow fermentation in the fridge can even enhance the flavor of the bread.