
Introduction
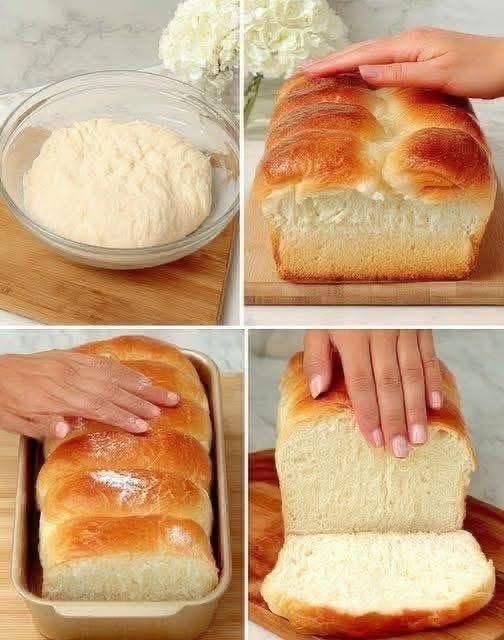
There’s something undeniably comforting about a freshly baked loaf of bread, and Amish White Bread takes that comfort to a whole new level. This isn’t just any white bread; it’s a staple of Amish kitchens, known for its incredibly soft texture, delicate sweetness, and simple, wholesome ingredients. Imagine tearing into a warm slice, the steam gently rising, the aroma filling your home – that’s the magic of Amish White Bread. It’s a recipe passed down through generations, embodying the Amish values of quality, simplicity, and heartfelt goodness in every bite.
What makes this particular white bread so beloved? It’s the perfect balance of richness and lightness, achieved through key ingredients like milk and a touch of sugar or honey, which contribute to its signature tender crumb and slightly sweet flavor. Unlike some denser loaves, Amish White Bread remains wonderfully soft and pliable, making it ideal for everything from a simple breakfast toast to the foundation of a hearty sandwich. It’s a testament to the fact that often, the simplest recipes yield the most profound culinary rewards, bringing a touch of traditional, homemade warmth to any meal.
Whether you’re an experienced baker or just starting your bread-making journey, this recipe for Amish White Bread is remarkably forgiving and incredibly rewarding. It celebrates the timeless art of bread making without unnecessary fuss, inviting you to slow down, enjoy the process, and savor the incomparable taste of homemade goodness. Get ready to fill your kitchen with the irresistible scent of baking bread and discover why this humble loaf has captured the hearts (and stomachs) of so many for so long.
Nutritional Information
Per serving (approximate values for one slice, based on 16 slices per loaf):
- Calories: 150
- Protein: 5g
- Carbohydrates: 28g
- Fat: 2g
- Fiber: 1g
- Sodium: 200mg
Ingredients
- 2 cups warm milk (105-115°F / 40-46°C)
- 2 tablespoons active dry yeast
- 1/2 cup granulated sugar (or 1/4 cup honey for a slightly different flavor)
- 1/4 cup unsalted butter, melted
- 1 1/2 teaspoons salt
- 6-7 cups bread flour, divided (or all-purpose flour)
- Additional melted butter for brushing (optional)
Instructions
- Activate the Yeast: In a large mixing bowl, combine the warm milk, active dry yeast, and 1 tablespoon of the granulated sugar. Stir gently and let it sit for 5-10 minutes, or until the mixture becomes foamy. This indicates that the yeast is active and ready to work. If it doesn’t foam, your milk might have been too hot or too cold, or your yeast may be old; discard and start again with fresh yeast.
- Combine Wet Ingredients: Once the yeast is foamy, add the remaining granulated sugar, melted butter, and salt to the milk mixture. Stir well to combine all ingredients thoroughly.
- Add Flour Gradually: Begin by adding 3 cups of the bread flour to the wet ingredients. Mix with a wooden spoon or a stand mixer with a dough hook on low speed until just combined. The mixture will be quite wet and sticky at this point.
- Knead the Dough: Gradually add the remaining bread flour, 1/2 cup at a time, mixing well after each addition. Continue adding flour until the dough comes together and starts to pull away from the sides of the bowl. The dough should be soft, slightly tacky, but not overly sticky. If using a stand mixer, knead on medium-low speed for 7-10 minutes. If kneading by hand, turn the dough out onto a lightly floured surface and knead for 10-15 minutes, until it is smooth, elastic, and springs back when gently poked. Avoid adding too much flour, as this can make the bread dense.
- First Rise: Lightly grease a large bowl with a little oil or cooking spray. Place the kneaded dough in the bowl, turning it once to coat the top. Cover the bowl with plastic wrap or a clean kitchen towel and place it in a warm, draft-free spot. Let the dough rise for 1 to 1.5 hours, or until it has doubled in size. The exact time will depend on the warmth of your kitchen.
- Punch Down and Shape: Once the dough has doubled, gently punch it down to release the air. Turn the dough out onto a lightly floured surface. Divide the dough in half (this recipe makes two standard loaves). For each half, gently flatten the dough into a rectangle. Fold the short ends towards the center, then roll the dough tightly from one long side to the other, creating a log shape. Pinch the seam closed and tuck the ends underneath.
- Second Rise: Lightly grease two standard (9×5 inch) loaf pans. Place one shaped loaf into each prepared pan, seam-side down. Cover the pans loosely with plastic wrap or a clean kitchen towel and let them rise again in a warm place for another 30-45 minutes, or until the dough has risen about 1 inch above the rim of the pans. While the bread is rising, preheat your oven to 350°F (175°C).
- Bake: Once the loaves have risen, place them in the preheated oven. Bake for 30-35 minutes, or until the tops are golden brown and the internal temperature reaches 200-210°F (93-99°C) when measured with an instant-read thermometer. If the tops are browning too quickly, you can loosely tent them with aluminum foil.
- Cool: Once baked, carefully remove the loaves from the oven. If desired, brush the tops with a little extra melted butter for a softer crust and added flavor. Let the bread cool in the pans for 10-15 minutes before carefully removing them to a wire rack. Allow the loaves to cool completely on the wire rack before slicing. Slicing warm bread can lead to a gummy texture.
Cooking Tips and Variations
Achieving that perfectly soft and flavorful Amish White Bread is easy with a few key tips and an open mind for variations.
Tips for Success:
- Temperature is Key for Yeast: Ensure your milk is between 105-115°F (40-46°C). Too cold, and the yeast won’t activate; too hot, and it will kill the yeast. A kitchen thermometer is your best friend here.
- Don’t Over-Flour: It’s tempting to keep adding flour when the dough is sticky, but too much flour results in a dense, dry loaf. Aim for a dough that is soft, pliable, and just slightly tacky. The dough should still feel a little sticky but should pull away from the sides of the bowl or your hands cleanly.
- Kneading is Crucial: Proper kneading develops the gluten, which gives the bread its structure and chewiness. Knead until the dough is smooth and elastic. You can test it by pulling a small piece – if it stretches thin enough to see light through it without tearing (the “windowpane test”), it’s ready.
- Warm, Draft-Free Rising Spot: Yeast loves warmth. A slightly warm oven (turned off, with the light on), a sunny spot, or even placing the bowl in a larger bowl of warm water can help your dough rise beautifully.
- Listen to Your Dough, Not Just the Clock: Rising times are estimates. Always go by whether the dough has doubled in size for the first rise, and risen significantly above the pan for the second rise.
- Cool Completely Before Slicing: This is perhaps the hardest tip to follow, but it’s essential for the best texture. Slicing hot bread can compress the crumb and make it gummy. The bread is still “cooking” internally as it cools.
- Brush with Butter: For an extra soft, golden, and flavorful crust, brush the top of your warm, freshly baked loaves with a little melted butter immediately after taking them out of the oven.
Variations to Try:
- Honey Wheat: Substitute half of the bread flour with whole wheat flour and use honey instead of sugar for a slightly heartier, nuttier flavor. You might need a little extra liquid as whole wheat flour absorbs more.
- Garlic Herb Bread: During the last few minutes of kneading, incorporate 2-3 cloves of minced garlic and 1-2 tablespoons of dried Italian herbs (or fresh chopped herbs like rosemary and thyme). This is fantastic served with savory dishes.
- Cinnamon Swirl: After the first rise and punching down, roll the dough into a large rectangle. Spread a mixture of softened butter, cinnamon, and brown sugar over the surface, then roll it up tightly and place it in the loaf pan for the second rise.
- Milk Substitution: While whole milk is traditional and provides the best richness, you can use 2% milk. For a dairy-free version, use unflavored, unsweetened almond or soy milk and a plant-based butter substitute.
- Sweetener Swap: Experiment with brown sugar for a richer, more molasses-like flavor, or maple syrup for a distinct sweetness. Adjust quantities to taste.
Storage and Reheating
Proper storage is key to keeping your homemade Amish White Bread fresh and delicious for as long as possible. Reheating can also bring back some of that fresh-baked magic.
Storage:
- Room Temperature (1-3 days): Once completely cooled, store the bread in an airtight container, a bread box, or a large resealable plastic bag at room temperature. This helps prevent it from drying out or becoming stale. Avoid storing it in the refrigerator, as this can actually make bread go stale faster due to a process called retrogradation of starches.
- Freezing (up to 3 months): For longer storage, Amish White Bread freezes exceptionally well.
- Whole Loaf: Once completely cooled, wrap the entire loaf tightly in plastic wrap, then an additional layer of aluminum foil.
- Sliced Loaf: For convenience, you can slice the cooled loaf first, then stack the slices and wrap them tightly in plastic wrap before placing them in a freezer-safe bag. This allows you to take out just a few slices at a time.
Reheating:
- From Room Temperature:
- Oven: For a whole loaf or several slices, preheat your oven to 350°F (175°C). Wrap the bread loosely in aluminum foil and heat for 10-15 minutes (for slices) or 15-20 minutes (for a whole loaf), until warmed through and soft.
- Microwave: For individual slices, wrap in a damp paper towel and microwave for 10-20 seconds. Be careful not to over-microwave, as it can make the bread tough.
- Toaster: Slices can be toasted directly in a toaster for a crispy exterior and warm interior.
- From Frozen:
- Oven (Recommended for whole loaves): Unwrap the frozen loaf and place it directly into a cold oven. Set the oven to 350°F (175°C) and bake for 30-40 minutes, or until thawed and warmed through. This slow heating allows the bread to thaw gently and retain its moisture.
- Toaster/Toaster Oven (for slices): Frozen slices can often be placed directly into a toaster or toaster oven. You may need to use a slightly longer setting than usual.
- Thaw at Room Temperature: Simply leave individual frozen slices or a whole loaf on the counter to thaw for a few hours. Once thawed, you can warm them using the room temperature reheating methods above.
Frequently Asked Questions
What kind of flour is best for Amish White Bread?
While all-purpose flour can certainly be used, bread flour is ideal for Amish White Bread. Bread flour has a higher protein content, which leads to better gluten development. This results in a chewier texture, a more structured crumb, and a better rise, contributing to the signature soft and airy quality of this beloved loaf. If using all-purpose flour, you might find the bread slightly less chewy, but still delicious.
My dough isn’t rising. What went wrong?
The most common reasons for dough not rising are inactive yeast or incorrect liquid temperature. Ensure your yeast is fresh and active (it should foam when mixed with warm milk and sugar). Also, verify that your milk is within the ideal temperature range of 105-115°F (40-46°C). If it’s too cold, the yeast won’t activate; too hot, and it will kill the yeast. A cold kitchen environment or insufficient kneading can also hinder rising.
Can I make this bread in a bread machine?
Yes, you can adapt this recipe for a bread machine. Typically, you would add the liquid ingredients first, followed by the dry ingredients, with the yeast placed last in the machine’s dispenser (check your bread machine’s specific instructions for ingredient order). Use the “white bread” or “basic dough” setting. If using the dough cycle, you’ll then remove the dough, shape it into loaves, let it rise, and bake it in a conventional oven as per the recipe’s instructions.
How can I get a really soft crust?
For an extra soft crust, there are a few tricks. Firstly, immediately after removing the baked loaves from the oven, brush the tops generously with melted butter. This adds moisture and flavor. Secondly, once the bread has cooled slightly (after about 10-15 minutes in the pan), remove it to a wire rack and cover it loosely with a clean kitchen towel while it finishes cooling. This traps some steam and keeps the crust tender. Avoid over-baking, as this can dry out the crust.