
No bake and no condensed milk
Craving a delightful dessert that doesn’t demand hours in the kitchen or a can of condensed milk? You’ve come to the right place! This no-bake, no-condensed-milk wonder is here to revolutionize your sweet tooth. Imagine a luscious, creamy, and effortlessly elegant dessert that comes together with minimal fuss. Perfect for those sweltering summer days when turning on the oven feels like a crime, or simply when you need a quick, impressive treat without the usual culinary commitment. This recipe delivers a velvety smooth texture and a delicate sweetness, making it an instant crowd-pleaser that tastes far more complex than it actually is to prepare.
What makes this particular recipe stand out is its ingenious approach to achieving that rich, satisfying creaminess without relying on condensed milk. We’re harnessing the power of a few pantry staples, transforming them into a light yet indulgent dessert that sets beautifully in the refrigerator. The result is a dessert with a custardy appeal, a melt-in-your-mouth consistency, and a clean, refreshing finish. It’s a fantastic option for beginner bakers (or non-bakers!) and seasoned pros alike, proving that extraordinary desserts don’t always require extraordinary effort or a long ingredient list. Get ready to impress yourself and your guests with this incredibly easy and utterly delicious creation.
Beyond its simplicity, this dessert offers a blank canvas for customization. While divine in its classic form, you can easily adapt it to suit your personal preferences or whatever ingredients you have on hand. Whether you’re looking to add a burst of fruit, a hint of chocolate, or a nutty crunch, this base recipe is incredibly versatile. It’s the ideal solution for last-minute entertaining, a light after-dinner treat, or simply satisfying that sudden dessert craving. Say goodbye to complicated baking schedules and hello to your new favorite go-to dessert that is both quick to prepare and incredibly satisfying.
Nutritional Information
Per serving (approximate values):
- Calories: 280
- Protein: 7g
- Carbohydrates: 35g
- Fat: 12g
- Fiber: 1g
- Sodium: 150mg
Ingredients
- 2 ½ cups whole milk (or preferred milk alternative)
- ½ cup granulated sugar
- ¼ cup cornstarch
- 2 large egg yolks
- 1 teaspoon vanilla extract
- 2 tablespoons unsalted butter, cut into small pieces
- 1 packet (¼ ounce or 7g) unflavored gelatin powder
- ¼ cup cold water
- Pinch of salt
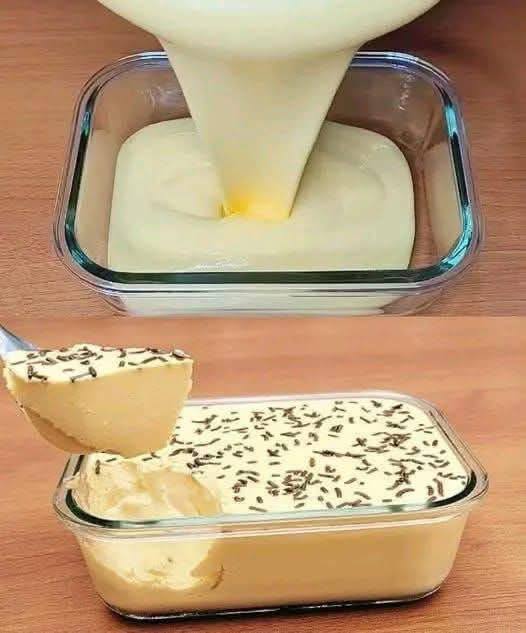
- Chocolate sprinkles or grated chocolate, for garnish (optional)
Instructions
- In a small bowl, sprinkle the gelatin powder over the cold water. Let it sit for 5-10 minutes to bloom, becoming thick and jelly-like. Do not stir it initially; allow the gelatin to absorb the water naturally.
- In a medium saucepan, whisk together the granulated sugar and cornstarch until thoroughly combined and no lumps remain. This step is crucial for preventing a lumpy dessert.
- In a separate bowl, lightly whisk the egg yolks.
- Gradually whisk in about ½ cup of the milk into the sugar and cornstarch mixture in the saucepan. Continue whisking until a smooth paste forms. This creates a slurry that will prevent lumps when the rest of the milk is added.
- Slowly pour in the remaining 2 cups of milk into the saucepan, whisking continuously until the mixture is completely smooth. Add a pinch of salt.
- Place the saucepan over medium heat, stirring constantly with a whisk. Continue to cook, stirring, until the mixture begins to thicken and comes to a gentle simmer. It should coat the back of a spoon. This typically takes about 8-10 minutes. Do not allow it to come to a rolling boil.
- Once the mixture has thickened, remove the saucepan from the heat. Immediately add the bloomed gelatin to the hot mixture, stirring vigorously until it is completely dissolved. Ensure there are no gelatin granules remaining.
- While the mixture is still hot, slowly temper about half a cup of the hot milk mixture into the whisked egg yolks, stirring constantly. This step prevents the eggs from scrambling.
- Pour the tempered egg yolk mixture back into the saucepan with the remaining hot milk mixture. Whisk continuously for about 1-2 minutes over low heat, ensuring the eggs are fully incorporated and cooked gently without curdling. Do not bring to a boil once the eggs are added.
- Remove the saucepan from the heat. Stir in the unsalted butter until it has melted completely and is fully incorporated, giving the dessert a rich, glossy finish.
- Add the vanilla extract and stir to combine.
- To ensure an incredibly smooth texture, pour the entire mixture through a fine-mesh sieve into a clean bowl or a large liquid measuring cup. This will catch any potential lumps from the cornstarch or bits of cooked egg yolk.
- Divide the mixture evenly into individual serving glasses, ramekins, or a larger dessert dish.
- Cover each serving dish or the large dish with plastic wrap, pressing the wrap directly onto the surface of the pudding to prevent a skin from forming.
- Refrigerate for at least 4 hours, or preferably overnight, until the dessert is fully set and firm.
- Before serving, remove the plastic wrap. Garnish with chocolate sprinkles, grated chocolate, fresh berries, or a dollop of whipped cream, if desired.
- Serve chilled and enjoy your effortlessly elegant no-bake, no-condensed-milk treat!
Cooking Tips and Variations
For the smoothest possible texture, don’t rush the whisking process, especially when incorporating the cornstarch and milk. A fine-mesh sieve is your best friend here; straining the mixture after cooking will guarantee a silky-smooth finish, catching any tiny lumps that might have formed. When heating, maintain a medium-low heat and stir continuously to prevent scorching at the bottom of the pan and ensure even cooking. Patience is key for allowing the mixture to thicken properly without boiling too vigorously, which can affect the final texture. Make sure your gelatin is fully dissolved; undissolved gelatin can lead to a grainy consistency. If you’re unsure, you can gently heat the bloomed gelatin in a microwave for a few seconds (about 5-10) until it’s liquid before adding it to the hot milk mixture, ensuring it’s not too hot when you add it.
This basic recipe is a fantastic starting point for countless variations. For a rich chocolate version, stir in ½ cup of good quality semi-sweet chocolate chips or chopped chocolate along with the butter and vanilla extract. The residual heat will melt the chocolate, which you can then whisk until smooth. For a coffee-flavored treat, dissolve 1-2 tablespoons of instant coffee or espresso powder in a small amount of hot milk before adding it to the main mixture. Citrus lovers can add the zest of one lemon or orange along with the vanilla for a bright, refreshing twist. A hint of almond extract instead of vanilla can also provide a sophisticated flavor profile. You can also layer this dessert with crushed cookies, fresh fruit, or a berry compote for added texture and flavor dimension. For a vegan adaptation, substitute the whole milk with a rich plant-based milk like full-fat coconut milk (from a can, not refrigerated carton) or oat milk, omit the egg yolks, and use agar-agar powder (following package directions for substitution ratios) instead of gelatin. Adjust sweetness as needed, as plant milks can vary in sugar content.
Storage and Reheating
This no-bake dessert is designed to be served chilled and is not suitable for reheating. Reheating would cause the gelatin to melt and the dessert to lose its set, resulting in a runny consistency. Store any leftovers in an airtight container or covered tightly with plastic wrap in the refrigerator. When covered well, it will maintain its delicious texture and flavor for up to 3-4 days. It is best enjoyed within this timeframe to ensure optimal freshness. If you’ve made it in individual serving dishes, simply cover each one with plastic wrap. For a larger dish, ensure the entire surface is covered to prevent a skin from forming and to keep it from absorbing any odors from the refrigerator. Always serve directly from the fridge for the best experience.
Frequently Asked Questions
Can I use a milk substitute for this recipe?
Yes, you can. While whole milk provides the richest and creamiest texture, you can use other milk alternatives like 2% milk, almond milk, or oat milk. Keep in mind that lower-fat milks might result in a slightly less rich consistency. If using plant-based milk, especially thinner varieties, the final set might be a little softer, but it will still be delicious.
Why did my dessert not set properly?
There are a few common reasons for a dessert not setting. The most likely cause is that the gelatin wasn’t fully bloomed or thoroughly dissolved in the hot mixture. Ensure you give the gelatin enough time to bloom in cold water and stir it vigorously into the hot milk mixture until no granules remain. Another reason could be not cooking the milk mixture long enough for the cornstarch to fully activate and thicken the base before the gelatin is added. Finally, make sure the dessert is chilled for the recommended minimum of 4 hours, or preferably overnight, as proper chilling time is essential for gelatin to set.
Can I make this dessert ahead of time for a party?
Absolutely! This is an excellent make-ahead dessert. In fact, making it the day before you plan to serve it is ideal, as it allows plenty of time for the dessert to chill and set completely, ensuring the best possible texture. Simply prepare it as directed, cover it tightly, and store it in the refrigerator. This frees up your time on the day of your event, allowing you to focus on other preparations.
What can I use instead of cornstarch if I don’t have any?
If you don’t have cornstarch, you can typically substitute it with an equal amount of all-purpose flour, though flour can sometimes give a slightly less translucent and more “floury” taste if not cooked out properly. Alternatively, you could use arrowroot powder as a substitute, using about half the amount of arrowroot powder for the cornstarch, as it has a stronger thickening power. Ensure that any substitute is thoroughly whisked with sugar and a small amount of milk to form a slurry before adding to the main mixture to prevent lumps.