
Introduction
While this might not be your typical food blog article, we’re diving into a topic that, much like a well-prepared meal, requires attention and understanding for optimal health: earwax. Yes, earwax – that often-misunderstood substance, scientifically known as cerumen, plays a crucial role in maintaining the health of your ears. Far from being a mere nuisance, it’s a natural, protective barrier, a self-cleaning agent that guards your ear canals against dirt, dust, bacteria, and other foreign invaders. Think of it as your ear’s personal bouncer, keeping unwanted guests out and ensuring the delicate inner workings are safe.
However, sometimes this helpful substance can become a problem. When earwax accumulates excessively, it can lead to a condition known as earwax buildup or impacted earwax. This isn’t just an annoyance; it can significantly affect your hearing and overall ear comfort, leading to a range of unpleasant symptoms. Understanding why this buildup happens and how to address it safely is key to maintaining good ear hygiene and preventing potential complications. Just as you wouldn’t ignore a rumbling stomach, you shouldn’t ignore what your ears are telling you.
In this comprehensive guide, we’ll explore the fascinating world of earwax, delve into the common causes behind its buildup, and shed light on the symptoms you should watch out for. More importantly, we’ll equip you with practical, safe home remedies – including the effective use of natural oils – to manage minor buildup, along with crucial advice on when it’s time to seek professional medical attention. Our goal is to demystify earwax, empower you with knowledge, and help you keep your ears feeling clear and comfortable, ensuring your auditory senses are always in top shape.
Nutritional Information
Per serving (approximate values):
- Calories: 0
- Protein: 0g
- Carbohydrates: 0g
- Fat: 0g
- Fiber: 0g
- Sodium: 0mg
Ingredients
- 1-2 drops medical-grade olive oil, mineral oil, or baby oil (at body temperature)
- Small dropper or ear syringe
- Cotton ball (optional)
- Warm water (for rinsing, if needed)
- Soft towel
Instructions
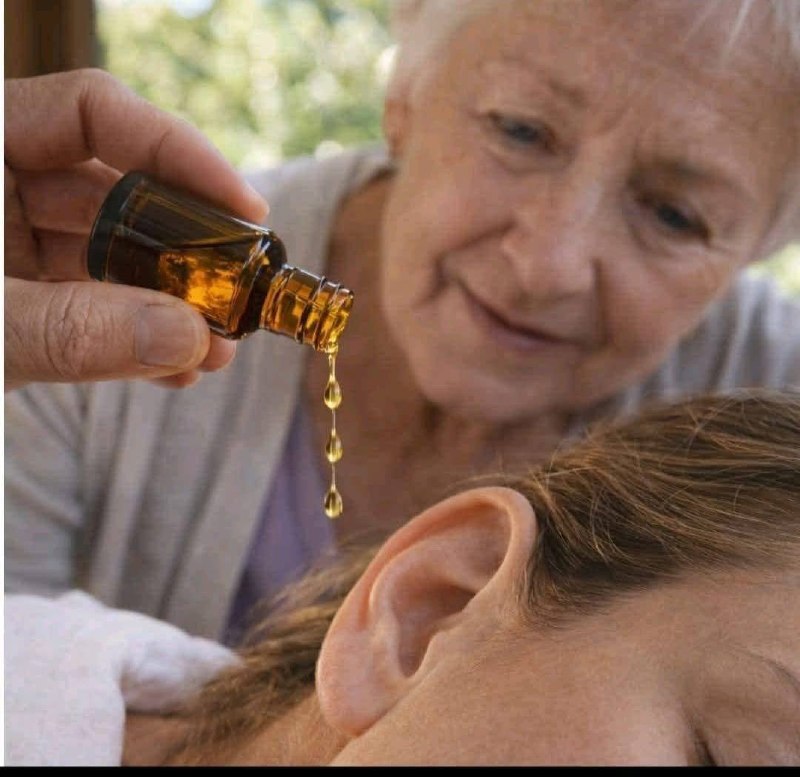
- Prepare the Oil: Ensure your chosen oil (olive oil, mineral oil, or baby oil) is at body temperature. You can do this by placing the sealed bottle in a bowl of warm water for a few minutes. Test a drop on your wrist to ensure it’s not too hot. Never use cold oil, as it can cause dizziness.
- Position Yourself: Lie down on your side with the affected ear facing upwards. Alternatively, you can tilt your head significantly to the side, ensuring the ear canal is accessible.
- Administer the Oil: Using a clean dropper or ear syringe, carefully place 1-2 drops of the warmed oil directly into your ear canal. Avoid inserting the dropper too deeply into the ear.
- Allow Time for Absorption: Remain in the tilted position for 5-10 minutes. This allows the oil to fully penetrate and soften the earwax. You might feel a bubbling or crackling sensation, which is normal as the oil works.
- Optional Cotton Ball: If you’re concerned about oil dripping out, you can loosely place a small cotton ball just inside the outer ear opening. Do not push it into the ear canal.
- Drain Excess Oil: After 5-10 minutes, tilt your head to the opposite side over a sink or basin to allow any excess oil to drain out. Gently wipe the outer ear with a soft towel. Do not insert anything into the ear canal to dry it.
- Repeat as Necessary: For effective earwax softening, this process usually needs to be repeated 1-2 times a day for several days (typically 3-5 days). Consistency is key.
- Gentle Rinsing (Optional, for softened wax): After several days of oil treatment, if the earwax is significantly softened but not fully dislodged, you may gently rinse the ear. Fill a clean, soft rubber bulb syringe (specifically designed for ear rinsing, not the dropper) with warm water. Tilt your head over a sink, and gently squirt the warm water into the ear canal. Tilt your head to the side to allow the water and softened wax to drain out. Repeat a few times.
- Dry the Ear: After rinsing, gently dry the outer ear with a soft towel. You can also use a hairdryer on the lowest, coolest setting, held at a distance, to help dry the ear canal.
- Avoid Cotton Swabs: Throughout this process and generally, avoid using cotton swabs or any other objects to clean inside your ear canal. This can push the wax further in, making the problem worse and potentially damaging your eardrum.
Cooking Tips and Variations
While we’re not “cooking” in the traditional sense, these “tips and variations” apply to the process of earwax management:
- Consistency is Key: Don’t expect immediate results. Earwax softening takes time. Stick to the recommended 3-5 days of oil treatment for best outcomes.
- Temperature Matters: Always ensure the oil is at body temperature. Cold oil can cause uncomfortable dizziness or vertigo. Test it on your wrist first.
- Choose the Right Oil: Medical-grade olive oil, mineral oil, or baby oil are generally safe and effective. Avoid essential oils or other untested substances, as they can irritate the delicate ear canal.
- Patience with Rinsing: If you opt for gentle rinsing after oil treatment, ensure the wax is significantly softened. Use a soft rubber bulb syringe designed for ears and warm, not hot, water. Gentle pressure is paramount; never forceful.
- Consider Commercial Drops: If natural oils aren’t preferred, over-the-counter earwax softening drops are available. These often contain carbamide peroxide, which releases oxygen to break down wax. Follow the product’s instructions carefully.
- Professional Cleaning: For stubborn or severely impacted earwax, or if home remedies don’t work, professional cleaning by a doctor or audiologist is the safest and most effective option. They have specialized tools and techniques to remove wax safely.
- Prevention Through Routine: If you’re prone to buildup, a weekly or bi-weekly application of a single drop of oil can help keep wax soft and prevent impaction.
Storage and Reheating
For earwax management, “storage and reheating” pertains to the oil itself and maintaining ear health:
- Oil Storage: Store your chosen oil (olive oil, mineral oil, baby oil) in its original, sealed container in a cool, dark place, away from direct sunlight and heat. This helps maintain its stability and prevents degradation. Do not store opened oil for extended periods if it’s not specifically designed for medical use.
- Dropper/Syringe Hygiene: Always clean your dropper or ear syringe thoroughly with warm, soapy water after each use and allow it to air dry completely before storing. This prevents the introduction of bacteria into your ear canal.
- No “Reheating” of Earwax: You should never attempt to “reheat” or melt earwax inside your ear using any form of heat. This can cause severe burns and damage to the eardrum and inner ear structures.
- Consistent Ear Hygiene: Regular, gentle cleaning of the outer ear with a soft cloth is sufficient for most people. Avoid internal cleaning with cotton swabs. If you are prone to earwax buildup, a consistent schedule of oil application (e.g., once a week) as a preventative measure can be beneficial.
- Professional Check-ups: If you frequently experience earwax buildup or discomfort, schedule regular check-ups with your doctor. They can monitor your ear health and recommend appropriate strategies for prevention and removal.
Frequently Asked Questions
Why does earwax buildup happen?
Earwax buildup occurs for several reasons. Some individuals naturally produce more earwax than others. The shape of the ear canal can also play a role, with narrower or more winding canals being more prone to blockage. A common culprit is the improper use of cotton swabs or other objects, which don’t remove earwax but instead push it deeper into the ear canal, compacting it against the eardrum. Other factors can include wearing hearing aids or earplugs frequently, as these can prevent the natural migration of wax out of the ear, and sometimes, the glands simply produce dryer, harder wax that doesn’t clear easily.
What are the symptoms of impacted earwax?
Impacted earwax can manifest in various ways. The most common symptom is a feeling of fullness or blockage in the ear, often accompanied by a temporary or partial hearing loss in the affected ear. Other symptoms can include an earache or discomfort, ringing in the ear (tinnitus), or a sensation of itching. In some cases, impacted earwax can lead to dizziness or vertigo, and even a cough due to irritation of a nerve that also innervates the ear canal. If you experience any of these symptoms, it’s important to address the earwax buildup.
Is it safe to use olive oil for earwax removal?
Yes, using medical-grade olive oil (or mineral oil or baby oil) at body temperature is generally considered a safe and effective home remedy for softening earwax. The oil helps to lubricate and break down the hardened wax, making it easier for the ear’s natural cleaning mechanisms to remove it, or preparing it for gentle rinsing. However, it’s crucial to ensure the oil is at body temperature to avoid discomfort or dizziness. Always use a clean dropper and avoid inserting anything deep into the ear canal. If you have a perforated eardrum, ear infection, or ear tubes, you should not use ear drops or attempt home remedies without consulting a doctor.
When should I see a doctor for earwax buildup?
You should see a doctor if home remedies are ineffective after several days, if you experience sudden or severe earache, hearing loss, dizziness, or discharge from the ear. These symptoms could indicate an ear infection, a perforated eardrum, or another underlying condition that requires professional medical attention. Additionally, if you have a history of ear problems, diabetes, or a compromised immune system, it’s always best to consult a healthcare professional before attempting any home earwax removal methods. A doctor or audiologist can safely and effectively remove impacted earwax using specialized tools and techniques, preventing potential damage to your ear.