
Introduction
Prepare to fall in love with the ultimate no-bake dessert that’s as elegant as it is effortless: our Creamy Chocolate Biscuit Dessert! This delightful treat combines layers of tender, coffee-soaked biscuits with a rich, velvety chocolate cream, creating a symphony of textures and flavors that will tantalize your taste buds. It’s the perfect solution for satisfying your sweet tooth without ever having to turn on the oven, making it an ideal dessert for any occasion, from casual family dinners to sophisticated gatherings.
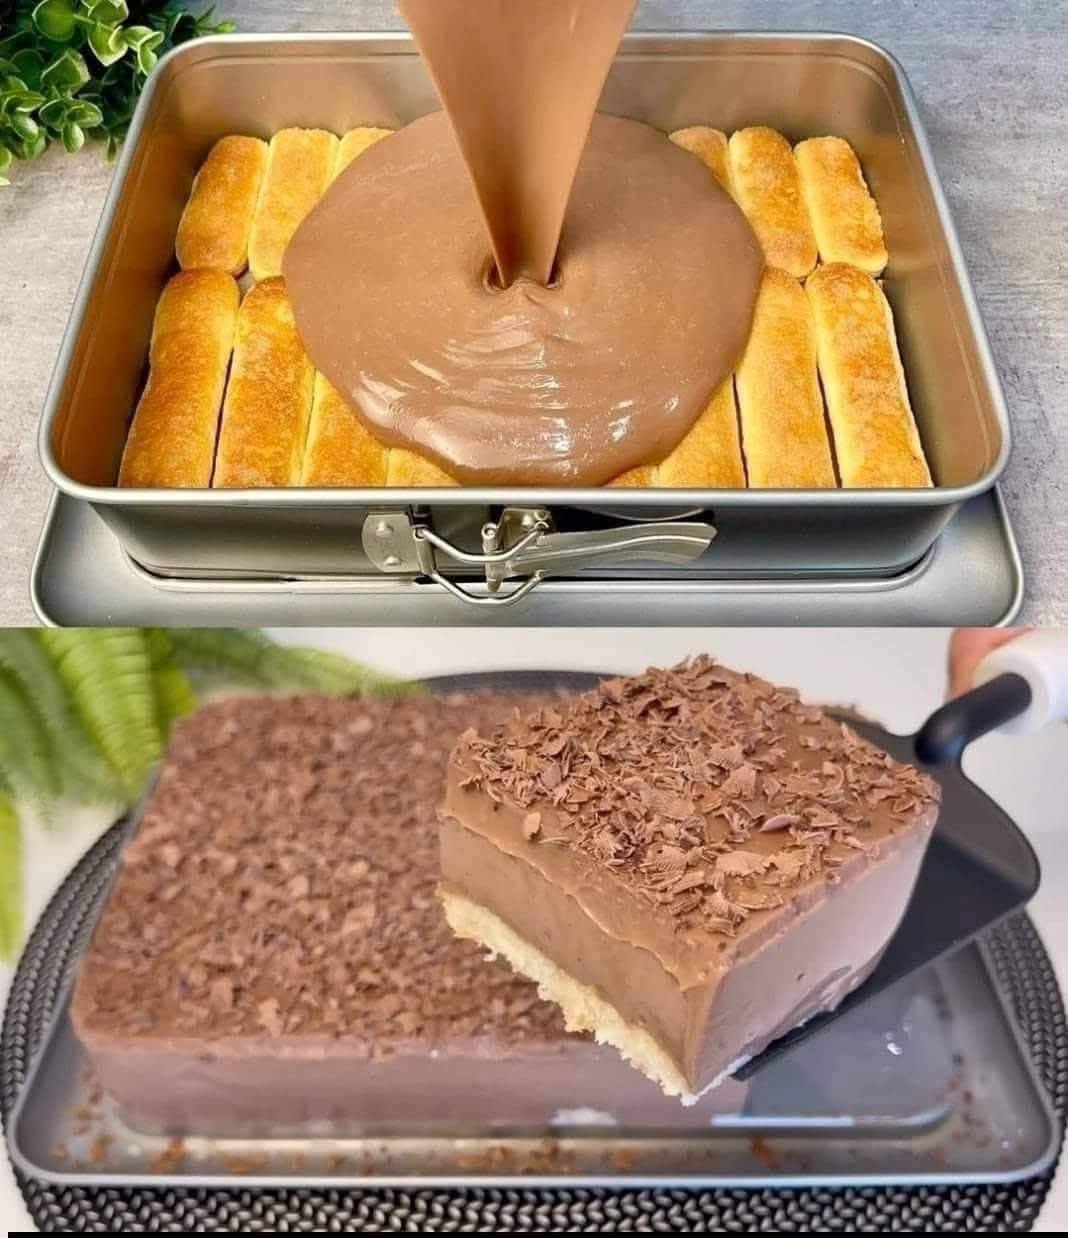
What makes this dessert truly special is its incredible creaminess, which melts in your mouth, perfectly complementing the subtle chewiness of the biscuits. The beauty of this recipe lies in its simplicity; with just a few key ingredients and minimal effort, you can create a show-stopping dessert that looks like it came straight from a gourmet patisserie. Its layered appearance, often adorned with delicate chocolate shavings, makes it a feast for the eyes before it even touches your tongue.
This Creamy Chocolate Biscuit Dessert isn’t just easy to make; it’s also incredibly versatile. Whether you’re a seasoned baker or a kitchen novice, you’ll find the process straightforward and rewarding. The combination of its appealing look, luxurious texture, and rich chocolate flavor ensures it will be a crowd-pleaser every single time. Get ready to impress your friends and family with this irresistible, no-fuss dessert that’s guaranteed to become a cherished addition to your recipe repertoire.
Nutritional Information
Per serving (approximate values):
- Calories: 450
- Protein: 7g
- Carbohydrates: 55g
- Fat: 25g
- Fiber: 3g
- Sodium: 200mg
Ingredients
- 200g (about 30-35) Ladyfinger biscuits (or similar plain, firm biscuits like digestive biscuits)
- 250ml strong brewed coffee, cooled (for soaking biscuits)
- 500ml heavy cream (also known as whipping cream), chilled
- 200g good quality dark chocolate (60-70% cocoa solids), finely chopped
- 50g granulated sugar (adjust to taste, depending on chocolate sweetness)
- 1 teaspoon vanilla extract
- 2 tablespoons unsweetened cocoa powder, for dusting (optional)
- 50g chocolate shavings or curls, for garnish (optional)
Instructions
- Prepare the Chocolate Cream: In a heatproof bowl, combine the finely chopped dark chocolate.
- Heat 100ml of the heavy cream in a small saucepan over medium heat until it just begins to simmer around the edges. Do not boil.
- Pour the hot cream over the chopped chocolate. Let it sit undisturbed for 2-3 minutes to allow the chocolate to melt.
- Whisk the chocolate and cream mixture gently until smooth and glossy. This is your ganache. Set aside to cool completely to room temperature, stirring occasionally to prevent a skin from forming. It’s crucial for it to be cool before mixing with whipped cream.
- In a large mixing bowl, combine the remaining 400ml of chilled heavy cream, granulated sugar, and vanilla extract.
- Using an electric mixer, beat the cream mixture on medium-high speed until stiff peaks form. Be careful not to overbeat, or it will turn grainy.
- Once the ganache is completely cool, gently fold it into the whipped cream in three additions. Use a spatula to fold, being careful not to deflate the cream. Mix until just combined and uniformly chocolatey. This is your creamy chocolate filling.
- Prepare the Biscuits: Pour the cooled strong brewed coffee into a shallow dish.
- Quickly dip each Ladyfinger biscuit into the coffee, one at a time, for just 1-2 seconds per side. Do not over-soak, or the biscuits will become soggy. You want them just moist enough to absorb flavor without falling apart.
- Assemble the Dessert: Choose a serving dish, ideally a rectangular or square glass dish (approximately 8×8 inch or similar).
- Arrange a single layer of the coffee-soaked biscuits at the bottom of the dish, breaking some to fit if necessary to cover the entire base.
- Spread approximately one-third of the creamy chocolate filling evenly over the biscuit layer.
- Repeat the layering process: add another layer of coffee-soaked biscuits, followed by another third of the chocolate cream.
- Finish with a final layer of coffee-soaked biscuits, and then spread the remaining chocolate cream evenly over the top.
- Chill the Dessert: Cover the dish tightly with plastic wrap.
- Refrigerate for at least 4-6 hours, or preferably overnight, to allow the dessert to set completely and the flavors to meld. This chilling time is essential for the dessert to firm up and become sliceable.
- Garnish and Serve: Before serving, if desired, dust the top with a light layer of unsweetened cocoa powder using a fine-mesh sieve.
- Garnish with chocolate shavings or curls for an elegant finish.
- Slice and serve chilled. Enjoy your homemade creamy chocolate biscuit dessert!
Cooking Tips and Variations
Tips for Best Results:
- Chocolate Quality Matters: For the best flavor, use high-quality dark chocolate (60-70% cocoa solids) for the ganache. The better the chocolate, the richer and more decadent your dessert will taste.
- Don’t Over-Soak Biscuits: This is crucial! Ladyfingers are very absorbent. A quick dip (1-2 seconds per side) is all you need. Over-soaked biscuits will make your dessert watery and mushy. If using a denser biscuit like a digestive, you might need a slightly longer dip.
- Cool the Ganache Completely: Ensure your chocolate ganache is at room temperature or even slightly cool to the touch before folding it into the whipped cream. If it’s warm, it will melt the whipped cream, resulting in a runny filling.
- Whip Cream to Stiff Peaks: Beat your heavy cream until it forms stiff peaks. This provides the structure for your creamy filling. However, be careful not to overbeat, as it can quickly turn into butter.
- Gentle Folding: When combining the ganache and whipped cream, use a gentle folding motion with a spatula. This helps maintain the airiness of the whipped cream, contributing to the dessert’s light and creamy texture.
- Adequate Chilling Time: Do not rush the chilling process. At least 4-6 hours, or ideally overnight, is necessary for the dessert to set properly, allowing the biscuits to soften and the cream to firm up. This makes for clean slices and a more enjoyable texture.
- Even Layers: Try to spread the chocolate cream evenly between biscuit layers. This ensures a balanced flavor and appealing presentation.
Recipe Variations:
- Biscuit Choices: While Ladyfingers are traditional, you can experiment with other plain, firm biscuits. Digestive biscuits, rich tea biscuits, or even graham crackers can work well, though they might require a slightly longer soak.
- Flavorful Coffee: Enhance the coffee’s flavor by adding a splash of coffee liqueur (like Kahlúa or Tia Maria) to the brewed coffee for a boozy kick.
- Cream Flavorings:
- Mint Chocolate: Add 1/2 teaspoon of pure peppermint extract to the chocolate cream for a refreshing twist.
- Orange Chocolate: Incorporate 1 teaspoon of orange zest or a few drops of orange extract for a citrusy note.
- Nutty Delight: Fold in 1/2 cup of finely chopped toasted nuts (like almonds, walnuts, or hazelnuts) into the chocolate cream for added texture and flavor.
- Espresso Boost: Add 1-2 teaspoons of instant espresso powder to the heavy cream before whipping for an intensified coffee-chocolate flavor.
- Different Chocolates: Experiment with milk chocolate for a sweeter, milder flavor, or a higher percentage dark chocolate for a more intense, less sweet dessert. You could even use a mix of dark and milk chocolate.
- Topping Ideas:
- Fresh Berries: Garnish with fresh raspberries or strawberries for a bright contrast in flavor and color.
- Whipped Cream: A dollop of plain whipped cream on top of each slice before serving can add an extra layer of indulgence.
- Chocolate Sauce Drizzle: A drizzle of homemade or store-bought chocolate sauce can elevate the presentation.
- Coconut Flakes: Toasted coconut flakes can add a tropical twist and pleasant chewiness.
- Individual Servings: Instead of a large dish, assemble the dessert in individual ramekins or small glasses for elegant single-serving portions.
Storage and Reheating
Storage Instructions:
- Refrigeration: This Creamy Chocolate Biscuit Dessert must be stored in the refrigerator. Cover the dish tightly with plastic wrap or aluminum foil to prevent it from absorbing odors from other foods in the fridge and to keep the dessert from drying out.
- Shelf Life: When properly stored, the dessert will remain fresh and delicious for up to 3-4 days in the refrigerator. The biscuits will continue to soften and absorb the flavors of the cream over time, often tasting even better on the second day.
- Freezing: While technically possible, freezing this dessert is not recommended. The texture of the cream can become icy and separate upon thawing, and the biscuits may become excessively soggy. It’s best enjoyed fresh and chilled from the refrigerator.
Reheating Instructions:
- This is a no-bake, chilled dessert, so it should not be reheated. It is meant to be served cold directly from the refrigerator. Reheating would cause the creamy filling to melt and the overall structure of the dessert to collapse, ruining its delicate texture.
- Simply remove it from the refrigerator about 10-15 minutes before serving to allow it to slightly come to temperature, which can enhance its flavors and make it a little less firm. However, it should still be served cold.
Frequently Asked Questions
Can I make this dessert ahead of time?
Absolutely! This dessert is actually best made ahead of time. It requires at least 4-6 hours of chilling to set properly, but chilling it overnight (12+ hours) allows the flavors to meld beautifully and the biscuits to fully soften, resulting in a superior texture and taste. It’s a perfect make-ahead option for parties or gatherings.
What kind of biscuits are best for this recipe?
Ladyfinger biscuits (savoiardi) are traditionally used and highly recommended due to their porous texture, which perfectly absorbs the coffee without becoming overly soggy. However, other plain, firm biscuits like digestive biscuits, rich tea biscuits, or even graham crackers can be used. Just be mindful that denser biscuits might require a slightly longer dip in the coffee, while more delicate ones still need a quick dip.
My chocolate cream is too runny. What went wrong?
There are a few common reasons for a runny chocolate cream. The most likely culprit is that the chocolate ganache was not completely cooled before being folded into the whipped cream. If the ganache is warm, it will melt the whipped cream, causing the mixture to thin out. Another reason could be under-whipping the heavy cream; it needs to be beaten to stiff peaks to provide enough structure. For a quick fix, you can try refrigerating the runny cream mixture for 20-30 minutes, then re-whipping it briefly until it thickens. If it’s still too runny, you might need to add a bit more whipped cream (whipped separately) and gently fold it in.