
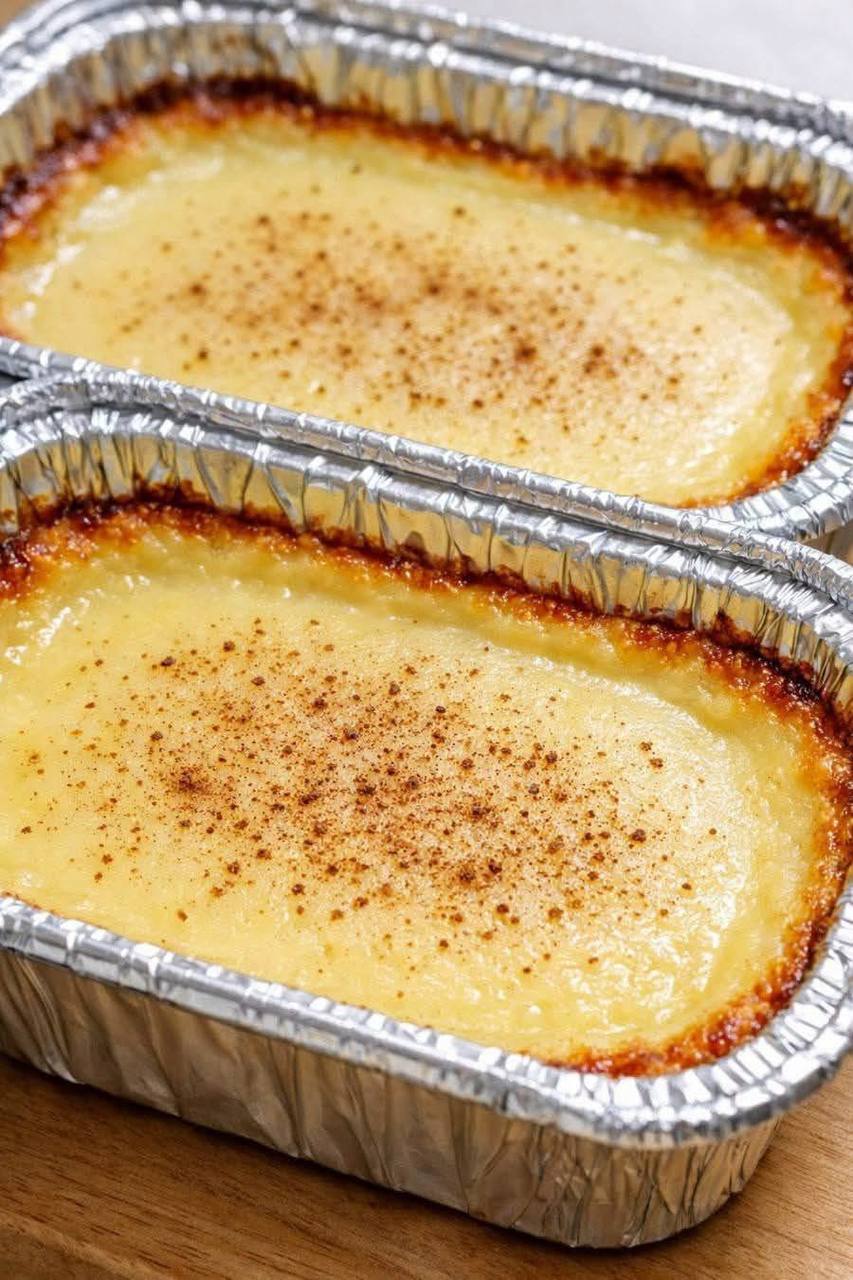
Baked milk custard is a timeless dessert that embodies simplicity and comfort in every creamy spoonful. This classic treat, often cherished for its nostalgic appeal, delivers a subtly sweet and deeply satisfying experience. Imagine a silky-smooth texture, a delicate milky flavor, and a beautifully golden-brown top, often kissed with a hint of warming spice. It’s a dessert that speaks to the soul, promising a moment of pure bliss with every bite.
What makes baked milk custard so popular is its understated elegance and incredible versatility. It’s a humble dish, yet it can feel incredibly luxurious. The magic lies in its basic ingredients—milk, eggs, sugar, and a touch of vanilla—transformed through the gentle art of baking into something truly extraordinary. It’s a go-to for home cooks looking for an easy-to-make dessert that consistently delivers on flavor and texture, impressing guests without requiring hours of complicated preparation.
Beyond its ease and deliciousness, baked milk custard holds a special place in many cultures worldwide, appearing in various forms from flan to crème brûlée. Our version focuses on the pure, unadulterated essence of a classic milk custard, baked to perfection. The gentle heat of a water bath ensures an incredibly smooth and tender consistency, preventing the eggs from overcooking and curdling. The result is a dessert that is both comforting and sophisticated, perfect for a cozy evening at home or as an elegant finish to a dinner party.
Nutritional Information
Per serving (approximate values, based on 6 servings):
- Calories: 220
- Protein: 8g
- Carbohydrates: 25g
- Fat: 10g
- Fiber: 0g
- Sodium: 100mg
Ingredients
- 4 large eggs
- 1/2 cup granulated sugar, plus 1 tablespoon for sprinkling (optional)
- 2 cups whole milk
- 1 teaspoon vanilla extract
- 1/4 teaspoon salt
- 1/4 teaspoon ground nutmeg or cinnamon, for sprinkling
- Boiling water, for the water bath
Instructions
- Preheat Oven and Prepare Baking Dish: Preheat your oven to 325°F (160°C). Choose a baking dish or individual ramekins (about 6-ounce capacity) that will fit inside a larger roasting pan. If using a single baking dish, an 8×8 inch square or a 9-inch round dish works well. Lightly grease the baking dish(es) if desired, although foil containers often don’t require it.
- Whisk Eggs and Sugar: In a medium-sized bowl, whisk the eggs and 1/2 cup granulated sugar together until well combined and slightly frothy, about 1-2 minutes. The sugar should be mostly dissolved, and the mixture should be pale yellow.
- Heat Milk: In a small saucepan, gently heat the whole milk over medium heat until it’s steamy and small bubbles form around the edges, but do not let it boil. This should take about 3-5 minutes. Heating the milk helps dissolve the sugar and ensures a smoother custard.
- Temper the Eggs: Gradually pour the warm milk into the egg mixture while continuously whisking. This process, called tempering, prevents the eggs from scrambling. Pour slowly at first, then more steadily once about half the milk has been incorporated. Continue whisking until the mixture is smooth.
- Add Vanilla and Salt: Stir in the vanilla extract and salt.
- Strain the Custard Mixture: For an extra smooth custard, pour the mixture through a fine-mesh sieve into a clean bowl or directly into your prepared baking dish(es). This removes any chalazae (the white stringy bits in eggs) or bits of cooked egg, ensuring a silky texture.
- Prepare Water Bath (Bain-Marie): Place your custard-filled baking dish(es) inside the larger roasting pan. Carefully pour boiling water into the roasting pan, ensuring the water comes up about halfway to two-thirds of the way up the sides of the custard dish(es). The water bath is crucial for even, gentle cooking, preventing the custard from curdling or cracking.
- Bake the Custard: Carefully transfer the roasting pan with the custard and water bath to the preheated oven. Bake for 45-60 minutes for a single large dish, or 30-40 minutes for individual ramekins. The custard is done when the edges are set, but the center still has a slight jiggle when gently shaken. An inserted knife near the center should come out clean.
- Cool and Chill: Once baked, carefully remove the roasting pan from the oven. Let the custard cool in the water bath for about 15-20 minutes. Then, carefully remove the custard dish(es) from the water bath and let them cool completely on a wire rack at room temperature.
- Refrigerate and Serve: Once completely cooled, cover the custard(s) with plastic wrap and refrigerate for at least 2-4 hours, or preferably overnight, to allow them to fully set and chill.
- Garnish and Serve: Just before serving, sprinkle the tops with the remaining 1 tablespoon of granulated sugar (if using) and the ground nutmeg or cinnamon. The sugar will add a slight textural contrast and a subtle sweetness.
Cooking Tips and Variations
Achieving a Silky Smooth Texture: The key to a perfect baked custard is a delicate touch. Always temper your eggs by slowly adding warm milk, whisking constantly. Straining the custard mixture through a fine-mesh sieve before baking is a non-negotiable step for eliminating any lumps or cooked egg bits, resulting in an incredibly smooth and luxurious texture. Avoid over-baking, as this can lead to a rubbery or curdled custard.
The Importance of the Water Bath: Baking in a bain-marie (water bath) is paramount for baked custards. The water bath provides gentle, even heat, which prevents the edges from overcooking before the center is set. It also helps to prevent cracking on the surface. Ensure the water in the bath is hot (boiling or very hot tap water) when you place it in the oven. The water level should come at least halfway up the sides of your custard dishes.
Checking for Doneness: Don’t rely solely on baking time, as oven temperatures can vary. To check for doneness, gently jiggle the custard dish. The edges should be set, but the very center should still have a slight wobble, like unset gelatin. A thin knife inserted about an inch from the edge should come out clean. Over-baking will result in a tough texture.
Preventing Cracks: Rapid temperature changes can cause cracks. After baking, allow the custard to cool in the water bath for about 15-20 minutes before carefully removing it. Then, let it cool completely at room temperature before refrigerating. This gradual cooling process helps prevent surface cracks.
Flavor Variations: While classic vanilla and nutmeg/cinnamon are delightful, feel free to experiment.
- Citrus Zest: Add 1 teaspoon of finely grated lemon or orange zest to the milk as it heats for a bright, refreshing note.
- Spices: Try a pinch of cardamom, star anise, or even a tiny amount of ground ginger for different aromatic profiles.
- Chocolate: Melt 2-3 ounces of good quality dark chocolate into the warm milk for a rich chocolate custard.
- Coffee: Dissolve 1-2 teaspoons of instant espresso powder in the warm milk for a coffee-flavored custard.
- Caramel Base: For a classic crème caramel, pour a thin layer of homemade caramel into the bottom of your ramekins before adding the custard mixture.
Serving Suggestions: Baked milk custard is wonderful on its own, but you can elevate it with simple accompaniments.
- Fresh Berries: A scattering of fresh raspberries, blueberries, or sliced strawberries adds a pop of color and tartness.
- Caramel Sauce: A drizzle of warm caramel sauce enhances the sweetness.
- Whipped Cream: A dollop of lightly sweetened whipped cream provides a luxurious finish.
- Toasted Nuts: A sprinkle of toasted slivered almonds or chopped pecans adds a delightful crunch.
Storage and Reheating
Storage: Baked milk custard should always be stored in the refrigerator. Once completely cooled, cover the custard dish(es) tightly with plastic wrap to prevent them from absorbing odors from the fridge and to keep them from drying out. Properly stored, baked milk custard will last for 3-4 days in the refrigerator. It’s best enjoyed chilled, as the flavors and textures fully develop when cold.
Reheating: While baked milk custard is traditionally served chilled, some people prefer it slightly warm. To gently warm the custard, you can do the following:
- Oven Method: Place individual ramekins or slices of custard on a baking sheet. Loosely cover with foil to prevent drying. Heat in a preheated oven at 250°F (120°C) for about 10-15 minutes, or until just warmed through. Be careful not to overheat, as this can cause the custard to curdle.
- Microwave Method (Use with Caution): If reheating individual servings, you can use a microwave on a low power setting (e.g., 50%) for very short intervals (15-30 seconds) until just slightly warm. Microwaving can easily overcook and ruin the texture of custard, so proceed with extreme caution and check frequently.
Generally, baked milk custard is at its best when served cold, allowing its delicate flavors and smooth texture to truly shine.
Frequently Asked Questions
Why did my custard turn out watery or separated?
A watery or separated custard often indicates that it was either undercooked or overcooked. If it’s watery, it likely didn’t set enough in the oven. If it’s separated, with liquid weeping from the custard, it was probably overcooked, causing the proteins to tighten and expel moisture. Always use a water bath, check for the slight jiggle in the center, and avoid baking at too high a temperature to prevent these issues.
Can I use skim milk or low-fat milk for this recipe?
While you can technically use skim or low-fat milk, it’s highly recommended to use whole milk for baked custards. Whole milk provides the necessary fat content to create a rich, creamy, and smooth texture. Using lower-fat milk can result in a thinner, less luxurious custard with a higher risk of a rubbery or watery consistency.
Why did my custard crack on top?
Cracks on the surface of a baked custard are usually caused by rapid cooling or over-baking. When a custard cools too quickly, the surface contracts faster than the interior, leading to cracks. To prevent this, allow the custard to cool gradually in the water bath for 15-20 minutes after baking before removing it to a wire rack to cool completely at room temperature. Also, ensure you don’t over-bake, as this can dry out the surface and make it more prone to cracking.