
Introduction
Spring has a way of stirring up old traditions, doesn’t it? For my family, the arrival of warmer weather and longer days signals one very specific culinary event: my dad’s annual demand for his favorite glazed ham. It’s not Easter, it’s not Christmas – it’s simply “Spring Sunday Ham,” a dish so iconic in our household that the season feels incomplete without it. This isn’t some complicated, gourmet affair with a dozen obscure ingredients. No, this is the kind of recipe that makes you wonder how something so simple can taste so incredibly good. We’re talking about a show-stopping centerpiece that comes together with just three humble ingredients, yet delivers a sweet, savory, and perfectly caramelized crust that will have everyone asking for seconds.
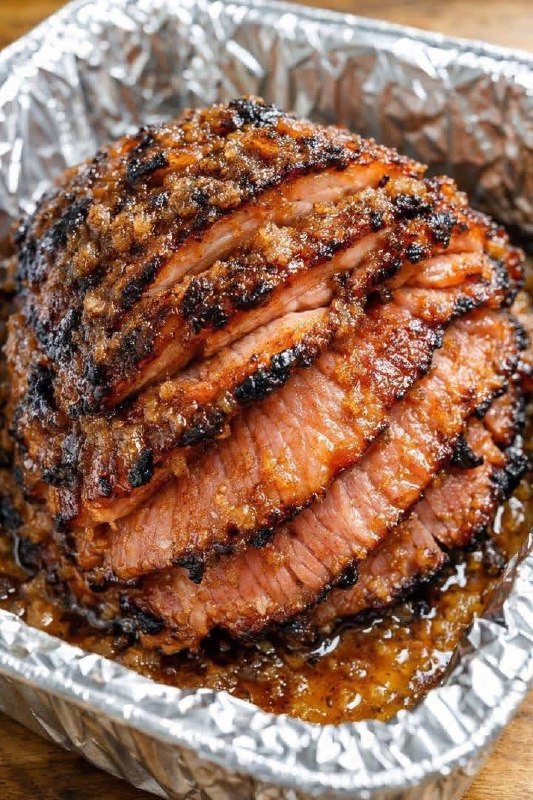
Imagine a perfectly cooked, tender ham, glistening with a rich, dark glaze that crackles with hints of burnt sugar. Each spiral slice is infused with an irresistible sweetness, balanced by the inherent savoriness of the ham. It’s the kind of meal that fills the house with an aroma that instantly brings a smile to your face, promising comfort and deliciousness. This recipe isn’t just easy; it’s foolproof, designed for anyone who wants to impress without spending hours slaving over a hot stove. Whether you’re a seasoned chef or a kitchen novice, you can master this three-ingredient wonder and bring a taste of springtime bliss to your own table. My dad, a man of simple pleasures but discerning taste, absolutely insists on this ham every year, and once you try it, you’ll understand exactly why.
The magic of this Spring Sunday Ham lies in its incredible simplicity and the way those three ingredients transform into something truly extraordinary. It’s a testament to the idea that sometimes, less truly is more. This recipe is perfect for those leisurely Sunday dinners, a casual gathering with friends, or even as a surprisingly easy holiday meal. The minimal effort belies the profound depth of flavor it achieves, making it a true culinary gem. Get ready to add a new, beloved tradition to your spring repertoire – one that’s guaranteed to become a family favorite, just like it is in ours.
Nutritional Information
Per serving (approximate values):
- Calories: 350
- Protein: 30g
- Carbohydrates: 25g
- Fat: 15g
- Fiber: 0g
- Sodium: 1200mg
Ingredients
- 1 (8-10 pound) fully cooked spiral-sliced ham (bone-in recommended)
- 2 cups packed light brown sugar
- 1 (20 ounce) can crushed pineapple in juice, undrained (or pineapple juice)
Instructions
- Preheat your oven to 325°F (160°C). If your ham comes with a small plastic button or moisture packet, remove it.
- Place the spiral-sliced ham, cut-side down, into a large disposable aluminum roasting pan. This makes cleanup incredibly easy, especially with the sticky glaze.
- In a medium bowl, combine the packed light brown sugar and the undrained crushed pineapple. Stir well until a thick, gooey paste forms. The pineapple juice will help dissolve the sugar and create a luscious glaze. If you’re using just pineapple juice, whisk it with the brown sugar until smooth.
- Generously spread the brown sugar and pineapple mixture evenly over the entire surface of the ham, making sure to work some of it down into the spiral slices. Don’t be shy; you want a thick layer for that incredible caramelized crust.
- Cover the roasting pan tightly with aluminum foil. This helps to keep the ham moist and allows it to heat through gently.
- Bake the ham in the preheated oven for 1 hour and 30 minutes to 2 hours, or until the internal temperature reaches 140°F (60°C). Since the ham is already fully cooked, you are essentially just heating it through and allowing the glaze to melt into the ham.
- After 1 hour and 30 minutes, remove the foil from the ham. Increase the oven temperature to 375°F (190°C).
- Continue baking uncovered for another 30-45 minutes, or until the glaze is beautifully caramelized, bubbly, and a deep golden-brown with some delightfully dark, sticky patches. Keep a close eye on it during this stage to prevent burning, but don’t be afraid of a little char; that’s where the magic happens! You can baste the ham occasionally with the pan juices during this time to enhance the glaze.
- Once the ham has reached its desired internal temperature and the glaze is perfectly caramelized, remove the ham from the oven.
- Tent the ham loosely with aluminum foil and let it rest for 15-20 minutes before serving. This crucial step allows the juices to redistribute throughout the ham, ensuring every slice is tender and moist.
- To serve, simply use a sharp knife to follow the pre-cut spiral slices. Spoon any extra glaze from the bottom of the pan over the slices before serving.
Cooking Tips and Variations
Achieving that perfect, sticky, caramelized crust is the hallmark of this ham, and it’s surprisingly easy. The key is the high heat at the end of the cooking process. Don’t be afraid to let the glaze get nice and dark; those slightly charred bits are packed with flavor. If your ham seems to be browning too quickly during the uncovered stage, you can loosely tent it with foil again, or reduce the oven temperature slightly. For an even more intense caramelization, you can briefly place the ham under the broiler for the last 5-10 minutes, but watch it like a hawk, as sugar can go from perfectly caramelized to burnt in seconds.
While this recipe shines in its simplicity, there are a few ways to customize it if you’re feeling adventurous (though my dad would argue it’s perfect as is!). For a spicier kick, you could add 1 teaspoon of ground mustard or a pinch of cayenne pepper to your brown sugar and pineapple mixture. If you love warm spices, a dash of ground cloves, cinnamon, or nutmeg would complement the sweetness beautifully. A tablespoon of apple cider vinegar added to the glaze can also provide a subtle tang that balances the sweetness. Some people also like to stud the ham with whole cloves before adding the glaze for a traditional touch and aromatic boost. However, remember that adding these extras pushes it beyond the “3-ingredient” claim, but they are great options for those who want to experiment.
When it comes to serving, this glazed ham is incredibly versatile. It’s the star of any plate, but it pairs wonderfully with classic spring side dishes. Think roasted asparagus with lemon, creamy mashed potatoes, a vibrant green bean casserole, or a fresh spring salad. For a touch of sweetness, consider serving it alongside baked apples or a homemade applesauce. Don’t forget some warm dinner rolls to soak up any extra glaze!
Storage and Reheating
Leftover ham is one of life’s true culinary gifts, and this glazed ham is no exception. To store, first allow the ham to cool completely to room temperature. Then, transfer any remaining ham slices or chunks (and any extra glaze) to an airtight container. It will keep beautifully in the refrigerator for 3 to 5 days. For longer storage, you can freeze cooked ham. Place slices or diced ham in freezer-safe bags or containers, removing as much air as possible. It can be frozen for up to 2-3 months. Thaw frozen ham overnight in the refrigerator before reheating.
Reheating this glazed ham is simple. For individual portions, you can gently warm slices in the microwave until heated through, though this can sometimes make the ham a little dry. For best results, especially if reheating a larger portion, place the ham slices or chunks in an oven-safe dish with a splash of water or chicken broth to help retain moisture. Cover the dish tightly with foil and reheat in a preheated oven at 300°F (150°C) for about 15-20 minutes, or until warmed through. Alternatively, for smaller amounts, you can reheat in a skillet over low-medium heat with a little liquid until warm. Avoid high heat when reheating, as it can dry out the ham.
Frequently Asked Questions
Can I use a bone-in or boneless ham for this recipe?
While a bone-in spiral-sliced ham is recommended for the best flavor and moisture, you can certainly use a boneless spiral-sliced ham. The cooking time might be slightly shorter for a boneless ham, so always rely on a meat thermometer to ensure it reaches 140°F (60°C).
My ham came with its own glaze packet. Should I use it?
You can, but for this specific 3-ingredient recipe, you’ll want to skip the packet and use our brown sugar and pineapple glaze instead. The beauty of this recipe is its simplicity and the unique flavor profile the brown sugar and pineapple create. If you’re curious about the packet, save it for another ham!
What if I don’t have crushed pineapple? Can I use pineapple juice?
Yes, absolutely! While crushed pineapple adds a little texture to the glaze, pure pineapple juice works just as well. You’ll use the same amount (20 ounces) and mix it with the brown sugar to create your glaze. The flavor will be equally delicious.
How do I know when the ham is fully heated and the glaze is perfect?
For the ham itself, use a meat thermometer inserted into the thickest part (avoiding the bone) to ensure it reaches 140°F (60°C). For the glaze, you’re looking for a deep, rich caramel color, with visible bubbling and some slightly darker, almost burnt-sugar spots. It should look sticky and thick, not watery. Trust your eyes and nose; the aroma will be incredible when it’s just right!