
Introduction
There are some desserts that just feel like home, and banana pudding is undoubtedly one of them. This beloved classic, with its creamy texture, sweet bananas, and tender vanilla wafers, has graced countless family gatherings, potlucks, and Sunday dinners. It’s a dish that evokes comfort and nostalgia with every spoonful, a true testament to simple ingredients coming together to create something truly magical. While the traditional large-format banana pudding is always a crowd-pleaser, sometimes you need something a little more personal, a little more portable, and a lot more convenient.
That’s where these delightful Banana Pudding Cups come in! We’re taking all the heartwarming goodness of classic banana pudding and transforming it into individual, perfectly portioned cups. This recipe is designed for speed and ease, making it an ideal choice for a last-minute dessert, a fun party treat, or simply a sweet indulgence for yourself. Using instant pudding mix streamlines the process without sacrificing flavor, ensuring you get that rich, creamy pudding texture in no time. Plus, serving them in individual cups makes them incredibly versatile – no-fuss for guests, easy to transport, and utterly charming to look at with their distinct layers.
Whether you’re hosting a backyard barbecue, looking for a simple yet impressive dessert for a get-together, or just craving a quick and delicious sweet treat, these Banana Pudding Cups are your answer. They’re quick to assemble, require no baking, and deliver all the familiar, comforting flavors you adore in a convenient, single-serving package. Get ready to whip up a batch of pure happiness that’s sure to be a hit!
Nutritional Information
Per serving (approximate values):
- Calories: 320
- Protein: 5g
- Carbohydrates: 55g
- Fat: 10g
- Fiber: 2g
- Sodium: 300mg
Ingredients
- 1 (3.4 ounce) package instant vanilla pudding mix
- 2 cups cold whole milk
- 2-3 ripe but firm bananas, sliced
- 1 (11 ounce) box vanilla wafers
- 1 cup heavy whipping cream (for topping, optional)
- 2 tablespoons powdered sugar (for topping, optional)
- 1/2 teaspoon vanilla extract (for topping, optional)
- 1 tablespoon lemon juice (to prevent banana browning, optional)
Instructions
- Prepare the Pudding: In a large mixing bowl, combine the instant vanilla pudding mix and 2 cups of cold whole milk. Whisk vigorously for 2-3 minutes until the mixture begins to thicken. Set aside and allow it to sit for 5 minutes to fully set.
- Prepare the Bananas: If using, gently toss the sliced bananas with 1 tablespoon of lemon juice in a small bowl. This step helps prevent them from browning too quickly.
- Crush Some Wafers: Take about 1/4 to 1/3 of the vanilla wafers and crush them into coarse crumbs. You can do this by placing them in a Ziploc bag and crushing with a rolling pin or pulsing briefly in a food processor. The remaining wafers will be used whole for layering.
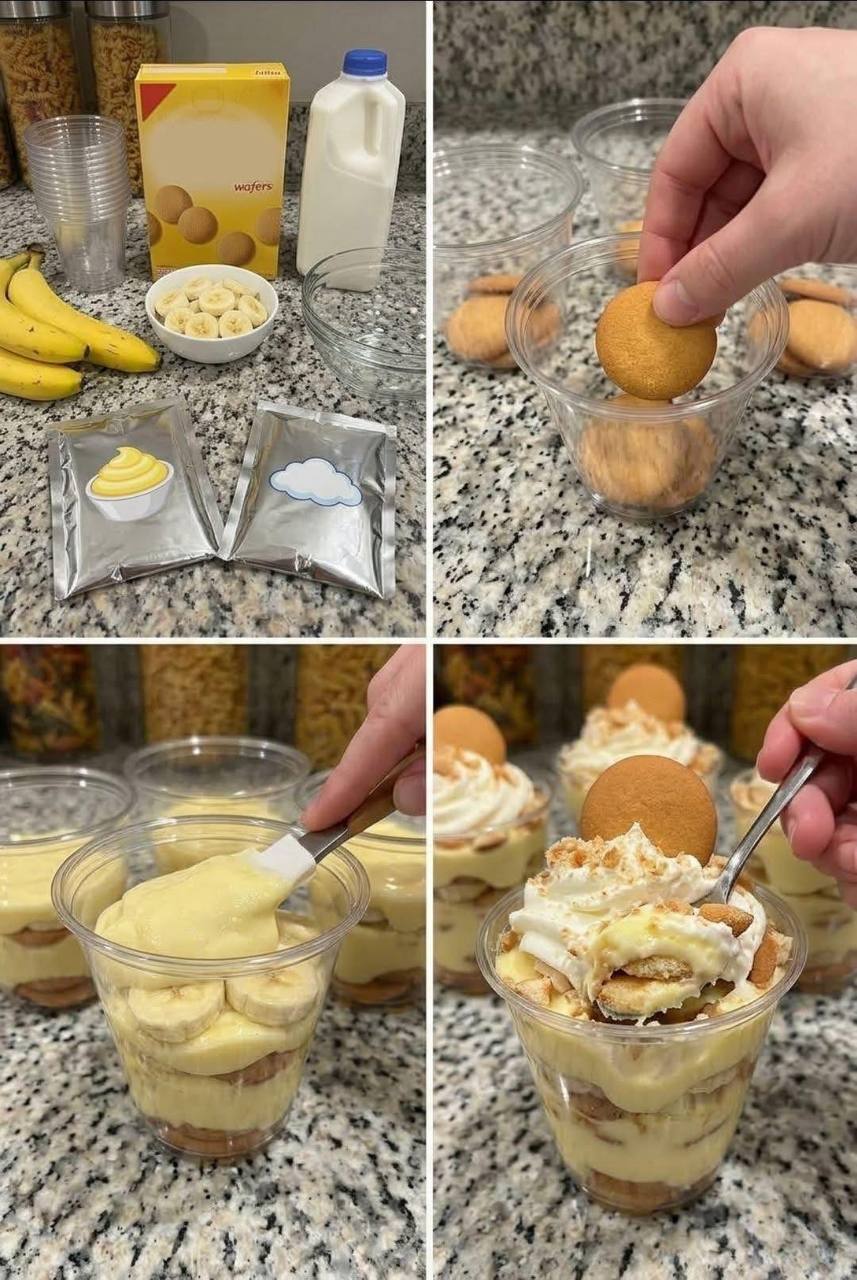
- Assemble the First Layer: Get your individual serving cups ready (clear cups work best to show off the layers!). Spoon about 1-2 tablespoons of the crushed vanilla wafer crumbs into the bottom of each cup.
- Add Pudding Layer: Spoon a generous layer of the prepared vanilla pudding over the crushed wafers in each cup, spreading it gently to cover the crumbs.
- Layer with Bananas: Arrange a layer of sliced bananas over the pudding in each cup. Try to get them to touch the sides of the cup for a nice visual effect.
- Add Whole Wafers: Place a few whole vanilla wafers on top of the banana slices in each cup. You might need to break some to fit, depending on the size of your cups.
- Repeat Layers: Continue layering, starting with another scoop of pudding, followed by more banana slices, and then a final layer of whole vanilla wafers. You should aim for at least two full sets of layers in each cup, ending with wafers.
- Chill the Cups: Once all cups are layered, cover them loosely with plastic wrap and refrigerate for at least 2-4 hours. This chilling time is crucial for the pudding to fully set and for the vanilla wafers to soften, absorbing some of the delicious pudding flavor.
- Prepare Whipped Cream (Optional): If you plan to top with fresh whipped cream, combine the heavy whipping cream, powdered sugar, and vanilla extract in a cold mixing bowl. Beat with an electric mixer on high speed until stiff peaks form.
- Garnish and Serve: Just before serving, top each chilled banana pudding cup with a dollop of fresh whipped cream (if using). You can also garnish with an extra vanilla wafer, a few banana slices, or a sprinkle of cinnamon or more crushed wafers for an appealing finish. Serve immediately and enjoy!
Cooking Tips and Variations
Achieving the perfect Banana Pudding Cup is all about a few key techniques and knowing how to customize it to your liking. Here are some tips and variations to elevate your dessert:
Preventing Banana Browning
One of the most common concerns with banana desserts is preventing the fruit from turning brown. While a little browning is natural, you can significantly slow it down:
- Lemon Juice: As mentioned in the recipe, tossing sliced bananas in a small amount of lemon juice (about 1 tablespoon per 2-3 bananas) is highly effective. The acidity acts as an antioxidant. Don’t worry, the small amount won’t make your pudding taste lemony.
- Pineapple Juice: Similar to lemon juice, a quick dip in pineapple juice can also help. It adds a slightly different tropical note, which can be a fun variation.
- Chill Promptly: Assemble your cups and refrigerate them as soon as possible. Exposure to air is what causes browning, so getting them covered and chilled quickly helps.
- Layering Strategy: If immediate browning is a major concern, you can place the banana slices in the middle layers rather than right on top, where they are more exposed to air.
Cookie Variations
While vanilla wafers are the traditional choice and provide that classic soft texture, don’t be afraid to experiment with other cookies:
- Graham Crackers: Crushed graham crackers can offer a slightly different texture and a hint of honey flavor.
- Shortbread Cookies: These provide a buttery richness and a firmer bite that can be a pleasant contrast to the creamy pudding.
- Biscoff Cookies: For a spiced, caramel-like flavor, Biscoff cookies (speculoos) are a fantastic choice, especially if you enjoy a more complex taste profile.
- Nutter Butters: If you’re a peanut butter fan, crushed Nutter Butters can add a delicious nutty element.
- Chocolate Wafers: For a chocolate-banana twist, try using chocolate wafers instead of vanilla.
Pudding Variations
The instant vanilla pudding is convenient, but you can easily switch things up:
- Homemade Pudding: For a richer, more gourmet experience, use a homemade vanilla custard or pudding. Just be sure to let it cool completely before layering.
- Other Pudding Flavors: Instant banana cream pudding mix or even cheesecake-flavored pudding mix can offer intriguing twists to the classic.
- Cream Cheese Layer: For an extra decadent touch, mix an 8-ounce block of softened cream cheese with 1/2 cup powdered sugar and 1/4 cup milk until smooth. You can add a thin layer of this mixture in between the pudding and banana layers.
Adding Extra Flavor and Texture
Boost the complexity of your banana pudding cups with these additions:
- Nuts: A sprinkle of chopped pecans, walnuts, or even candied almonds can add a delightful crunch and nutty flavor.
- Chocolate: Mini chocolate chips, chocolate shavings, or a drizzle of chocolate syrup can complement the banana and vanilla beautifully.
- Caramel Drizzle: A light drizzle of caramel sauce over the top or between layers adds a luscious sweetness.
- Coconut: Toasted coconut flakes can give a tropical flair and a pleasant chewiness.
- Cinnamon or Nutmeg: A tiny pinch of ground cinnamon or nutmeg sprinkled over the banana layers or the finished pudding can enhance the warm, comforting flavors.
Making Ahead and Storage
These cups are fantastic for making in advance, but a few considerations will ensure they stay fresh and delicious:
- Optimal Make-Ahead Time: Assemble the cups 4-8 hours before serving. This allows the wafers to soften perfectly without becoming mushy. If making more than 8 hours in advance, consider adding the whipped cream topping just before serving.
- Whipped Cream Stabilizer: If you’re preparing homemade whipped cream and want to add it hours in advance, consider using a whipped cream stabilizer (available in baking aisles) or adding a teaspoon of cornstarch or unflavored gelatin to your cream before whipping. This will help prevent it from deflating or weeping.
- Storage: Store assembled cups covered loosely with plastic wrap in the refrigerator. They are best enjoyed within 2-3 days. Beyond that, the bananas may become too soft and brown, and the wafers might get overly soggy.
Presentation Tips
- Clear Cups: Using clear glasses, mason jars, or plastic cups is highly recommended. The beautiful layers are part of the appeal!
- Garnish: Don’t underestimate the power of a simple garnish. A whole vanilla wafer, a thin banana slice, a sprinkle of crushed wafers, or a dusting of cocoa powder or cinnamon can make your cups look professionally prepared.
By incorporating these tips and variations, you can customize your Banana Pudding Cups to suit any taste or occasion, making them a truly versatile and irresistible dessert.
Storage and Reheating
These Banana Pudding Cups are best enjoyed chilled and fresh, but proper storage can extend their deliciousness for a few days.
Storage:
- Refrigeration: Once assembled, cover each individual cup loosely with plastic wrap or an airtight lid. Store them in the refrigerator.
- Duration: Banana Pudding Cups are best consumed within 2-3 days. After this time, the bananas may start to brown more significantly, and the wafers might become excessively soft. The pudding itself will remain good for longer, but the overall texture and appearance of the layered dessert will diminish.
- Whipped Cream: If you’ve topped the cups with fresh whipped cream, it’s best to add it just before serving, especially if you’re storing them for more than a few hours. Homemade whipped cream can deflate or “weep” (release liquid) over time when stored. If you must add it ahead, consider using a stabilized whipped cream or a store-bought aerosol whipped topping, which tends to hold up better.
Reheating:
Banana Pudding Cups are a cold dessert and are not meant to be reheated. Reheating would melt the pudding, turn the bananas mushy, and make the wafers completely soggy. Always serve them chilled directly from the refrigerator.
Frequently Asked Questions
Can I use any type of milk for the pudding?
For the best results and a rich, creamy pudding, it’s highly recommended to use whole milk. The fat content in whole milk contributes significantly to the pudding’s texture and thickness. While you can use 2% or skim milk, the pudding may be slightly less creamy and set a bit softer. Non-dairy milks like almond or soy milk can also be used, but be aware that they might alter the flavor and the pudding’s setting consistency. Always check the instant pudding mix package for specific recommendations regarding milk types.
How do I prevent the vanilla wafers from getting too soggy?
The goal of traditional banana pudding is for the wafers to soften and absorb the pudding’s flavor, creating a cake-like texture. However, if you prefer them with a bit more bite, here are a few tips: first, avoid making the cups too far in advance; 4-8 hours of chilling is usually ideal for a good balance of soft and slightly firm. Second, you can add a layer of fresh, whole wafers right before serving on top for a contrasting texture. Third, ensure your pudding is well-set before layering, as excess liquid will hasten sogginess. Some people also like to slightly toast their wafers before layering to give them a little more resilience.
Can I make these banana pudding cups ahead of time for a party?
Absolutely! Banana Pudding Cups are an excellent make-ahead dessert, which is one of their biggest advantages for parties or gatherings. For optimal flavor and texture, assemble them 4-8 hours before you plan to serve them. This allows enough time for the pudding to fully set and the wafers to soften to the perfect consistency. If you’re preparing them more than 8 hours in advance, it’s best to add the fresh whipped cream topping just before serving to ensure it looks its best. Store them covered in the refrigerator until ready to serve.
What if I don’t have individual serving cups?
No problem at all! While individual cups are convenient and showcase the layers beautifully, you can easily make this recipe in a larger dish. A 9×13 inch baking dish or a large trifle bowl works perfectly. Simply layer the ingredients in the same order as described for the individual cups. The chilling time will remain the same. When serving from a larger dish, you’ll scoop out portions, which will still be just as delicious and comforting.