
Introduction
Craving that nostalgic taste of luncheon meat but want to skip the mystery ingredients and excessive preservatives? You’re in the right place! This homemade luncheon meat recipe brings all the savory satisfaction you love, but with the peace of mind that comes from knowing exactly what goes into your food. Forget the canned versions; this from-scratch method allows you to control the quality of meat, the sodium levels, and the spices, resulting in a significantly fresher and arguably more delicious product. It’s surprisingly easy to make and incredibly versatile, transforming humble ground meat into a culinary canvas ready for sandwiches, fried rice, or a classic breakfast fry-up.
Luncheon meat, often associated with its iconic canned cousin, Spam, has been a staple in many households around the world for its convenience and robust flavor. While store-bought options are handy, they often come with a laundry list of additives. Our homemade version is a game-changer, offering a healthier alternative without sacrificing that beloved umami kick. Whether you’re looking for a cleaner eating option, have dietary restrictions, or simply enjoy the satisfaction of cooking from scratch, this recipe is a must-try. It’s perfect for meal prep, providing a ready-to-eat protein that can elevate everyday meals.
This recipe is designed to be straightforward, using common ingredients you likely already have in your pantry. We’ll guide you through each step, from mixing the perfect meat blend to steaming it to perfection and then pan-frying it to achieve that irresistible crispy edge. Get ready to impress your taste buds and your family with this delightful homemade treat. It’s a simple process that yields incredible results, proving that some of the best foods are the ones made with care in your own kitchen.
Nutritional Information
Per serving (approximate values for 1/8th of a 1lb batch):
- Calories: 250-300
- Protein: 18-22g
- Carbohydrates: 5-8g
- Fat: 18-22g
- Fiber: 0-1g
- Sodium: 450-600mg
Ingredients
- 1 pound (450g) ground pork (or a mix of pork and chicken/turkey for a leaner option)
- 1 large egg
- 1 tablespoon cornstarch (or potato starch)
- 1 teaspoon salt
- 1 teaspoon sugar
- 1 teaspoon garlic powder
- 1/2 teaspoon black pepper
- 1 tablespoon soy sauce (low sodium preferred)
- 1/2 teaspoon smoked paprika (optional, for extra flavor)
- 1/4 cup cold water or chicken broth
Instructions
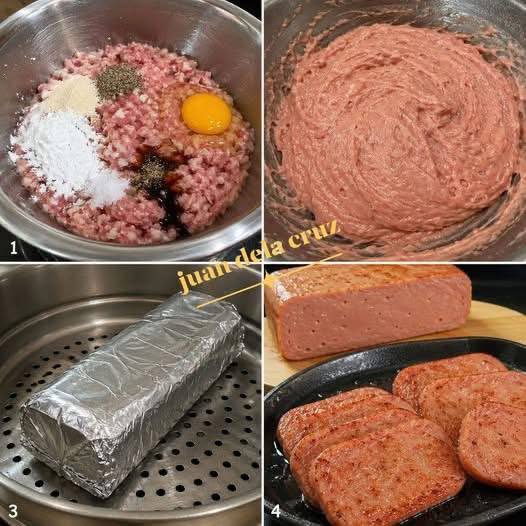
- Prepare Your Workspace: Gather all your ingredients and have a large mixing bowl ready. Lay out a large sheet of aluminum foil (about 18×12 inches or 45×30 cm) on a clean surface. You might want to spray it lightly with cooking spray to prevent sticking, though it’s often not strictly necessary.
- Combine Dry Ingredients: In the large mixing bowl, combine the ground pork, cornstarch, salt, sugar, garlic powder, black pepper, and smoked paprika (if using). Use your hands to gently mix these ingredients together, ensuring the spices are evenly distributed throughout the meat. Don’t overmix at this stage.
- Add Wet Ingredients: Crack the egg into a small bowl and lightly whisk it. Add the whisked egg, soy sauce, and cold water or chicken broth to the meat mixture.
- Mix Thoroughly: Now, this is a crucial step for texture. Using your hands, thoroughly mix the meat mixture. You want to knead and squish it for at least 5-7 minutes, or until the mixture becomes very sticky, cohesive, and almost paste-like. The goal is to emulsify the fat and protein, which helps create that characteristic smooth luncheon meat texture. If you have a stand mixer with a paddle attachment, you can use it on medium-low speed for 3-4 minutes.
- Shape the Meat: Transfer the well-mixed meat mixture onto the prepared aluminum foil. Using your hands, shape the mixture into a compact log, roughly 6-8 inches (15-20 cm) long and 2-3 inches (5-7 cm) in diameter. Try to make it as uniform as possible to ensure even cooking.
- Wrap Tightly: Carefully roll the aluminum foil tightly around the meat log, ensuring there are no air pockets. Twist both ends of the foil like a candy wrapper to seal it completely. You can double-wrap it with another layer of foil for extra security and to maintain its shape during steaming.
- Prepare the Steamer: Fill a large pot with about 2-3 inches of water and place a steaming basket inside, ensuring the water level is below the basket. Bring the water to a rolling boil over high heat.
- Steam the Luncheon Meat: Carefully place the wrapped meat log into the steaming basket. Reduce the heat to medium-high, cover the pot tightly, and steam for 60-75 minutes. The exact time will depend on the thickness of your log. To check for doneness, an instant-read thermometer inserted into the center of the log (piercing through the foil) should read 160°F (71°C).
- Cool and Chill: Once steamed, carefully remove the foil-wrapped log from the steamer using tongs. Place it on a wire rack to cool down to room temperature. This will take about 1-2 hours. Once cooled, transfer the still-wrapped log to the refrigerator and chill for at least 4 hours, or preferably overnight. Chilling is essential for the meat to firm up and allow for clean slicing.
- Slice and Serve: After chilling, unwrap the luncheon meat log. Use a sharp knife to slice it into desired thickness, usually about 1/4 inch (0.5 cm) thick.
- Optional Pan-Frying: For an extra layer of flavor and a crispy texture, heat a little oil (vegetable, canola, or a neutral oil) in a non-stick pan over medium heat. Fry the sliced luncheon meat for 2-3 minutes per side, until golden brown and slightly crispy.
- Enjoy! Your homemade luncheon meat is now ready to be enjoyed in sandwiches, with eggs, or in any dish where you’d typically use store-bought versions.
Cooking Tips and Variations
The secret to great homemade luncheon meat lies in the mixing. Don’t be shy with your hands; the more you knead the mixture, the more cohesive and smooth your final product will be. This emulsification process is what prevents the meat from crumbling and gives it that distinct luncheon meat texture. For an even finer texture, you can pulse the mixed ingredients in a food processor for a few seconds, but be careful not to over-process into a complete paste. When shaping the log, ensure it’s as compact as possible to avoid air pockets, which can affect the final consistency. Double-wrapping in foil is a small step that makes a big difference in maintaining the log’s shape during steaming.
To vary the flavor profile, consider adding different spices or herbs. For a slightly spicy kick, include a pinch of cayenne pepper or red pepper flakes. A touch of onion powder can enhance the savory depth. For an Asian-inspired flavor, you could add a dash of sesame oil or grated ginger to the mixture. If you prefer a smoky flavor without the paprika, a tiny amount of liquid smoke (just a drop or two) can be incorporated into the wet ingredients. You can also experiment with different ground meats; while pork is traditional, a blend with ground chicken or turkey can make it leaner, or even using all ground beef will yield a different but still delicious result. Just be mindful that leaner meats might require a little more moisture.
Ensuring the meat is properly chilled after steaming is paramount for clean, even slices. If you try to slice it warm, it will be much softer and more prone to crumbling. An overnight chill is truly ideal. When pan-frying, a medium heat is key; too high and it will burn before cooking through, too low and it won’t achieve that desirable crispy exterior. Don’t overcrowd the pan, fry in batches if necessary, to ensure each slice gets proper browning. These small adjustments can dramatically improve your homemade luncheon meat experience.
Storage and Reheating
Once cooled and sliced, homemade luncheon meat should be stored in an airtight container in the refrigerator. It will typically keep well for 5-7 days. For longer storage, you can freeze the unsliced log or individual slices. To freeze the log, wrap it tightly in plastic wrap, then in aluminum foil, and place it in a freezer-safe bag. To freeze slices, place parchment paper between each slice to prevent sticking, then store them in a freezer-safe bag or container. Frozen luncheon meat can last for up to 2-3 months.
To reheat, if previously chilled, you can pan-fry the slices directly from the refrigerator until heated through and nicely browned. This is the preferred method as it restores some crispness. You can also microwave slices for about 30 seconds to 1 minute, but they won’t get crispy. If reheating from frozen, it’s best to thaw the slices in the refrigerator overnight before pan-frying. Alternatively, you can pan-fry from frozen on a lower heat setting, allowing more time for them to thaw and heat through without burning the exterior.
Frequently Asked Questions
What kind of ground meat is best for homemade luncheon meat?
Ground pork with about 20-30% fat content is traditionally best as it provides the most authentic flavor and juiciness. However, a blend of ground pork and ground chicken or turkey can also work well for a leaner option. Avoid extra-lean ground meats as they can result in a drier, less flavorful product.
Can I make this recipe without a steamer?
Yes! If you don’t have a dedicated steamer, you can create a makeshift one. Place a heat-proof plate or a small metal rack upside down in a large pot. Add a few inches of water, ensuring the water level is below the top of your makeshift rack. Place the foil-wrapped meat log on top of the rack, cover the pot tightly, and proceed with steaming as directed. You can also bake it in a water bath (bain-marie) in the oven at 325°F (160°C) for a similar amount of time, ensuring the internal temperature reaches 160°F (71°C).
Why is chilling the luncheon meat so important after steaming?
Chilling the steamed luncheon meat is crucial for several reasons. First, it allows the meat to fully set and firm up, making it much easier to slice cleanly and evenly without crumbling. Second, it improves the texture, giving it that characteristic dense, smooth consistency. Trying to slice it warm will result in a softer, more delicate product that doesn’t hold its shape as well.
Can I reduce the sodium content in this recipe?
Absolutely! You can significantly reduce the sodium by using low-sodium soy sauce and by reducing the amount of added salt. Start with half the recommended salt and taste a small, cooked (microwaved) portion of the mixture before shaping and steaming to adjust to your preference. Keep in mind that some salt is necessary for flavor and preservation, but you have full control over the exact amount.