
Introduction
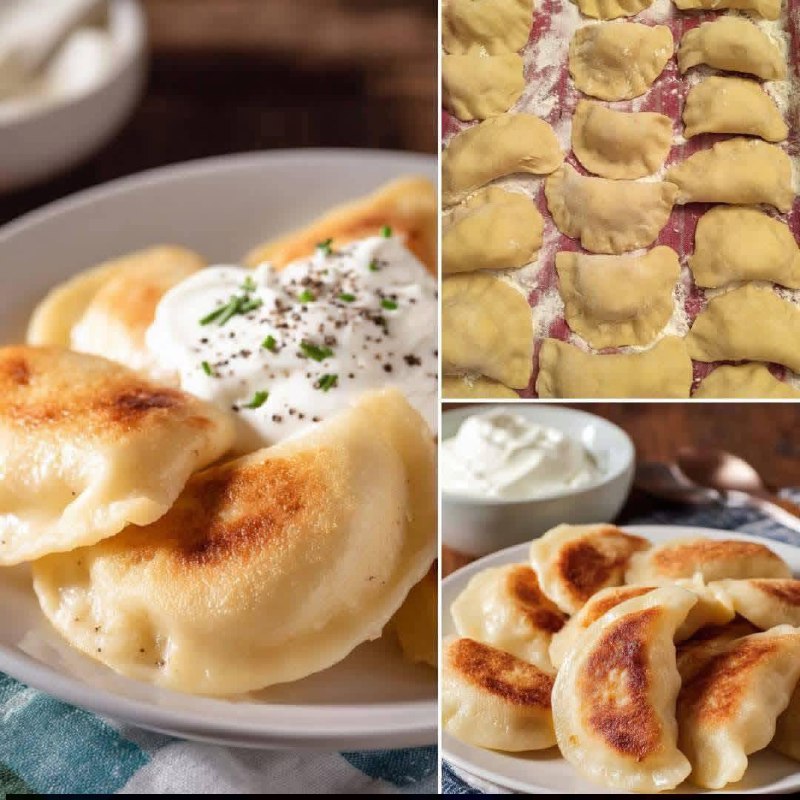
Ah, perogies! These delightful, crescent-shaped dumplings are a beloved staple in Polish and Eastern European cuisine, bringing warmth and comfort to tables for generations. Traditionally made with a simple wheat flour dough, perogies are typically filled with a savory mixture of mashed potatoes and cheese, though sweet and other savory fillings are also popular. Boiled until tender and often pan-fried to a golden crisp, they are a true testament to rustic, satisfying home cooking. The pillowy dough, combined with a rich, flavorful filling, creates a culinary experience that is both hearty and incredibly addictive. They’re perfect as a main course, a comforting side dish, or even a delightful appetizer, especially when paired with classic toppings.
For those who navigate the world of gluten-free eating, the thought of enjoying authentic, homemade perogies might seem like a distant dream. Traditional perogy dough relies heavily on gluten for its elasticity and chew, making it notoriously challenging to replicate in a gluten-free format. Many gluten-free versions can end up crumbly, tough, or simply lack that familiar, satisfying texture. But fear not, fellow food lovers! We’ve cracked the code to creating truly delicious gluten-free perogies that capture all the magic of the original, without any of the gluten. This recipe delivers a tender, pliable dough that’s a joy to work with and holds up beautifully to boiling and pan-frying, ensuring every bite is as authentic and comforting as you remember.
Get ready to roll up your sleeves and embark on a culinary adventure that proves gluten-free doesn’t mean flavor-free or texture-compromised. Our Gluten-Free Perogies recipe, featuring a classic potato and cheese filling, promises to bring the joy of these cherished dumplings back to your table. Whether you’re a seasoned perogy maker or a curious newcomer, this guide will walk you through every step, ensuring a batch of golden-brown, perfectly stuffed perogies that will impress even the most discerning palates. Prepare for tender dough, creamy filling, and that irresistible crispy exterior – all completely gluten-free!
Nutritional Information
Per serving (approximate values for 4 perogies):
- Calories: 420
- Protein: 15g
- Carbohydrates: 50g
- Fat: 18g
- Fiber: 4g
- Sodium: 450mg
Ingredients
For the Gluten-Free Perogy Dough:
- 2 cups gluten-free all-purpose flour blend (ensure it contains xanthan gum or add separately)
- 1 teaspoon xanthan gum (if your flour blend does not include it)
- 1/2 teaspoon salt
- 1 large egg
- 2 tablespoons olive oil or neutral vegetable oil
- 1/2 cup warm water (plus 1-2 tablespoons more if needed)
For the Potato and Cheese Filling:
- 3 large russet potatoes (about 1.5 lbs), peeled and quartered
- 1/2 cup shredded cheddar cheese (or farmer’s cheese, or a mix)
- 1/4 cup finely diced yellow onion
- 2 tablespoons unsalted butter
- 1/2 teaspoon salt, or to taste
- 1/4 teaspoon black pepper, or to taste
For Serving:
- 2 tablespoons butter, for pan-frying
- 1/4 cup finely chopped yellow onion (optional, for frying)
- 1/2 cup sour cream
- Fresh chives or green onions, chopped (for garnish)
- Extra black pepper, for garnish
Instructions
- Prepare the Potato and Cheese Filling:
- Place the peeled and quartered potatoes in a large pot and cover with cold water. Add a pinch of salt. Bring to a boil over medium-high heat, then reduce heat and simmer until the potatoes are very tender when pierced with a fork, about 15-20 minutes.
- While potatoes are boiling, melt 2 tablespoons of butter in a small skillet over medium heat. Add the finely diced onion and sauté until softened and translucent, about 5-7 minutes. Remove from heat.
- Drain the cooked potatoes thoroughly. Return them to the hot, empty pot. Mash the potatoes until smooth.
- Add the shredded cheese, sautéed onion, salt, and pepper to the mashed potatoes. Mix well until everything is combined and the cheese is melted. Taste and adjust seasoning as needed. Set aside to cool completely. The filling should be firm enough to handle.
- Make the Gluten-Free Perogy Dough:
- In a large mixing bowl, whisk together the gluten-free flour blend, xanthan gum (if using), and salt.
- In a separate small bowl, whisk together the egg, olive oil, and warm water.
- Pour the wet ingredients into the dry ingredients. Mix with a spoon or your hands until a shaggy dough forms.
- Turn the dough out onto a lightly floured gluten-free surface (use a bit of your gluten-free flour blend for dusting). Knead gently for 3-5 minutes until the dough comes together and is relatively smooth and elastic. It will be softer than traditional dough. If it’s too sticky, add a tiny bit more flour; if too dry, add a few drops of warm water.
- Form the dough into a ball, wrap it tightly in plastic wrap, and let it rest at room temperature for at least 30 minutes. This allows the flours to hydrate properly, making the dough easier to roll.
- Assemble the Perogies:
- Divide the rested dough into two equal portions. Keep one portion wrapped while you work with the other.
- On a lightly floured gluten-free surface, roll out one portion of dough to about 1/8-inch thickness. Gluten-free dough can be a bit more delicate, so work gently. You may need to patch small tears.
- Using a round cookie cutter (about 2.5-3 inches in diameter) or a glass, cut out circles from the dough. Gather the scraps, gently re-knead them, and roll them out again to cut more circles.
- Place about 1 teaspoon of the cooled potato and cheese filling in the center of each dough circle.
- Lightly moisten the edge of half the dough circle with a little water using your fingertip. Fold the dough over the filling to create a half-moon shape.
- Pinch the edges firmly to seal the perogy, ensuring no gaps. You can crimp the edges with a fork for a decorative finish and extra seal.
- Place the assembled perogies on a lightly floured baking sheet or parchment paper-lined tray. Make sure they don’t touch to prevent sticking. Repeat with the remaining dough and filling.
- Cook the Perogies:
- Bring a large pot of salted water to a rolling boil.
- Carefully drop 6-8 perogies into the boiling water at a time (do not overcrowd the pot).
- Simmer for 3-5 minutes, or until the perogies float to the surface and are cooked through. They will puff up slightly.
- Using a slotted spoon, remove the cooked perogies from the water and drain well. You can place them on a plate lightly coated with a tiny bit of oil to prevent sticking while you cook the rest.
- Pan-Fry (Optional but Recommended):
- In a large skillet, melt 2 tablespoons of butter over medium heat. If using, add the finely chopped onion and sauté until golden brown and crispy, about 5-7 minutes.
- Add the boiled perogies to the skillet in a single layer (work in batches if necessary).
- Pan-fry for 3-4 minutes per side, or until golden brown and slightly crispy.
- Serve:
- Serve the hot perogies immediately with a dollop of sour cream, a sprinkle of fresh chives or green onions, and a crack of fresh black pepper.
Cooking Tips and Variations
Achieving perfect gluten-free perogies often comes down to a few key techniques and knowing how to adapt. The nature of gluten-free dough means it behaves differently from its wheat-based counterpart, so a little patience and understanding go a long way. First and foremost, the choice of gluten-free flour blend is crucial. Not all blends are created equal, and some are better suited for doughs that need to be rolled and stretched. Look for a blend that contains a good balance of rice flours, starches (tapioca, potato, corn), and often a protein like sorghum or millet flour. If your blend doesn’t include it, adding xanthan gum is non-negotiable, as it provides the necessary elasticity and binding that gluten would normally supply, preventing the dough from being crumbly or tough. Psyllium husk powder can also be used as a binder, often lending a more pliable and slightly chewier texture to gluten-free doughs, so consider experimenting with it (typically 1-2 teaspoons per cup of flour, with a little extra liquid). When mixing the dough, be mindful of hydration. Gluten-free flours absorb liquid differently, and the dough should be soft and pliable, but not overly sticky. It’s often better to start with slightly less water and add more gradually until the right consistency is achieved. Over-hydrated dough will be difficult to roll, while under-hydrated dough will be crumbly.
Resting the dough after kneading is another critical step that’s often overlooked. This 30-minute rest period allows the flours to fully hydrate and the xanthan gum to work its magic, resulting in a dough that is much easier to roll out without tearing. When rolling, use plenty of gluten-free flour for dusting your work surface and rolling pin, but avoid incorporating too much into the dough itself, as this can make it dry. Roll gently and evenly. If the dough starts to crack at the edges, you can often gently press it back together with your fingers. For shaping, a round cookie cutter ensures uniform perogies, which cook more evenly. When sealing the perogies, ensure a very firm crimp. Gluten-free dough can sometimes be less forgiving with seals, so pressing down with a fork around the edges not only adds a decorative touch but also provides a more secure seal, preventing the filling from escaping during boiling. Don’t overcrowd the pot when boiling; this lowers the water temperature and can lead to gummy perogies. Cook them in batches, and once they float, give them another minute or two to ensure they are fully cooked through.
For variations, the world of perogy fillings is vast and exciting! Beyond the classic potato and cheese, consider a savory sauerkraut and mushroom filling, which offers a delightful tang and umami depth. Simply sauté finely chopped sauerkraut with mushrooms and onions until tender, then season to taste. For a meat option, ground beef or pork mixed with sautéed onions and spices makes a hearty filling. Sweet perogies are also popular, often filled with fresh fruit like blueberries, cherries, or plums, sweetened and sometimes thickened with a touch of cornstarch. If you’re looking for a dairy-free option for the potato and cheese filling, simply substitute the dairy cheese with your favorite dairy-free shredded cheese blend and use a dairy-free butter alternative for sautéing the onions. For serving, while sour cream and fried onions are traditional, consider adding crispy bacon bits or even a dollop of applesauce for a sweet-savory contrast, especially with potato-based fillings. A drizzle of browned butter over the finished perogies adds an incredible nutty richness that elevates the dish to another level. Don’t be afraid to experiment with herbs in your filling too; fresh dill or parsley can add a lovely brightness.
Storage and Reheating
Proper storage and reheating are key to enjoying your delicious gluten-free perogies beyond the initial meal. Cooked perogies can be stored in an airtight container in the refrigerator for up to 3-4 days. To prevent them from sticking together, especially if they haven’t been pan-fried, you can lightly toss them with a tiny amount of oil before storing. For longer storage, perogies freeze beautifully, both cooked and uncooked. To freeze uncooked perogies, arrange them in a single layer on a parchment paper-lined baking sheet and place them in the freezer until solid, typically 1-2 hours. Once frozen, transfer them to a freezer-safe bag or container, separating layers with parchment paper, and store for up to 3 months. Freezing them individually first prevents them from clumping together.
To freeze cooked perogies, allow them to cool completely after boiling (and pan-frying, if you’ve done that step). Arrange them on a baking sheet and freeze until solid, then transfer to a freezer-safe bag or container. They can be stored for up to 3 months. When it comes to reheating, cooked perogies can be gently pan-fried from the refrigerator until heated through and golden brown. You can also warm them in the microwave, though this won’t achieve the crispy exterior. For frozen uncooked perogies, you can boil them directly from frozen, adding a few extra minutes to the cooking time (about 5-7 minutes after they float). For frozen cooked perogies, the best method is to pan-fry them directly from frozen with a little butter or oil over medium heat until they are heated through and crispy. This usually takes about 8-12 minutes, turning occasionally. Avoid boiling already cooked and frozen perogies, as they can become mushy. Always ensure perogies are heated to an internal temperature of 165°F (74°C) for food safety.
Frequently Asked Questions
What is the best type of gluten-free flour blend for perogies?
The best gluten-free flour blend for perogies often contains a mix of different flours and starches, such as brown rice flour, white rice flour, tapioca starch, and potato starch. It’s crucial that the blend either contains xanthan gum or that you add it separately, as this provides the necessary elasticity and structure that gluten would normally offer. Blends specifically marketed for “all-purpose baking” or “bread making” can work well. Avoid blends that are primarily just rice flour, as they can result in a crumbly dough.
Can I make the dough ahead of time?
Yes, you can absolutely make the gluten-free perogy dough ahead of time. After kneading, wrap the dough tightly in plastic wrap and refrigerate it for up to 24 hours. When you’re ready to use it, let it sit at room temperature for about 20-30 minutes to make it easier to roll out. You might find it slightly firmer, but it should still be pliable.
My gluten-free perogies are falling apart when I boil them. What went wrong?
If your gluten-free perogies are falling apart, it’s most likely due to an issue with the seal or the dough’s hydration. Ensure you are firmly pinching the edges together, and consider using a fork to crimp them for an extra secure seal. Also, if the dough was too dry, it might not have sealed properly. Conversely, dough that is too wet can also be fragile. Make sure the dough is pliable but not sticky, and don’t overcrowd the pot when boiling, as vigorous boiling can also cause delicate perogies to break apart.
Can I make these perogies dairy-free?
Yes, this recipe can easily be adapted to be dairy-free. For the potato and cheese filling, simply substitute the cheddar cheese with your favorite dairy-free shredded cheese alternative. Ensure the butter used for sautéing the onions and for pan-frying the perogies is a dairy-free butter alternative. You can also opt for a dairy-free sour cream alternative for serving, or simply enjoy them with fried onions and chives.