
Introduction
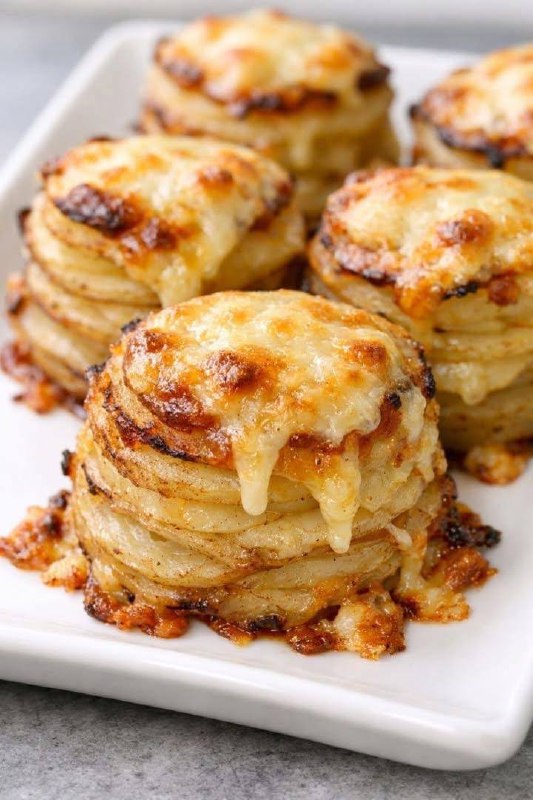
As Easter approaches, the hunt isn’t just for eggs anymore; it’s for that perfect side dish that will steal the show on your holiday table. Look no further than these glorious Cheesy Potato Stacks! Imagine perfectly thin slices of tender potato, layered with rich, melty cheese, and baked until golden brown and irresistibly crispy on the edges. These individual potato gratins are not only a feast for the eyes but a symphony of textures and flavors that will have everyone reaching for seconds.
What makes these Cheesy Potato Stacks so special for your Easter celebration? Beyond their undeniably delicious taste, they offer an elegant presentation that elevates any meal. Each stack is a self-contained masterpiece, making serving a breeze and impressing your guests with minimal fuss. They strike that coveted balance between comforting familiarity and sophisticated flair, ensuring they’ll be a beloved addition to your holiday spread, whether alongside a traditional ham, roast lamb, or a festive vegetarian main.
This recipe transforms humble potatoes and cheese into something truly extraordinary. The magic lies in the thin slicing, which allows the potatoes to cook through beautifully while absorbing all the savory goodness of the cheese and seasonings. The result is a dish with perfectly tender interiors and delightfully crispy, caramelized edges – a textural dream that’s both hearty and refined. Get ready to add a new tradition to your Easter menu that your family will request year after year!
Nutritional Information
Per serving (approximate values):
- Calories: 320
- Protein: 12g
- Carbohydrates: 35g
- Fat: 15g
- Fiber: 4g
- Sodium: 450mg
Ingredients
- 2 ½ pounds Yukon Gold potatoes (about 6-7 medium), peeled
- 1 cup heavy cream
- ½ cup whole milk
- 2 cloves garlic, minced very fine
- 1 teaspoon fresh thyme leaves, finely chopped (or ½ teaspoon dried)
- ½ teaspoon salt
- ¼ teaspoon black pepper, freshly ground
- ⅛ teaspoon nutmeg, freshly grated (optional, but recommended)
- 6 tablespoons unsalted butter, melted
- 2 cups sharp cheddar cheese, freshly shredded
- ½ cup Parmesan cheese, freshly grated
- Cooking spray or additional butter for greasing
- Fresh parsley or chives, chopped, for garnish (optional)
Instructions
- Preheat your oven to 375°F (190°C). Lightly grease a 12-cup muffin tin or individual ramekins with cooking spray or butter.
- In a medium saucepan, combine the heavy cream, whole milk, minced garlic, fresh thyme, salt, black pepper, and nutmeg (if using). Bring the mixture to a gentle simmer over medium heat, stirring occasionally. Once it just begins to simmer, remove from heat and set aside to infuse.
- While the cream mixture is heating, prepare the potatoes. Using a mandoline slicer (highly recommended for evenness) or a very sharp knife, slice the peeled potatoes as thinly as possible, aiming for about ⅛-inch thickness. Try to keep the slices uniform for even cooking.
- In a large bowl, combine the thinly sliced potatoes with the melted butter. Toss gently to ensure all the potato slices are lightly coated. This helps prevent sticking and promotes browning.
- In a separate bowl, combine the shredded sharp cheddar cheese and grated Parmesan cheese. Toss to mix well.
- Begin assembling the potato stacks. Take a few potato slices and arrange them in the bottom of each greased muffin cup or ramekin, overlapping slightly to form a base.
- Sprinkle a small amount of the mixed cheese over the potato layer.
- Continue layering potatoes and cheese, pressing down gently after each layer, until the muffin cup is nearly full. Aim for about 6-8 layers of potato and 5-7 layers of cheese per stack. The stacks should be slightly mounded as they will settle during baking.
- Once all the stacks are assembled, carefully pour the warm cream mixture over each stack. Fill each cup until the liquid almost reaches the top of the potatoes. The potatoes should be mostly submerged.
- Place the muffin tin or ramekins on a baking sheet to catch any potential drips.
- Bake for 45-55 minutes, or until the potatoes are fork-tender and the cheese is melted, bubbly, and golden brown on top. If the tops are browning too quickly, you can loosely tent the pan with foil for the last 10-15 minutes of baking.
- Once baked, remove from the oven and let the potato stacks rest in the muffin tin for 5-10 minutes. This allows them to set slightly, making them easier to remove.
- Carefully run a knife around the edges of each stack, if necessary, and gently lift them out using a small offset spatula or spoon.
- Garnish with fresh chopped parsley or chives, if desired, and serve warm.
Cooking Tips and Variations
For the absolute best results, a mandoline slicer is your secret weapon for this recipe. Uniformly thin potato slices are crucial for even cooking and creating those beautiful, tender layers. If you don’t have one, take your time with a sharp chef’s knife to get them as thin and consistent as possible. Don’t rinse the sliced potatoes; the starch helps them bind together. To ensure your potato stacks don’t stick, generously grease your muffin tin or ramekins. You can even cut small circles of parchment paper to line the bottoms of the muffin cups for extra insurance, though often not strictly necessary with good greasing. When layering, press down gently but firmly to compact the slices; this creates a sturdier stack. Keep an eye on them during the last 10-15 minutes of baking; if the tops are getting too dark, a loose tent of foil will prevent burning while the potatoes finish cooking through.
The beauty of these potato stacks lies in their versatility. Feel free to experiment with different cheeses. A blend of Gruyere and sharp white cheddar is divine, or try a bit of smoked gouda for an extra layer of flavor. For an herbaceous twist, consider adding finely chopped rosemary or sage to the cream mixture along with the thyme. A pinch of cayenne pepper or a dash of hot sauce can introduce a subtle warmth if you like a little kick. For a heartier version, you can sprinkle in some finely crumbled cooked bacon bits between a few layers of potatoes and cheese. You could also add a very thin layer of caramelized onions for an even richer, sweeter depth of flavor. If you’re serving these for a larger crowd and don’t want individual stacks, you can adapt this recipe to a 9×13-inch baking dish for a more traditional gratin style, simply increasing the baking time slightly until tender and bubbly.
Storage and Reheating
Leftover Cheesy Potato Stacks can be stored in an airtight container in the refrigerator for up to 3-4 days. To reheat, the best method for maintaining their crispiness is in the oven or an air fryer. Preheat your oven to 350°F (175°C) and place the stacks on a baking sheet. Heat for 10-15 minutes, or until warmed through and the cheese is re-melted and bubbly. If using an air fryer, set it to 325°F (160°C) and cook for 5-8 minutes, checking periodically. You can also reheat them in the microwave, but they will lose some of their crisp texture and might become a bit softer. If microwaving, heat in 30-second intervals until hot. While freezing is possible, the texture of the potatoes can become a bit mealy upon thawing and reheating, so it’s generally not recommended for optimal quality.
Frequently Asked Questions
Can I make these Cheesy Potato Stacks ahead of time?
Yes, you can! You can assemble the potato stacks up to 12 hours in advance. After assembling and pouring the cream mixture, cover the muffin tin or ramekins tightly with plastic wrap and refrigerate. When ready to bake, remove them from the fridge about 30 minutes before baking to bring them closer to room temperature, then bake as directed, potentially adding an extra 5-10 minutes to the baking time.
What kind of potatoes are best for this recipe?
Yukon Gold potatoes are ideal for this recipe because of their creamy texture and relatively low starch content, which helps them hold their shape when sliced thinly. Russet potatoes can also work, but they tend to be a bit starchier and might result in a slightly fluffier texture. Avoid waxy potatoes like red or new potatoes, as they won’t absorb the cream mixture as well and might not become as tender.
My potato stacks are falling apart when I try to remove them. What went wrong?
This can happen if they haven’t set enough after baking or if they weren’t pressed down firmly enough during assembly. Ensure you let them rest for at least 5-10 minutes after coming out of the oven; this allows the cheese and starches to firm up and bind the layers. If they’re still sticking, gently run a thin knife around the edges before attempting to lift them out. A well-greased muffin tin is also crucial for easy removal.