
Introduction
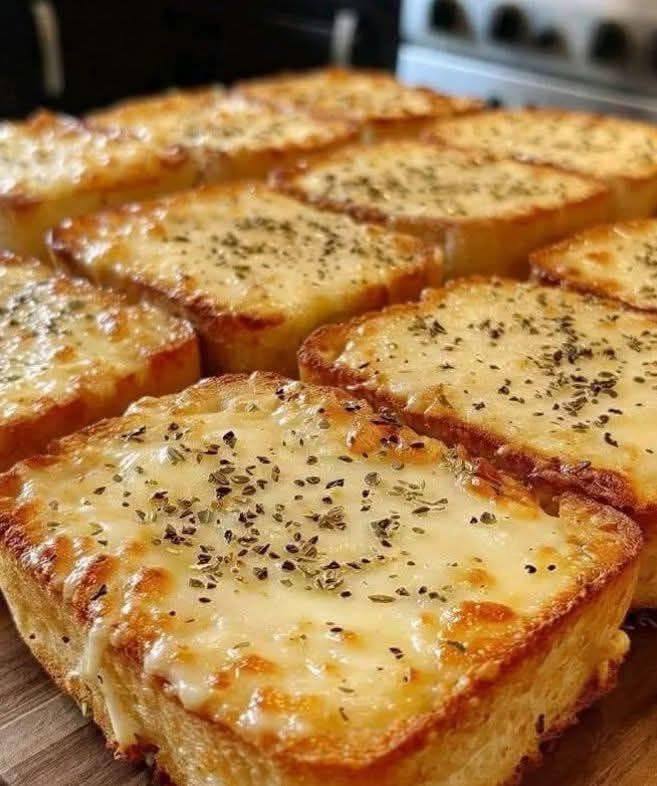
There are few things in life as universally loved and undeniably comforting as a warm, crusty slice of Cheesy Garlic Bread. It’s that perfect symphony of savory garlic, rich butter, and gooey, melted cheese, all cradled on a perfectly toasted piece of bread. Whether it’s the star of your appetizer spread, the ideal companion to a hearty pasta dish, or simply a delicious snack on its own, cheesy garlic bread has a way of making any meal feel a little more special, a little more indulgent, and a lot more satisfying. Its irresistible aroma alone is enough to draw a crowd to the kitchen, promising a treat that delivers on every level of flavor and texture.
What makes this particular recipe stand out is its incredible simplicity and speed without compromising on flavor. Forget complicated techniques or long ingredient lists; this is about harnessing the power of fresh ingredients and a few easy steps to create something truly spectacular. We’re talking about a dish that comes together in mere minutes of prep time, then bakes to golden, cheesy perfection in under 15 minutes. It’s the ultimate crowd-plepleaser for a reason – it’s quick enough for a weeknight side, yet impressive enough for entertaining. The beauty lies in its versatility; you can customize it to your heart’s content, but even the basic version is an absolute showstopper.
So, get ready to transform a humble loaf of bread into a culinary masterpiece that will have everyone asking for more. This recipe promises a cheesy garlic bread experience that is crispy on the outside, soft and fluffy on the inside, and bursting with garlicky, cheesy goodness in every single bite. It’s the kind of comfort food that warms the soul and satisfies the deepest cravings, proving that sometimes, the simplest things are truly the best.
Nutritional Information
Per serving (approximate values):
- Calories: 320
- Protein: 12g
- Carbohydrates: 30g
- Fat: 17g
- Fiber: 2g
- Sodium: 450mg
Ingredients
- 1 loaf (16-ounce) Italian or French bread
- 1/2 cup (1 stick) unsalted butter, softened
- 4-6 cloves garlic, minced (about 2 tablespoons)
- 1/4 cup fresh parsley, finely chopped (optional, for garnish and flavor)
- 1/2 teaspoon dried oregano or Italian seasoning
- 1/4 teaspoon salt
- 1/8 teaspoon black pepper
- 1 cup shredded mozzarella cheese
- 1/2 cup shredded provolone cheese (or your favorite cheese blend like Monterey Jack or cheddar)
- 1 tablespoon olive oil (optional, for richer garlic butter)
Instructions
- Preheat your oven to 375°F (190°C). Line a baking sheet with parchment paper or aluminum foil for easier cleanup.
- Prepare the bread: If your loaf is unsliced, carefully slice it lengthwise down the middle, creating two equal halves. If it’s already sliced, keep the slices together. Place the bread halves cut-side up on the prepared baking sheet.
- Make the garlic butter: In a small bowl, combine the softened butter, minced garlic, chopped fresh parsley (if using), dried oregano or Italian seasoning, salt, and black pepper. If using, add the olive oil and mix until all ingredients are thoroughly combined and the butter mixture is smooth and spreadable.
- Spread the garlic butter: Using a butter knife or a small spatula, generously spread the garlic butter mixture evenly over the cut surfaces of both bread halves. Make sure to get it right to the edges for maximum flavor.
- Add the cheese: Evenly sprinkle the shredded mozzarella cheese over both buttered bread halves. Then, add the shredded provolone cheese (or your preferred cheese blend) on top of the mozzarella. Distribute the cheese from edge to edge to ensure every bite is cheesy.
- Bake the bread: Place the baking sheet with the cheesy garlic bread into the preheated oven. Bake for 10-12 minutes, or until the bread edges are golden brown and the cheese is completely melted and bubbly.
- Broil for extra crispiness and color (optional but recommended): For an extra crispy crust and beautifully golden-brown, slightly charred cheese, switch your oven to the broiler setting. Watch carefully! Broil for an additional 1-3 minutes, keeping a close eye on it to prevent burning. The cheese can go from perfect to burnt very quickly under the broiler.
- Serve immediately: Once removed from the oven, let the cheesy garlic bread cool for a minute or two before slicing into individual pieces. Serve warm and enjoy the irresistible aroma and flavor!
Cooking Tips and Variations
For the ultimate cheesy garlic bread, starting with the right bread is key. A good quality Italian or French bread loaf with a sturdy crust and a soft interior is ideal. Avoid overly soft sandwich bread, as it can become soggy. If you can’t find a fresh loaf, a frozen garlic bread loaf can be a good base, just be sure to adjust baking times. To achieve the perfect level of crispness, make sure your oven is fully preheated before you put the bread in. The initial bake will toast the bread, and the optional broiling step at the end is crucial for that golden, bubbly cheese and extra crispy texture. However, when broiling, never walk away from the oven; cheese can burn very quickly.
To prevent the bread from getting soggy, especially if you’re making it ahead of time or worried about excess moisture, avoid overloading it with too much butter. While generous is good, a thick, greasy layer can lead to a less-than-crispy result. Also, ensure your garlic is well minced, or even better, use a garlic press, so it distributes evenly without creating large pockets of raw garlic. For a stronger garlic flavor, consider using fresh garlic and even rubbing a cut clove directly on the bread before applying the butter mixture. Conversely, for a milder garlic flavor, you can use garlic powder, typically about 1 teaspoon for this recipe.
When it comes to variations, the possibilities are endless. For a spicy kick, sprinkle a pinch of red pepper flakes over the cheese before baking. You can experiment with different cheese combinations; a blend of mozzarella, provolone, and a touch of Parmesan or Pecorino Romano adds depth and complexity. Smoked gouda or cheddar can also offer interesting flavor profiles. For an herbaceous twist, consider adding finely chopped fresh rosemary, thyme, or basil to your garlic butter. A little bit of finely grated lemon zest can also brighten up the flavor profile and add a subtle zing. You can even make it a loaded garlic bread by adding finely diced cooked bacon, sun-dried tomatoes, or caramelized onions before adding the cheese. For a richer garlic butter, adding a tablespoon of good quality olive oil to the butter mixture helps create a smoother spread and can enhance the overall flavor.
Serving suggestions for cheesy garlic bread are abundant. It’s a classic pairing with any pasta dish, from a simple marinara to a rich lasagna. It also makes an excellent side for soups, stews, or chili, perfect for dipping and soaking up delicious broths. As a standalone appetizer, it’s always a hit at parties or gatherings. Cut into smaller, bite-sized pieces, it becomes a fantastic finger food. You can even serve it alongside grilled meats or chicken for an extra burst of flavor. Don’t forget a side of warm marinara sauce for dipping!
Storage and Reheating
Cheesy garlic bread is definitely best enjoyed fresh from the oven, but if you happen to have leftovers, they can be stored and reheated. To store, allow the garlic bread to cool completely to room temperature. Once cool, wrap it tightly in aluminum foil or place it in an airtight container. It can be stored in the refrigerator for up to 3-4 days. Storing it properly helps to prevent it from drying out and absorbing other odors from your fridge.
For reheating, the best method to restore its crispy texture is using an oven or toaster oven. Preheat your oven to 350°F (175°C). Place the leftover garlic bread directly on a baking sheet or wrap it loosely in aluminum foil. Reheat for about 10-15 minutes, or until the cheese is re-melted and bubbly and the bread is warmed through and crisp. If you prefer a crispier crust, remove the foil for the last few minutes of reheating. Avoid reheating in the microwave if possible, as it tends to make the bread soft and chewy rather than crispy. If a microwave is your only option, heat in 30-second intervals until warm, but be aware that the texture will be compromised. You can also quickly reheat individual slices in a pan on the stovetop over medium heat until warmed and slightly crispy on the bottom.
Frequently Asked Questions
Can I use pre-minced garlic from a jar?
While fresh garlic is always recommended for the best flavor, you can certainly use pre-minced garlic from a jar if that’s what you have on hand. Just be aware that the flavor might be slightly less pungent than fresh garlic. Adjust the quantity to your taste, starting with the recommended amount and adding more if desired.
What’s the best type of cheese to use for cheesy garlic bread?
Mozzarella is a classic choice for its excellent melting properties and mild flavor. However, a blend of cheeses often yields the best results. Provolone adds a nice stretch and a slightly sharper flavor, while a touch of Parmesan or Pecorino Romano can add a salty, umami depth. Feel free to experiment with your favorite melting cheeses like Monterey Jack or even a mild cheddar for a different flavor profile.
Can I prepare the garlic butter ahead of time?
Absolutely! Preparing the garlic butter ahead of time is a great time-saver. Simply mix all the garlic butter ingredients together, cover the bowl, and store it in the refrigerator for up to 3-4 days. When you’re ready to use it, let it sit at room temperature for about 15-30 minutes to soften enough to be easily spreadable. This makes assembly incredibly quick right before baking.
How do I prevent the garlic bread from being too greasy?
To prevent greasiness, ensure your butter is softened but not melted into a liquid before spreading. A softened butter will adhere better to the bread without soaking in excessively. Also, while generous, avoid applying an extremely thick layer of butter. The cheese you choose also plays a role; some cheeses release more oil when melted. If you find your cheese is getting too oily, you can gently blot the surface with a paper towel immediately after taking it out of the oven, though this is rarely necessary with standard cheese blends.