
Introduction
Prepare to have your dessert world rocked. What if I told you that a cake so utterly decadent, so bursting with vibrant flavor, and so visually stunning could be yours in just 15 minutes of active prep time? No, this isn’t a culinary fantasy; it’s the real deal, and it’s about to become your new favorite secret weapon in the kitchen. This isn’t just any cake; it’s the “Cake in 15 Minutes!” – a legendary dessert that has people clamoring for the recipe, and for good reason. It’s the perfect marriage of creamy, tangy, and sweet, crowned with a cloud of toasted meringue that will genuinely drive you crazy with delight.
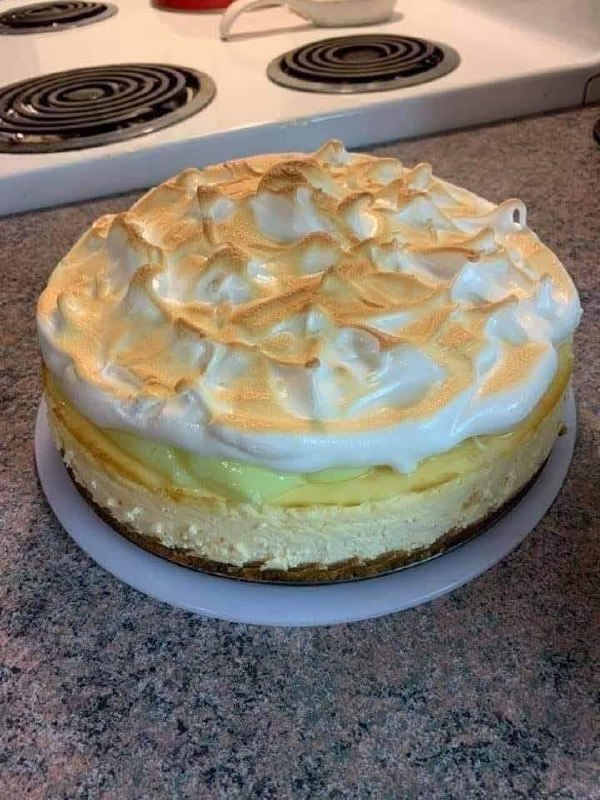
So, what makes this cake so famous, so irresistible, and so incredibly fast? The magic lies in its clever construction. Imagine a rich, silky cheesecake base, perfectly baked to a golden hue, providing a substantial and satisfying foundation. Layered atop this is a bright, zesty lemon filling or curd, a burst of sunshine that cuts through the richness and awakens your taste buds. And then, the grand finale: a majestic crown of fluffy, sweet meringue, lightly toasted to perfection, adding a delicate crispness and a hint of caramelized sugar. Each component is a star, but together, they create a symphony of textures and flavors that is truly unforgettable. The best part? We’re leveraging a few smart shortcuts that make this gourmet-level dessert accessible even on the busiest weeknights.
Forget spending hours in the kitchen for a show-stopping dessert. This cake is designed for maximum impact with minimal effort, making it ideal for impromptu gatherings, last-minute cravings, or simply when you want to treat yourself to something extraordinary without the fuss. It’s elegant enough for a special occasion but simple enough for an everyday indulgence. Get ready to impress your family and friends (and yourself!) with this incredible creation. Once you taste it, you’ll understand why everyone is raving about the “Cake in 15 Minutes!” – it’s a game-changer.
Nutritional Information
Per serving (approximate values):
- Calories: 450
- Protein: 8g
- Carbohydrates: 55g
- Fat: 23g
- Fiber: 1g
- Sodium: 280mg
Ingredients
- 1 (9-inch) pre-baked graham cracker crust
- 1 (8-ounce) package cream cheese, softened
- 1/2 cup granulated sugar (for cheesecake)
- 1 large egg
- 1 teaspoon vanilla extract
- 1 (3.4-ounce) package lemon instant pudding mix
- 1 1/2 cups cold milk (whole or 2%)
- 3 large egg whites, at room temperature
- 1/4 teaspoon cream of tartar (optional, for meringue stability)
- 6 tablespoons granulated sugar (for meringue)
Instructions
- Preheat your oven to 350°F (175°C).
- In a medium bowl, beat the softened cream cheese with 1/2 cup granulated sugar until smooth and creamy.
- Add the large egg and vanilla extract to the cream cheese mixture and beat until well combined, scraping down the sides of the bowl as needed.
- Pour the cream cheese mixture into the pre-baked graham cracker crust and spread evenly.
- Bake for 15-20 minutes, or until the edges are set and the center is just slightly jiggly. Remove from the oven and let cool completely on a wire rack. This step is crucial for the cheesecake to set properly.
- While the cheesecake is cooling, prepare the lemon pudding. In a separate bowl, whisk together the lemon instant pudding mix and 1 1/2 cups cold milk for 2 minutes, or until thickened.
- Once the cheesecake layer is completely cool (you can speed this up by placing it in the refrigerator for 10-15 minutes), carefully spread the thickened lemon pudding evenly over the cheesecake layer. Place the cake in the refrigerator to chill for at least 30 minutes while you prepare the meringue.
- To make the meringue, ensure your egg whites are at room temperature and that your mixing bowl and whisk attachments are immaculately clean and free of any grease.
- In a clean, dry bowl (preferably glass or metal), beat the egg whites with an electric mixer on medium speed until foamy.
- Add the cream of tartar (if using) and continue beating.
- Gradually add the 6 tablespoons of granulated sugar, one tablespoon at a time, while continuing to beat on high speed.
- Continue beating until stiff, glossy peaks form. The meringue should hold its shape and not collapse when the beater is lifted.
- Remove the chilled cake from the refrigerator. Carefully spoon or pipe the meringue over the lemon pudding layer, ensuring it covers the entire surface and extends to the edges of the crust. You can create decorative swirls or peaks with the back of a spoon.
- To toast the meringue, you have a few options:
- Kitchen Torch: Use a kitchen torch to gently brown the peaks of the meringue until golden.
- Broiler: Place the cake under a preheated broiler for 1-2 minutes, watching it very carefully to prevent burning. Keep the oven door slightly ajar and do not walk away.
- Oven: Bake at 350°F (175°C) for 5-8 minutes, or until the meringue is lightly golden.
- Once the meringue is toasted, return the cake to the refrigerator and chill for at least 2-3 hours before serving. This allows all the layers to set properly and the flavors to meld beautifully.
- Slice and serve chilled.
Cooking Tips and Variations
For the ultimate “15-minute” claim, ensure you have all your ingredients prepped and measured before you start. The 15 minutes refers to active assembly and initial baking, not total chilling time. A truly set cake will need several hours in the fridge.
Meringue mastery is key for that show-stopping finish. Always use room temperature egg whites; they whip up to a greater volume. Ensure your bowl and beaters are completely grease-free, as even a tiny speck of fat can prevent the egg whites from stiffening. If you don’t have cream of tartar, a tiny pinch of salt or a teaspoon of lemon juice can help stabilize the egg whites.
When toasting the meringue, use extreme caution, especially with a broiler. Meringue can go from perfectly golden to burnt in a matter of seconds. Stay vigilant! A kitchen torch offers the most control and is highly recommended for achieving those beautiful, even peaks.
Don’t rush the chilling process. While the cake is assembled quickly, the layers need adequate time in the refrigerator to set up properly and for the flavors to fully develop. A well-chilled cake will slice cleanly and taste infinitely better.
For variations, consider a lime instant pudding mix for a zesty lime meringue pie adaptation. You could also swirl in some fresh berries or a thin layer of raspberry jam over the cheesecake before adding the lemon pudding for a fruity twist. If you’re feeling adventurous, try a chocolate graham cracker crust for a different flavor profile. For an extra touch of elegance, garnish each slice with a few fresh lemon zest curls or a sprig of mint.
If you prefer a homemade lemon curd, feel free to substitute the instant pudding. Just ensure it’s cooled completely before spreading it over the cheesecake layer. This will add a few minutes to your prep time but will elevate the flavor even further. If your meringue seems runny, it likely wasn’t beaten to stiff enough peaks or there was some fat contamination. Keep beating until it’s firm and glossy. If your cheesecake cracks, don’t worry, the pudding layer will cover it!
Storage and Reheating
This “Cake in 15 Minutes!” is best enjoyed chilled. Store any leftovers in an airtight container in the refrigerator for up to 3-4 days. The meringue will soften over time, especially if exposed to air or humidity, but the flavors will still be delicious. To help preserve the meringue’s texture, you can lightly cover the cake with plastic wrap, being careful not to press down on the meringue peaks.
This cake is not suitable for freezing, as the meringue and pudding layers will not hold up well after thawing, becoming watery and losing their desired texture. It is a dessert meant to be made and enjoyed fresh within a few days.
Reheating is not recommended for this type of cake. It is designed to be served cold, straight from the refrigerator. Reheating would cause the meringue to deflate and become chewy, and the other layers would lose their creamy, set consistency. Simply remove a slice from the refrigerator and serve.
Frequently Asked Questions
Why did my meringue weep or collapse?
Meringue weeping (where liquid seeps out) or collapsing is usually due to undissolved sugar, under-beaten egg whites, or humidity. Ensure you beat the egg whites until the sugar is completely dissolved and the meringue forms stiff, glossy peaks. Using room temperature egg whites and adding a stabilizer like cream of tartar can also help. High humidity can also be a factor, so try to make meringue on a dry day if possible.
Can I make this cake ahead of time?
Yes, you can assemble the entire cake, including the meringue, up to 24 hours in advance. However, for the best meringue texture, it’s ideal to toast the meringue within a few hours of serving. If you prepare it a day ahead, the meringue might soften slightly, but the cake will still be delicious. Always store it in the refrigerator.
What if I don’t have a kitchen torch?
No problem! You can achieve a beautiful toasted meringue using your oven’s broiler. Place the cake on the top rack of your oven and set the broiler to low. Watch it continuously – it only takes 1-2 minutes for the meringue to brown. Alternatively, you can bake the meringue at 350°F (175°C) for 5-8 minutes until lightly golden. Both methods work well, but the broiler offers quicker results and more distinct browning.
Can I use a different type of crust?
Absolutely! While a graham cracker crust provides a classic base, you can experiment with other pre-baked crusts. A shortbread crust would add a buttery, crumbly texture, or a chocolate cookie crust could offer a delightful contrast to the lemon and cheesecake. Just ensure the crust is pre-baked and cooled before adding the cheesecake layer.