
Introduction
Get ready to unleash the ultimate comfort food experience with this incredibly easy and utterly delicious cheese bread recipe! Forget complicated baking techniques or long waits for yeast to rise. This isn’t your grandma’s sourdough (unless your grandma was a wizard who made instant cheesy perfection). We’re talking about a quick, pan-fried flatbread that’s bursting with gooey, melted cheese, ready to satisfy your cravings in a flash. Imagine a warm, golden-brown exterior giving way to a soft, chewy interior, where streams of savory cheese stretch and delight. It’s the kind of bread that begs to be torn apart, shared (or not!), and savored with every single bite.
What makes this cheese bread so special? Its simplicity, for starters. You likely have most of the ingredients in your pantry right now, making it a spontaneous snack or a last-minute addition to any meal. It’s incredibly versatile too – perfect for a hearty breakfast, a satisfying afternoon snack, a delightful side dish to your favorite soup or salad, or even as a unique appetizer. The process is so straightforward that even novice cooks will feel like seasoned bakers. There’s a certain magic in watching a simple dough transform into a golden, puffed-up pocket of cheesy goodness right before your eyes on the stovetop, filling your kitchen with an irresistible aroma that promises pure deliciousness.
This particular cheese bread stands out from its relatives like the airy Brazilian Pão de Queijo or the garlicky Italian-American cheesy bread. While those are wonderful in their own right, our version is a comforting, doughy flatbread, pan-fried to perfection, making it incredibly quick and accessible. It’s like a warm hug in food form, a savory treat that delivers maximum flavor with minimal effort. Prepare to fall in love with this cheesy creation – once you try it, it’s sure to become a regular in your culinary rotation!
Nutritional Information
Per serving (approximate values):
- Calories: 320 kcal
- Protein: 12g
- Carbohydrates: 35g
- Fat: 14g
- Fiber: 2g
- Sodium: 450mg
Ingredients
- 2 cups (240g) all-purpose flour, plus more for dusting
- 1 teaspoon baking powder
- 1/2 teaspoon salt
- 1/2 cup (120ml) warm water (about 105-115°F / 40-46°C)
- 1/4 cup (60ml) milk (any kind), warmed
- 2 tablespoons olive oil, plus more for cooking
- 1 cup (113g) shredded mozzarella cheese, or a blend of mozzarella and cheddar
- Optional: 1/2 teaspoon garlic powder, 1 tablespoon chopped fresh chives or parsley
Instructions
- In a large mixing bowl, whisk together the all-purpose flour, baking powder, and salt. If using, add garlic powder and mix well.
- In a separate small bowl, combine the warm water, warm milk, and 2 tablespoons of olive oil.
- Pour the wet ingredients into the dry ingredients. Mix with a spoon or your hands until a shaggy dough forms.
- Turn the dough out onto a lightly floured surface. Knead for 5-7 minutes until the dough is smooth and elastic. It should be soft and slightly tacky, but not sticky. Add a tiny bit more flour if too sticky, or a tiny bit more water if too dry.
- Form the dough into a ball, lightly grease the bowl with a little olive oil, and place the dough back in. Cover the bowl with a clean kitchen towel or plastic wrap and let it rest for at least 20-30 minutes at room temperature. This resting period is crucial for a tender bread.
- While the dough is resting, prepare your cheese. If using, mix the shredded cheese with chopped chives or parsley.
- Once the dough has rested, divide it into 4 equal portions.
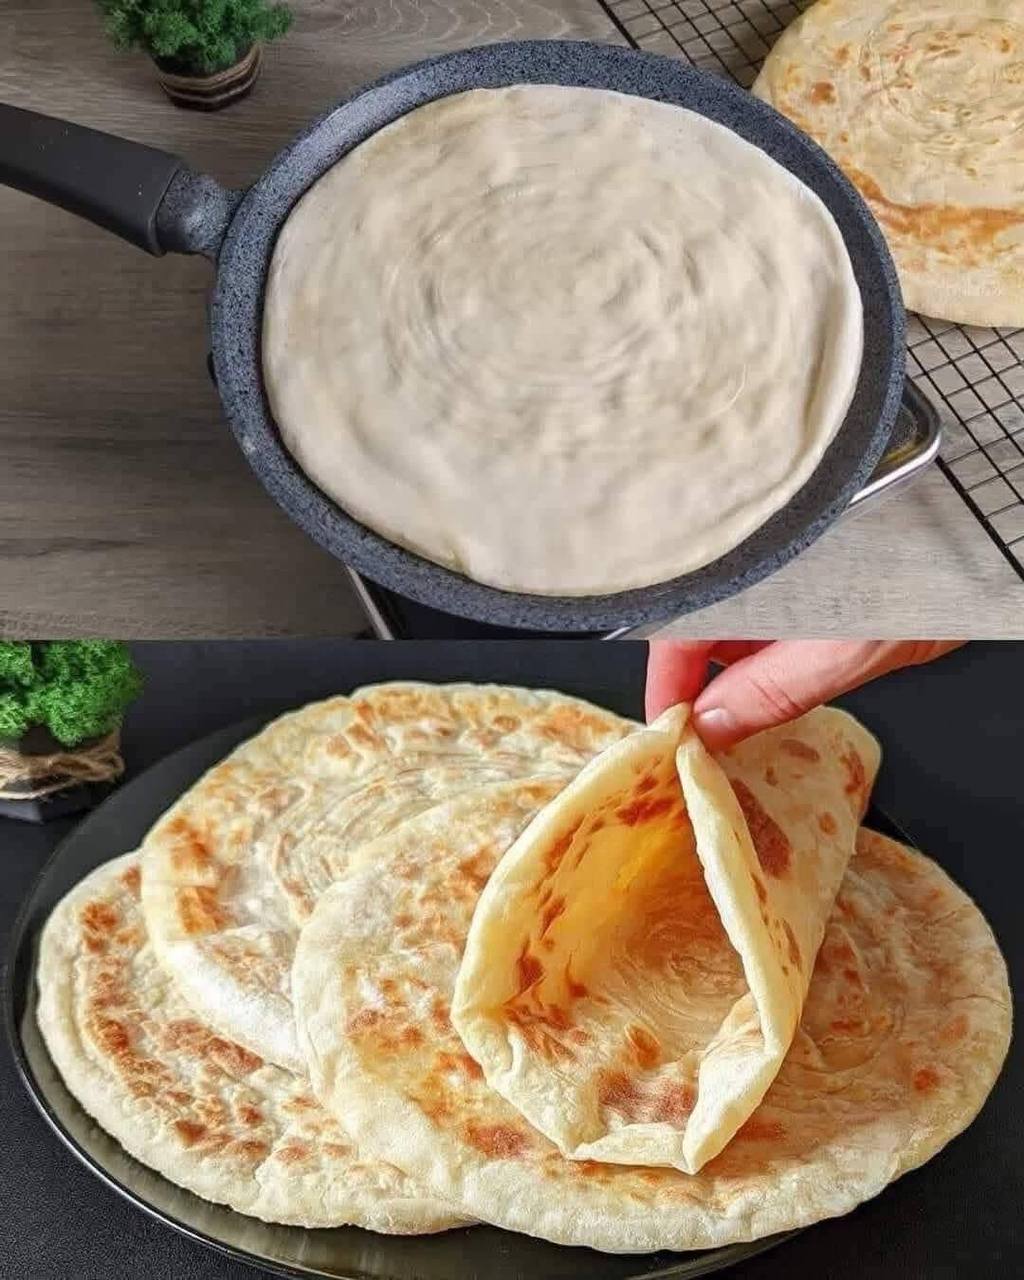
- On a lightly floured surface, take one portion of dough and roll it out into a thin circle, about 6-7 inches in diameter. Don’t make it too thin, or the cheese might break through.
- Place about 1/4 cup of the shredded cheese in the center of the rolled-out dough circle, leaving a border around the edges.
- Carefully gather the edges of the dough over the cheese, bringing them together to meet in the center. Pinch the seams tightly to seal the cheese inside, forming a ball. Ensure there are no gaps for the cheese to escape during cooking.
- Gently flatten the sealed dough ball with your palm, then carefully roll it out again into a circle, about 5-6 inches in diameter. Be gentle to prevent the cheese from tearing through the dough. If a little cheese peeks out, just pinch the dough around it.
- Repeat steps 7-11 with the remaining dough portions and cheese.
- Heat a large non-stick skillet or cast-iron pan over medium heat. Add about 1 tablespoon of olive oil (or butter) to the pan, ensuring it coats the bottom.
- Once the oil is shimmering, carefully place one cheese bread into the hot pan. Cook for 3-5 minutes per side, or until golden brown and puffed up, and the cheese inside is melted and gooey. You might need to adjust the heat slightly to prevent burning.
- Remove the cooked cheese bread from the pan and place it on a wire rack or plate. Repeat with the remaining cheese breads, adding more oil to the pan as needed for each one.
- Serve immediately while warm and the cheese is still wonderfully melty.
Cooking Tips and Variations
For the best results, always use warm liquids when making the dough. This helps activate the baking powder more effectively, leading to a softer, more tender bread. Don’t skip the resting time for the dough; it allows the gluten to relax, making the dough easier to roll out and preventing it from shrinking back. When rolling out the filled dough, use gentle, even pressure. If you press too hard, the cheese can burst through before it even hits the pan. If you see a small tear, simply pinch it closed.
Experiment with different cheeses! While mozzarella is a classic for its meltiness, a blend with cheddar, provolone, or even a touch of cream cheese can add depth and tang. For a spicy kick, add a pinch of red pepper flakes to the cheese filling or a finely chopped jalapeño. Fresh herbs like rosemary, thyme, or oregano can be kneaded into the dough or mixed with the cheese for an aromatic twist. You can also make a sweet version by filling the dough with cream cheese and a sprinkle of sugar and cinnamon, then serving it with fruit compote.
Storage and Reheating
Leftover cheese bread is best stored in an airtight container at room temperature for up to 2 days. If you plan to keep them longer, refrigerate for up to 4 days. While they are best enjoyed fresh, they still make for a delightful snack later.
To reheat, the best method is to use a dry skillet over medium-low heat. Place the cheese bread in the pan and cook for 2-3 minutes per side, until warmed through and slightly crispy again. This method helps restore some of its original texture. You can also reheat them in a toaster oven or conventional oven at 350°F (175°C) for about 5-7 minutes, or until the cheese is melted and the bread is heated through. Microwaving is an option for speed, but it can make the bread a bit soft and chewy rather than crispy.
Frequently Asked Questions
Can I make the dough ahead of time?
Yes, you absolutely can! After kneading the dough, you can place it in an oiled bowl, cover it tightly with plastic wrap, and refrigerate it for up to 24 hours. When you’re ready to cook, let the dough come to room temperature for about 30 minutes before dividing and rolling it out.
What if I don’t have a non-stick pan?
While a non-stick pan is recommended for easy cooking and cleanup, you can use a well-seasoned cast-iron skillet or any heavy-bottomed pan. Just be sure to use enough oil or butter to prevent sticking and keep an eye on the heat to avoid burning.
My cheese bread isn’t puffing up like yours. What went wrong?
Several factors could affect puffiness. Ensure your baking powder is fresh and active. Also, make sure your dough isn’t rolled too thin, which can make it hard to trap steam, or too thick, which can make it dense. The pan heat is also important; medium heat allows the bread to cook evenly and puff up without burning too quickly. If the heat is too low, it won’t puff; if too high, it’ll burn before cooking through.
Can I make this recipe gluten-free?
Yes, you can experiment with a 1:1 gluten-free all-purpose flour blend. Be aware that the dough might be a bit more delicate and less elastic, so handle it gently. The texture might also be slightly different but still delicious.