
Introduction
As the days grow longer and the promise of spring fills the air, traditions beckon us back to the kitchen, and few are as cherished as the baking of Easter bread. More than just a simple loaf, Easter bread is a culinary celebration, a sweet and often elaborately decorated centerpiece that graces tables across cultures during the holiday season. This particular rendition, with its rich, golden hue and captivating swirl, embodies the very spirit of Easter – a time of renewal, joy, and gathering around delicious food. It’s a bread that tells a story, each bite offering a delightful blend of tender, enriched dough, bursting with sweet dried fruits and crunchy nuts, all culminating in a lightly glazed finish.
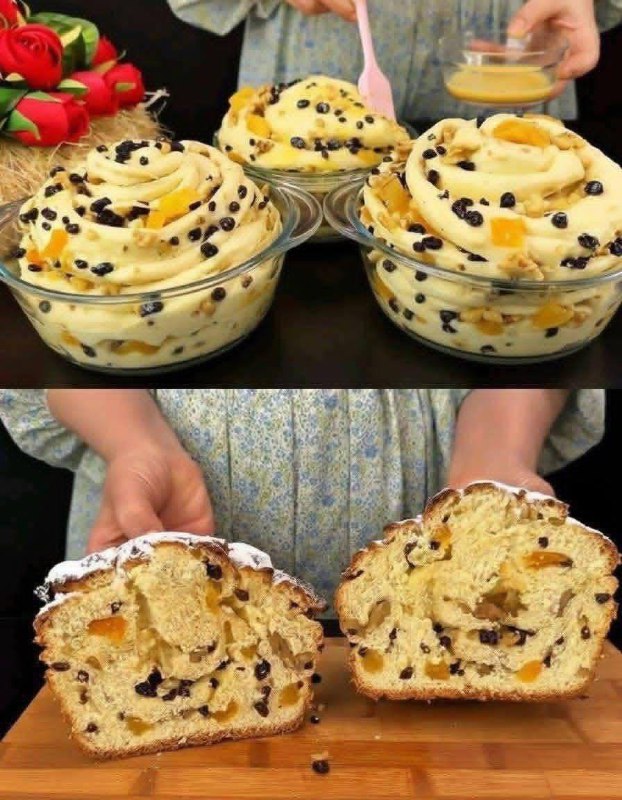
What makes this Easter bread truly special is its inviting aroma that fills your home as it bakes, signaling the arrival of something truly extraordinary. Imagine a brioche-like dough, soft and yielding, meticulously rolled with a generous filling of plump raisins, sun-kissed apricots, and earthy walnuts. The artistry comes alive as the dough is gently swirled, creating a beautiful marbling effect that is as appealing to the eye as it is to the palate. This isn’t just a bread; it’s an experience, a labor of love that transforms simple ingredients into a masterpiece of flavor and texture, perfect for sharing with family and friends.
Whether enjoyed for breakfast, brunch, or as a sweet complement to your Easter feast, this swirled fruit and nut Easter bread is destined to become a new holiday favorite. Its comforting sweetness, combined with the satisfying chew of the dough and the varied textures of the filling, makes every slice a moment to savor. Get ready to embark on a delightful baking journey that will fill your kitchen with warmth and your heart with the joy of creating something truly memorable for your Easter celebration.
Nutritional Information
Per serving (approximate values):
- Calories: 350
- Protein: 8g
- Carbohydrates: 55g
- Fat: 12g
- Fiber: 3g
- Sodium: 250mg
Ingredients
- For the Dough:
- 500g (about 4 cups) all-purpose flour, plus more for dusting
- 7g (2 ¼ teaspoons) active dry yeast
- 100g (½ cup) granulated sugar
- ½ teaspoon salt
- 120ml (½ cup) warm milk (105-115°F / 40-46°C)
- 2 large eggs, at room temperature
- 1 large egg yolk, at room temperature
- 80g (⅓ cup) unsalted butter, softened and cut into pieces
- 1 teaspoon vanilla extract
- Zest of 1 lemon (optional, for extra flavor)
- For the Filling:
- 100g (⅔ cup) dark raisins
- 75g (½ cup) dried apricots, finely diced
- 75g (½ cup) walnuts, chopped
- 50g (¼ cup) granulated sugar
- 1 teaspoon ground cinnamon
- 2 tablespoons unsalted butter, melted
- For the Glaze:
- 1 large egg, beaten (for egg wash)
- 60g (½ cup) powdered sugar
- 1-2 tablespoons milk or lemon juice
Instructions
- Activate the Yeast: In a small bowl, combine the warm milk and 1 teaspoon of the granulated sugar. Sprinkle the active dry yeast over the top and let it sit for 5-10 minutes, until foamy. This indicates the yeast is active.
- Combine Dry Ingredients: In a large mixing bowl (or the bowl of a stand mixer fitted with the dough hook attachment), whisk together the flour, remaining granulated sugar, and salt.
- Add Wet Ingredients to Dry: Pour the activated yeast mixture into the dry ingredients. Add the 2 large eggs, egg yolk, vanilla extract, and lemon zest (if using).
- Knead the Dough: If using a stand mixer, mix on low speed until a shaggy dough forms, about 2-3 minutes. If kneading by hand, mix with a wooden spoon until combined.
- Incorporate Butter: Gradually add the softened butter pieces, one at a time, allowing each piece to be mostly incorporated before adding the next.
- Continue Kneading: Increase the mixer speed to medium-low and knead for 8-10 minutes, or knead by hand on a lightly floured surface for 10-15 minutes, until the dough is smooth, elastic, and no longer sticky. It should pass the “windowpane test” (a small piece of dough can be stretched thin enough to see light through it without tearing).
- First Rise: Lightly grease a clean bowl. Place the dough in the bowl, turning it once to coat. Cover the bowl with plastic wrap or a clean kitchen towel and let it rise in a warm, draft-free place for 1.5 to 2 hours, or until doubled in size.
- Prepare the Filling: While the dough is rising, combine the raisins, diced apricots, chopped walnuts, 50g granulated sugar, and ground cinnamon in a medium bowl. Stir to combine. Set aside.
- Punch Down and Chill (Optional but Recommended): Once the dough has doubled, gently punch it down to release the air. If time permits, cover the bowl again and refrigerate for at least 30 minutes (or up to overnight). Chilling the dough makes it easier to handle and roll.
- Prepare for Shaping: Lightly flour a clean work surface. Gently turn the chilled dough out onto the floured surface.
- Roll the Dough: Using a rolling pin, roll the dough into a large rectangle, approximately 18×12 inches (45×30 cm) and about ¼ inch thick.
- Spread Filling: Brush the melted butter evenly over the entire surface of the dough, leaving a ½ inch border along one of the long edges. Evenly sprinkle the prepared fruit and nut filling over the buttered dough, pressing it down lightly so it adheres.
- Roll into a Log: Starting from one of the long edges (the one without the border), tightly roll the dough into a log. Pinch the seam closed to seal.
- Shape the Bread: Gently transfer the log to a 9-inch round baking pan (springform or regular cake pan) lined with parchment paper. If the log is too long, you can gently coil it into a spiral shape within the pan. Alternatively, you can cut the log in half lengthwise and twist the two halves together before coiling. Ensure it fits snugly.
- Second Rise: Cover the pan loosely with plastic wrap or a clean kitchen towel and let it rise in a warm, draft-free place for 45-60 minutes, or until visibly puffy and almost doubled in size.
- Preheat Oven: While the bread is rising for the second time, preheat your oven to 350°F (175°C).
- Egg Wash: Once the bread has risen, gently brush the top with the beaten egg (egg wash).
- Bake: Bake for 30-40 minutes, or until the top is golden brown and a wooden skewer inserted into the center comes out clean. If the top browns too quickly, you can loosely tent it with aluminum foil for the last 10-15 minutes of baking.
- Cool: Remove the bread from the oven and let it cool in the pan for 10-15 minutes before carefully transferring it to a wire rack to cool completely.
- Prepare Glaze: While the bread is cooling, whisk together the powdered sugar and 1 tablespoon of milk or lemon juice in a small bowl until smooth. Add more liquid a few drops at a time if needed, until you reach a pourable but not too thin consistency.
- Glaze and Serve: Once the bread has cooled to lukewarm, drizzle the glaze over the top. Let the glaze set for a few minutes before slicing and serving.
Cooking Tips and Variations
For the best results, always ensure your yeast is fresh and active. You can test it by mixing a small amount with warm water and a pinch of sugar; if it doesn’t foam within 5-10 minutes, your yeast might be old and should be replaced. When kneading, resist the urge to add too much extra flour, as this can lead to a dry, tough bread. The dough should be slightly sticky but manageable. A good trick for a perfect rise is to place the covered dough in a slightly warm oven (turned off, of course) with the light on, which creates a cozy, consistent environment.
To prevent your bread from drying out during baking, you can place a small pan of water on the bottom rack of your oven to create some steam. If the top of the bread is browning too quickly before the inside is cooked, loosely tent it with aluminum foil. Always allow the bread to cool completely on a wire rack to prevent it from becoming soggy and to ensure the internal structure sets properly.
Variations abound for this versatile Easter bread. Feel free to experiment with different dried fruits; dried cranberries, cherries, or even finely chopped prunes would be delicious alternatives or additions. For nuts, pecans or slivered almonds can be used instead of walnuts. You can also add other warm spices to the filling, such as a pinch of nutmeg or cardamom, to deepen the flavor profile. For a citrusy twist, increase the amount of lemon zest in the dough or use orange zest instead. If you prefer a richer glaze, you can omit the milk and use melted butter with the powdered sugar and a touch of vanilla extract for a butter glaze.
Another popular variation is to add a cream cheese filling. To do this, combine 4 ounces softened cream cheese with 2 tablespoons powdered sugar and ½ teaspoon vanilla extract. Spread this mixture over the dough before adding the fruit and nut filling. For a more decorative touch, after the second rise and before baking, you can create a cross on top of the bread with strips of dough or by scoring it with a sharp knife. Some traditions also involve placing colored hard-boiled eggs directly into the dough before baking for a festive look, though this recipe is designed for a filled, swirled bread.
Don’t be afraid to make this recipe your own. The beauty of baking is in the personal touch and the joy of creating something unique. Whether you stick to the classic or venture into new flavor combinations, the process of making and sharing this Easter bread is sure to bring warmth and happiness to your holiday celebration.
Storage and Reheating
Proper storage is key to keeping your Easter bread fresh and delicious. Once completely cooled, the bread can be stored at room temperature for up to 3-4 days. To maintain its softness and prevent it from drying out, wrap the bread tightly in plastic wrap or aluminum foil, or place it in an airtight container. If your kitchen is particularly warm or humid, or if you want to extend its shelf life, you can store it in the refrigerator for up to a week. However, refrigerated bread tends to dry out a bit more quickly, so ensure it’s well-wrapped.
For longer storage, Easter bread freezes beautifully. Once completely cool, wrap the entire loaf or individual slices tightly in plastic wrap, then an additional layer of aluminum foil. Place it in a freezer-safe bag or container. It can be stored in the freezer for up to 2-3 months. Thaw frozen bread overnight in the refrigerator or at room temperature for a few hours.
Reheating this Easter bread can bring back its fresh-baked warmth and softness. If you have a whole loaf or large slices, you can reheat them in a preheated oven at 300°F (150°C) for about 10-15 minutes, or until warmed through. For individual slices, a toaster oven or even a microwave can be used. In the microwave, heat for 15-30 seconds, checking frequently to avoid over-heating, which can make it tough. A quick zap in the microwave is perfect for softening it up, especially if it’s been refrigerated. Enjoy your reheated Easter bread with a cup of coffee or tea, or as a delightful snack any time of day.
Frequently Asked Questions
What is the difference between Easter bread and other sweet breads?
Easter bread, while sharing characteristics with other sweet, enriched breads like brioche or challah, often has specific cultural and symbolic significance tied to the Easter holiday. It typically contains eggs, butter, and sugar, resulting in a rich, tender crumb. What often sets it apart are its traditional shapes (like braids, wreaths, or round loaves with colored eggs), specific flavorings (like citrus zest, anise, or mahlab), and the inclusion of dried fruits and nuts, as seen in this recipe. Different cultures have their own unique versions, but all share the celebratory essence of the season.
Can I make the dough ahead of time?
Absolutely! Making the dough ahead of time is a fantastic way to break up the baking process and can even enhance the flavor and texture of the bread. After the first rise, you can punch down the dough, cover it tightly with plastic wrap, and refrigerate it for up to 24-48 hours. When you’re ready to bake, remove the dough from the refrigerator and let it come to room temperature for about 30-60 minutes before rolling, filling, and proceeding with the second rise and baking instructions. This slow, cold fermentation can develop deeper flavors in the bread.
What if my bread doesn’t rise?
If your bread isn’t rising, the most common culprit is inactive yeast. This can happen if the yeast is old, or if the liquid used to activate it was either too hot (killing the yeast) or too cold (preventing it from activating). Ensure your warm milk is between 105-115°F (40-46°C). Another factor could be a cold environment; yeast needs warmth to thrive. Try placing your dough in a warm, draft-free spot, like a slightly warmed (but turned off) oven with the light on. If the yeast was indeed inactive, unfortunately, you might need to start over with fresh yeast.
Can I substitute other flours?
While this recipe is designed for all-purpose flour, you can experiment with some substitutions, but be aware it might alter the texture. For a slightly healthier option, you could replace up to 1 cup of the all-purpose flour with whole wheat pastry flour, which has a lower protein content than regular whole wheat flour and won’t make the bread too dense. However, using 100% whole wheat or other alternative flours like almond or coconut flour is not recommended for this recipe, as they behave very differently from wheat flour and would require significant adjustments to the liquid content and overall recipe structure to achieve a similar result.