
Introduction
There’s something undeniably comforting and utterly delicious about a pan of cheesy scalloped potatoes. It’s the kind of dish that evokes memories of family gatherings, holiday feasts, and cozy weeknight dinners. This classic side dish, with its tender layers of potato swimming in a rich, creamy cheese sauce, is a guaranteed crowd-pleaser that never goes out of style. While traditionally made with a homemade cream sauce, our version takes a brilliant shortcut that makes this beloved comfort food even more accessible for busy cooks: canned cheese sauce!
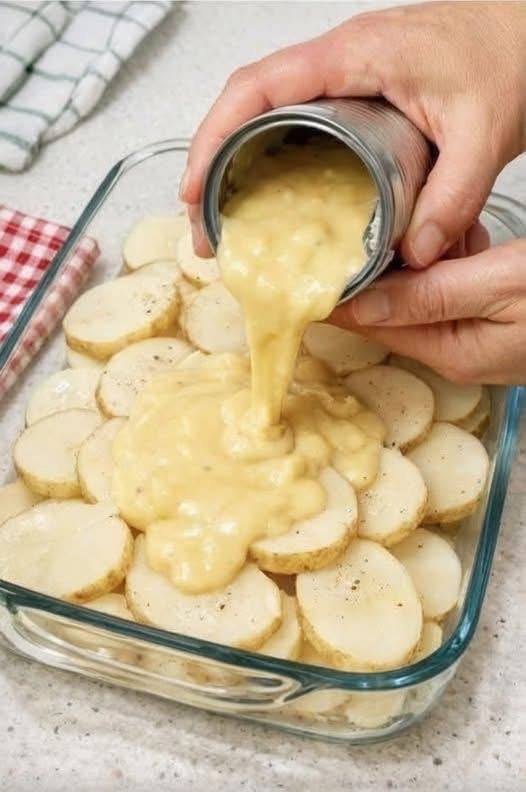
That’s right! Say goodbye to whisking béchamel and hello to effortless deliciousness. By utilizing a readily available canned cheese sauce, we transform what can sometimes be a labor-intensive recipe into a simple, straightforward dish perfect for any occasion. Whether you’re whipping up a quick side for a weeknight roast chicken or need a reliable potluck contribution that everyone will rave about, these cheesy scalloped potatoes deliver on flavor without demanding hours of your time. It’s the ultimate combination of convenience and home-cooked goodness.
This recipe is designed to be easy to follow, even for novice cooks, and yields a dish that tastes like you spent all day in the kitchen. The key lies in the layering of thinly sliced potatoes and that luscious cheese sauce, which bakes down into a bubbly, golden masterpiece. Get ready to impress your family and friends with a dish that’s rich, creamy, and oh-so-cheesy, proving that sometimes, the simplest ingredients can create the most extraordinary results.
Nutritional Information
Per serving (approximate values):
- Calories: 350
- Protein: 12g
- Carbohydrates: 35g
- Fat: 18g
- Fiber: 3g
- Sodium: 650mg
Ingredients
- 4-5 large Russet or Yukon Gold potatoes (about 2.5-3 pounds), peeled and thinly sliced (1/8-inch thick)
- 2 (15-ounce) cans condensed cheddar cheese soup or canned cheese sauce
- 1/2 cup milk (whole or 2%)
- 1/2 teaspoon garlic powder (optional)
- 1/4 teaspoon black pepper
- 1/2 teaspoon salt, plus more for seasoning potatoes
- 1 cup shredded sharp cheddar cheese, divided (for topping)
- Optional add-ins: 1 cup diced cooked ham, 1/2 cup cooked and crumbled bacon, 1/4 cup finely chopped onion, 1 teaspoon fresh minced garlic
Instructions
- Preheat your oven to 375°F (190°C). Lightly grease a 9×13 inch baking dish.
- Prepare the potatoes: Peel the potatoes and slice them into very thin, uniform rounds, about 1/8-inch thick. A mandoline slicer is highly recommended for achieving consistent thickness, which ensures even cooking. If slicing by hand, try to keep them as even as possible.
- In a medium bowl, whisk together the canned cheese soup (or sauce), milk, garlic powder (if using), black pepper, and 1/2 teaspoon of salt until smooth and well combined. This will be your creamy cheese sauce. If adding optional diced ham or chopped onion, stir them into the sauce mixture now.
- Begin layering: Arrange one-third of the sliced potatoes in an even layer at the bottom of the prepared baking dish. Slightly overlap them if necessary to cover the bottom completely.
- Pour about one-third of the cheese sauce mixture evenly over the potato layer.
- Repeat the layering process: Add another one-third of the sliced potatoes, followed by another one-third of the cheese sauce.
- Place the remaining one-third of the sliced potatoes on top, creating the final potato layer.
- Pour the remaining cheese sauce evenly over the top layer of potatoes, making sure to spread it to the edges.
- Cover the baking dish tightly with aluminum foil.
- Bake for 45-60 minutes, or until the potatoes are tender when pierced with a fork. Cooking time can vary depending on the thickness of your potato slices.
- Remove the foil from the baking dish. Sprinkle the 1 cup of shredded sharp cheddar cheese evenly over the top of the potatoes.
- Return the dish to the oven, uncovered, and bake for an additional 15-20 minutes, or until the cheese is melted, bubbly, and golden brown. If the top is browning too quickly, you can loosely tent it with foil again.
- Once baked, remove the cheesy scalloped potatoes from the oven and let them rest for 10-15 minutes before serving. This resting period allows the sauce to set slightly, making for easier and cleaner serving.
Cooking Tips and Variations
For truly perfect cheesy scalloped potatoes, uniform potato slices are paramount. Using a mandoline slicer will give you consistent 1/8-inch thick rounds, ensuring all potatoes cook at the same rate. Uneven slices can lead to some potatoes being undercooked and others mushy. If you don’t have a mandoline, take your time with a sharp knife to achieve the thinnest, most even slices possible. Another excellent tip to prevent the top potato layer from browning too much before the dish is fully cooked is to ensure the dish is tightly covered with foil for the initial baking period. This traps steam and helps cook the potatoes through without drying them out. Only remove the foil for the last 15-20 minutes to achieve that beautiful golden, bubbly cheese crust.
When it comes to cheese, while cheddar is a classic choice, feel free to experiment! A blend of Gruyere and sharp cheddar can add a more sophisticated, nutty flavor. Monterey Jack or Colby Jack are great for extra meltiness and a milder taste. If you prefer a bolder flavor, a touch of smoked gouda mixed in with your cheddar can be absolutely divine. For those who enjoy a bit of heat, a pinch of cayenne pepper or a dash of hot sauce can be added to the cheese sauce mixture. You can also swap out half of the cheddar for Gruyere or a good quality Swiss cheese for a different flavor profile.
While this recipe champions the convenience of canned cheese sauce, you can certainly make a homemade cheese sauce if you prefer. Start with a roux (equal parts butter and flour cooked together), then gradually whisk in milk until thickened. Stir in your favorite shredded cheeses (cheddar, Gruyere, Parmesan) until melted and smooth. Season with salt, pepper, and a pinch of nutmeg for a traditional touch. This from-scratch approach offers more control over the flavor and texture of your sauce.
Don’t be afraid to add other vegetables to this casserole! Finely diced onions or shallots can be sautéed until translucent and added to the cheese sauce for an extra layer of flavor. A handful of fresh spinach, wilted and squeezed dry, can be layered between the potatoes. Sautéed mushrooms or bell peppers could also make a delicious addition. For a heartier meal, cooked and crumbled bacon, diced cooked ham, or even shredded cooked chicken can be layered in with the potatoes and cheese sauce, transforming it into a complete one-dish meal. A sprinkle of fresh chives or parsley after baking adds a lovely fresh finish.
Storage and Reheating
Storing leftover cheesy scalloped potatoes is straightforward. Once the dish has cooled completely to room temperature, transfer any leftovers to an airtight container. It will keep well in the refrigerator for up to 3-4 days. To maintain the best texture and prevent sogginess, it’s crucial to ensure the potatoes are fully cooled before sealing them in a container. This also helps prevent bacterial growth.
For reheating, the oven is generally the best method to restore that delicious crispy top and creamy interior. Preheat your oven to 300°F (150°C). Place the leftover scalloped potatoes in an oven-safe dish, preferably one that is not too deep, to allow for even reheating. If the potatoes appear a bit dry, you can add a splash of milk or even a dollop of butter on top before reheating. Cover the dish loosely with aluminum foil to prevent drying out and bake for 20-30 minutes, or until heated through and bubbly. If you want to crisp up the top again, remove the foil for the last 5-10 minutes.
While the oven is preferred, you can also reheat individual portions in the microwave. Place a serving on a microwave-safe plate and heat on medium power for 1-2 minutes, stirring halfway through, until hot. Be aware that microwave reheating might alter the texture slightly, making the potatoes a bit softer and the cheese less crispy than oven reheating. The creamy sauce might also become a little thinner. Regardless of the method, make sure the potatoes are heated thoroughly to an internal temperature of 165°F (74°C) for food safety.
Frequently Asked Questions
Can I prepare this dish ahead of time?
Yes, you can absolutely prepare cheesy scalloped potatoes ahead of time! You have a couple of options. You can assemble the entire dish (layering potatoes and sauce) in the baking dish, cover it tightly with plastic wrap or foil, and refrigerate it for up to 24 hours before baking. When ready to bake, remove it from the refrigerator about 30 minutes before placing it in the oven to allow it to come closer to room temperature. You may need to add an extra 10-15 minutes to the initial covered baking time. Alternatively, you can bake the dish completely, let it cool, and then refrigerate. Reheat as described in the storage section.
What kind of potatoes work best for scalloped potatoes?
For scalloped potatoes, starchy potatoes like Russet (Idaho) are excellent because they break down slightly during cooking, contributing to the creamy texture of the dish. Waxy potatoes, like Yukon Gold, also work wonderfully as they hold their shape well while still becoming tender, and they offer a naturally buttery flavor. Avoid very waxy potatoes like red new potatoes, as they tend to remain too firm and don’t absorb the sauce as effectively. The key, regardless of potato type, is consistent, thin slicing.
Why are my scalloped potatoes watery?
Watery scalloped potatoes can be caused by a few factors. One common reason is that the potatoes were not sliced thinly enough, preventing them from fully cooking and absorbing the sauce. Another culprit can be not allowing the dish to rest after baking; the resting period is crucial for the sauce to set and thicken. Overcrowding the baking dish can also lead to excess moisture. Lastly, if you added too much milk to thin the canned cheese sauce, or if the potatoes themselves had a very high water content, it could result in a thinner sauce. Ensuring proper slicing, adequate baking time, and a resting period should help prevent this.