
Introduction
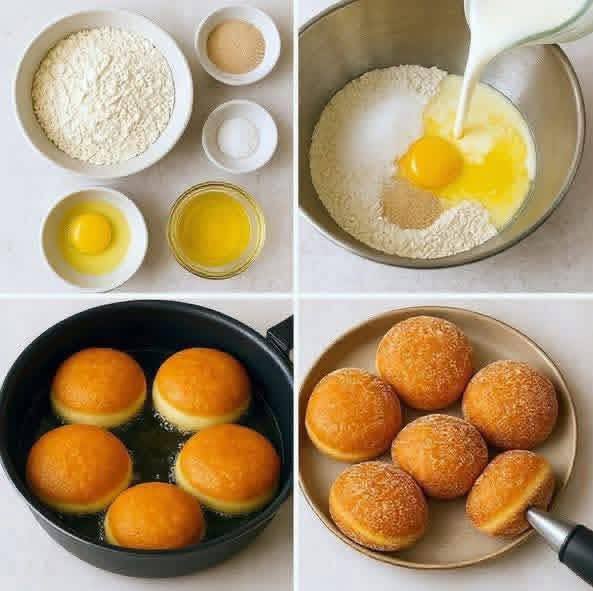
Get ready to indulge in a treat that’s guaranteed to put a smile on your face: Creamy Fried Bombs! Imagine biting into a cloud-like, golden-fried dough, only to discover a luscious, velvety cream filling bursting forth. These aren’t just any doughnuts; they’re an experience – a perfect harmony of crisp exterior, tender crumb, and impossibly smooth, sweet cream. Think of them as the elevated, homemade version of your favorite filled pastry, designed to impress and delight with every single bite.
What makes these “bombs” so special? It’s the delightful contrast of textures and temperatures. The dough itself is incredibly light and airy, thanks to a careful proofing process, absorbing just enough golden crispness from the hot oil without becoming greasy. Then there’s the filling, a rich, custardy cream that provides a cool, sweet counterpoint to the warm, fried exterior. Whether you call them bomboloni, Berliner Pfannkuchen, or simply the best fried dough you’ve ever had, these Creamy Fried Bombs are a celebration of comfort food elevated to an art form, perfect for special occasions, dessert cravings, or simply making an ordinary day extraordinary.
The beauty of making these at home lies in the freshness and the ability to customize. While the traditional pastry cream is undeniably divine, the possibilities for variations are endless. But before we get to those exciting twists, let’s master the classic. This recipe will guide you through creating a tender yeast dough, frying it to golden perfection, and filling it with a decadent cream that will have everyone asking for more. Prepare your taste buds for an explosion of flavor and texture – these Creamy Fried Bombs are truly irresistible!
Nutritional Information
Per serving (approximate values):
- Calories: 380
- Protein: 7g
- Carbohydrates: 45g
- Fat: 20g
- Fiber: 1g
- Sodium: 200mg
Ingredients
- For the Dough:
- 1 cup (240ml) warm milk (105-115°F / 40-46°C)
- 2 ¼ teaspoons (1 packet) active dry yeast
- ¼ cup (50g) granulated sugar, plus 1 teaspoon
- 1 large egg, room temperature
- 4 tablespoons (56g) unsalted butter, melted and cooled
- ½ teaspoon salt
- 3 ½ cups (420g) all-purpose flour, plus more for dusting
- Vegetable oil or canola oil, for deep frying
- Powdered sugar, for dusting (optional)
- For the Cream Filling:
- 2 cups (480ml) whole milk
- ½ cup (100g) granulated sugar
- ¼ cup (30g) cornstarch
- ¼ teaspoon salt
- 3 large egg yolks
- 2 tablespoons (28g) unsalted butter
- 1 teaspoon vanilla extract
Instructions
- Prepare the Dough: In a large mixing bowl or the bowl of a stand mixer, combine the warm milk, 1 teaspoon of granulated sugar, and active dry yeast. Stir gently and let it sit for 5-10 minutes, or until the mixture becomes foamy, indicating the yeast is active.
- Add the remaining ¼ cup granulated sugar, the large egg, melted butter, and salt to the yeast mixture. Whisk until well combined.
- Gradually add the all-purpose flour, one cup at a time, mixing with a wooden spoon or dough hook until a shaggy dough forms.
- If using a stand mixer, attach the dough hook and knead on medium-low speed for 8-10 minutes, until the dough is smooth, elastic, and pulls away from the sides of the bowl. If kneading by hand, turn the dough out onto a lightly floured surface and knead for 10-12 minutes until smooth and elastic.
- Lightly grease a clean large bowl with a little oil. Place the dough in the bowl, turning it once to coat. Cover the bowl with plastic wrap or a clean kitchen towel and let it rise in a warm place for 1-1.5 hours, or until doubled in size.
- Prepare the Cream Filling: While the dough is rising, prepare the cream filling. In a medium saucepan, combine the whole milk and half of the granulated sugar (¼ cup). Heat over medium heat, stirring occasionally, until the mixture just begins to simmer around the edges. Do not boil.
- In a separate medium bowl, whisk together the remaining ¼ cup granulated sugar, cornstarch, and salt. Add the egg yolks and whisk vigorously until the mixture is smooth and pale yellow.
- Once the milk mixture is simmering, slowly temper the egg yolk mixture by gradually pouring about half of the hot milk into the egg yolks while whisking constantly. This prevents the eggs from scrambling.
- Pour the tempered egg yolk mixture back into the saucepan with the remaining hot milk. Return the saucepan to medium heat and cook, whisking continuously, for 2-4 minutes, until the mixture thickens considerably and comes to a gentle boil. Continue to whisk for another minute to ensure the cornstarch is fully cooked.
- Remove the saucepan from the heat. Stir in the unsalted butter and vanilla extract until the butter is fully melted and incorporated.
- Pour the pastry cream into a clean bowl. Press plastic wrap directly onto the surface of the cream to prevent a skin from forming. Refrigerate for at least 2-3 hours, or until thoroughly chilled and firm.
- Shape the Dough: Once the dough has doubled, gently punch it down to release the air. Turn the dough out onto a lightly floured surface.
- Using a rolling pin, roll the dough out to about ½-inch thickness.
- Using a 2.5-3 inch round cutter (or the rim of a glass), cut out as many circles as possible. Gather the scraps, gently re-knead them, and roll out again to cut more circles.
- Place the cut dough circles on a parchment-lined baking sheet, leaving some space between each. Cover loosely with plastic wrap or a clean kitchen towel and let them rise again for another 30-45 minutes, or until visibly puffy.
- Fry the Bombs: In a large, heavy-bottomed pot or Dutch oven, pour about 3-4 inches of vegetable or canola oil. Heat the oil over medium heat to 350-360°F (175-180°C). Use a candy thermometer to monitor the temperature; maintaining the correct temperature is crucial.
- Carefully lower 3-4 dough circles into the hot oil, ensuring not to overcrowd the pot. Fry for 1.5-2 minutes per side, until golden brown and puffed.
- Using a slotted spoon, remove the fried bombs from the oil and transfer them to a wire rack set over a baking sheet lined with paper towels to drain excess oil. Repeat with the remaining dough circles, ensuring the oil temperature stays consistent between batches.
- Allow the fried bombs to cool slightly, but they are best filled while still warm.
- Fill the Bombs: Once the fried bombs are cool enough to handle, retrieve the chilled pastry cream from the refrigerator. Whisk it briefly to loosen it up.
- Transfer the pastry cream to a piping bag fitted with a long, thin piping tip (like a Bismark tip or a plain round tip). If you don’t have a special tip, you can make a small incision with a knife into the side of each bomb, then carefully pipe the cream in.
- Insert the piping tip into the side of each fried bomb and gently squeeze the bag, filling the bomb until it feels plump and slightly heavy.
- Serve: Dust the filled Creamy Fried Bombs generously with powdered sugar just before serving. Enjoy them warm or at room temperature.
Cooking Tips and Variations
Perfect Oil Temperature is Key: This is arguably the most crucial tip for frying. If the oil is too hot, the outside will burn before the inside cooks through, leaving you with raw dough. If the oil is too cold, the dough will absorb too much oil, resulting in greasy, heavy bombs. Invest in a good candy thermometer and diligently monitor the oil temperature, keeping it between 350-360°F (175-180°C). Adjust the heat as needed between batches.
Don’t Overcrowd the Pot: Frying too many bombs at once will cause the oil temperature to drop significantly, leading to greasy results. Fry in small batches, typically 3-4 at a time, to maintain consistent oil temperature and ensure even cooking.
Proper Kneading for a Light Dough: Kneading the dough sufficiently develops the gluten, which is essential for a soft, elastic, and airy texture. You’ll know it’s properly kneaded when it’s smooth, no longer sticky, and passes the “windowpane test” – you should be able to stretch a small piece of dough thin enough to see light through it without it tearing.
Allow for Full Proofing: Don’t rush the rising process. Both the initial bulk rise and the final proofing of the shaped dough are vital for achieving that desirable light and fluffy texture. A warm, draft-free environment helps the yeast work its magic. If your kitchen is cool, you can place the dough in a slightly warmed (but turned off) oven.
Chill the Pastry Cream Thoroughly: A well-chilled pastry cream will be thicker, easier to pipe, and hold its shape better inside the fried bombs. Don’t skip the refrigeration step; it’s essential for the cream’s texture and stability.
Filling Variations: While classic pastry cream is divine, feel free to get creative!
- Chocolate Cream: Melt 2-3 ounces of good quality dark chocolate into the hot pastry cream base along with the butter and vanilla.
- Lemon Curd: A tangy lemon curd offers a bright contrast to the sweet dough.
- Jam/Jelly: Use a high-quality fruit jam (raspberry, strawberry, apricot) for a simpler, fruitier filling. Warm it slightly to make it easier to pipe.
- Nutella: For a quick and crowd-pleasing option, simply pipe softened Nutella into the bombs.
- Whipped Cream: For a lighter option, fill with sweetened whipped cream just before serving.
Toppings and Garnishes:
- Powdered Sugar: The classic and simplest finish.
- Cinnamon Sugar: Mix granulated sugar with a touch of cinnamon for a warm, fragrant coating immediately after frying.
- Glaze: A simple powdered sugar glaze (powdered sugar mixed with a little milk or lemon juice) can be drizzled over the top.
- Chocolate Drizzle: Melted chocolate can be drizzled for an extra touch of decadence.
Safety First When Frying: Always be cautious when working with hot oil. Keep a fire extinguisher nearby, never leave oil unattended, and use tongs or a slotted spoon to carefully place and remove dough from the oil. Ensure your pot is large enough to prevent boil-overs.
Storage and Reheating
Storage: Creamy Fried Bombs are best enjoyed fresh, ideally on the same day they are made. The fried dough can start to lose its crispness and become a bit chewy over time, and the cream filling can make the dough soggy. If you have leftovers, store them in an airtight container in the refrigerator for up to 2 days. For best results, if you anticipate having leftovers, consider frying the bombs and storing them unfilled, then filling them just before serving.
Reheating: Reheating filled fried bombs can be tricky because of the cream filling.
- Oven/Toaster Oven: For the best texture, place the bombs on a baking sheet and reheat in a preheated oven or toaster oven at 300°F (150°C) for 5-10 minutes, or until just warmed through. Be careful not to overheat, as the cream can become too hot and runny.
- Air Fryer: An air fryer can also work well. Place the bombs in a single layer and air fry at 300°F (150°C) for 3-5 minutes, checking frequently.
- Microwave (least recommended): While possible, the microwave tends to make the fried dough soft and chewy, and the cream can overheat unevenly. If using, microwave in 15-second intervals until just warm.
If you stored unfilled fried bombs, you can reheat them using the oven or air fryer method, and then fill them with fresh, chilled cream just before serving for an optimal experience.
Frequently Asked Questions
Why did my fried bombs turn out greasy?
Greasy fried bombs are almost always a result of the oil temperature being too low. When the oil isn’t hot enough, the dough absorbs the oil instead of cooking quickly and forming a crisp exterior. Ensure your oil is consistently between 350-360°F (175-180°C) using a thermometer, and don’t overcrowd the pot, which can lower the temperature.
Can I make the dough or filling ahead of time?
Yes, absolutely! The cream filling can be made up to 2-3 days in advance and stored in an airtight container in the refrigerator with plastic wrap pressed directly onto its surface. For the dough, you can prepare it up to the first rise, then punch it down, cover it tightly, and refrigerate it overnight. The next day, let it come to room temperature for about 30-60 minutes before rolling, cutting, and proceeding with the second rise and frying.
What if I don’t have a piping bag and tip for filling?
No problem! You can still fill your Creamy Fried Bombs. Once they’ve cooled a bit, use a small, sharp paring knife to carefully make a small incision (a “pocket”) into the side of each bomb. Then, use a small spoon to gently scoop and push the cream filling into the opening. It might be a little messier, but it works perfectly well!
My dough didn’t rise. What went wrong?
There are a few common culprits for dough that doesn’t rise. The most likely reason is inactive yeast. Ensure your yeast is fresh and that your milk is at the correct warm temperature (105-115°F / 40-46°C). Milk that’s too hot will kill the yeast, and milk that’s too cold won’t activate it. Also, ensure your rising environment is warm and draft-free. Sometimes, simply giving the dough a bit more time in a warmer spot is all it needs.