
Introduction
There are very few things in life as comforting and delightful as a slice of homemade pound cake, and when that pound cake is infused with the bright, zesty essence of lemon and the tenderizing magic of buttermilk, you’ve truly hit a dessert jackpot. Our Lemon Buttermilk Pound Cake isn’t just a cake; it’s a culinary experience – a perfect harmony of sweet, tangy, and incredibly moist. This recipe takes the classic, time-honored pound cake, known for its dense yet tender crumb, and elevates it with vibrant citrus notes and the subtle tang that only buttermilk can provide. It’s the kind of cake that evokes memories of sunny afternoons, family gatherings, and pure, unadulterated joy with every single bite.
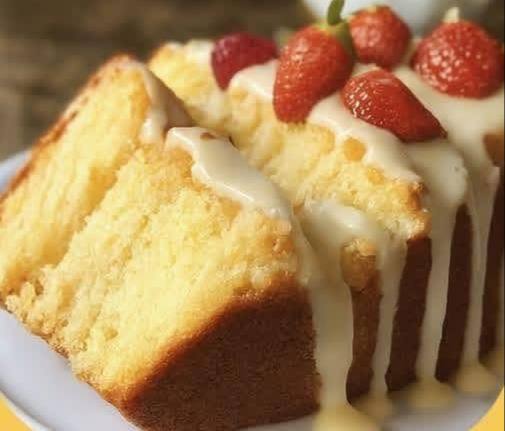
What makes this Lemon Buttermilk Pound Cake so special? It’s a combination of factors, starting with the careful balance of ingredients. The lemon, incorporated through both zest and juice, provides an invigorating burst of flavor that cuts through the richness of the butter and sugar. Buttermilk, a secret weapon in many baking endeavors, not only adds a delicate tang but also contributes significantly to the cake’s incredibly moist and tender texture. It reacts with the baking soda, creating a lighter crumb than traditional pound cakes, all while maintaining that signature density. Finished with a simple yet irresistible lemon glaze, this cake is both elegant enough for a special occasion and comforting enough for an everyday treat.
Whether you’re an experienced baker or just starting your culinary journey, this recipe is designed to guide you to success. We’ll walk you through each step, ensuring your pound cake emerges from the oven golden brown, perfectly domed, and ready to impress. The aroma that will fill your kitchen as this cake bakes is just a preview of the deliciousness to come. Get ready to bake a cake that will become a cherished favorite, perfect for serving with a cup of tea, as a dessert after dinner, or simply as a delightful snack any time of day. Its bright flavor pairs beautifully with fresh berries, making it an ideal centerpiece for spring and summer gatherings.
Nutritional Information
Per serving (approximate values):
- Calories: 380
- Protein: 5g
- Carbohydrates: 55g
- Fat: 16g
- Fiber: 1g
- Sodium: 220mg
Ingredients
- 2 ½ cups all-purpose flour, spooned and leveled
- 1 teaspoon baking powder
- ½ teaspoon baking soda
- ½ teaspoon salt
- 1 cup (2 sticks) unsalted butter, softened to room temperature
- 2 cups granulated sugar
- 4 large eggs, at room temperature
- 1 tablespoon lemon zest (from 2 medium lemons)
- ½ cup fresh lemon juice (from 2-3 medium lemons)
- 1 cup full-fat buttermilk, at room temperature
- 1 teaspoon pure vanilla extract
For the Lemon Glaze:
- 1 ½ cups powdered sugar, sifted
- 3-4 tablespoons fresh lemon juice
Instructions
- Prepare Your Pan: Preheat your oven to 325°F (160°C). Grease and flour a 9×5-inch loaf pan, or spray generously with a non-stick baking spray. For easier removal, you can also line the bottom with parchment paper, leaving an overhang on the sides.
- Whisk Dry Ingredients: In a medium bowl, whisk together the all-purpose flour, baking powder, baking soda, and salt. Set aside.
- Cream Butter and Sugar: In a large bowl, using an electric mixer (stand mixer with paddle attachment or a hand mixer), beat the softened butter on medium speed until creamy, about 1-2 minutes. Gradually add the granulated sugar and continue to beat on medium-high speed for 5-7 minutes, until the mixture is light, fluffy, and pale in color. This step is crucial for incorporating air and achieving a tender crumb.
- Add Eggs and Lemon Zest: Add the eggs one at a time, beating well after each addition until fully incorporated. Scrape down the sides of the bowl as needed. Beat in the lemon zest until fragrant, about 30 seconds.
- Combine Wet Ingredients: In a separate small bowl or liquid measuring cup, whisk together the ½ cup fresh lemon juice, buttermilk, and vanilla extract.
- Alternate Wet and Dry: With the mixer on low speed, gradually add about one-third of the dry ingredients to the butter mixture, mixing just until combined. Then, add about half of the wet ingredients, mixing until just combined. Repeat with another third of the dry ingredients, then the remaining wet ingredients, and finally the last third of the dry ingredients. Mix only until just combined; do not overmix, as this can lead to a tough cake. A few streaks of flour are okay.
- Transfer to Pan: Pour the batter evenly into the prepared loaf pan. Gently tap the pan on the counter a few times to release any air bubbles and settle the batter.
- Bake: Bake for 60-75 minutes, or until a wooden skewer or toothpick inserted into the center of the cake comes out clean. The top should be golden brown and spring back when lightly touched. If the top is browning too quickly, you can loosely tent it with aluminum foil during the last 15-20 minutes of baking.
- Cool the Cake: Once baked, remove the cake from the oven and let it cool in the pan on a wire rack for 15-20 minutes. This allows the cake to set and prevents it from breaking when removed.
- Remove from Pan: After cooling slightly, carefully invert the cake onto the wire rack to remove it from the pan. Turn it right-side up and allow it to cool completely before glazing. Glazing a warm cake will cause the glaze to melt and soak in rather than form a nice coating.
- Prepare the Lemon Glaze: While the cake cools, prepare the glaze. In a small bowl, whisk together the sifted powdered sugar and 3 tablespoons of fresh lemon juice until smooth. If the glaze is too thick, add more lemon juice, ½ teaspoon at a time, until you reach a pourable but still thick consistency. If it’s too thin, add a little more powdered sugar.
- Glaze the Cake: Once the cake is completely cool, drizzle the lemon glaze evenly over the top, letting it drip down the sides. Allow the glaze to set for about 15-20 minutes before slicing and serving.
Cooking Tips and Variations
Achieving the perfect Lemon Buttermilk Pound Cake is all about technique and a few helpful tricks. Firstly, ensuring all your cold ingredients, especially the butter, eggs, and buttermilk, are at room temperature is paramount. This allows them to emulsify properly, creating a smooth batter and a consistently tender crumb. Cold ingredients can lead to a lumpy batter and a denser, less desirable texture. Plan ahead and take them out of the refrigerator at least 30 minutes to an hour before you begin baking.
When creaming the butter and sugar, don’t rush this step. Beating them together until they are light, fluffy, and pale in color is crucial for incorporating air into the batter, which contributes significantly to the cake’s rise and texture. This can take anywhere from 5 to 7 minutes with an electric mixer. Scrape down the sides of your bowl frequently to ensure everything is evenly mixed.
Measuring flour correctly is another common pitfall. Always spoon your flour into the measuring cup and then level it off with a straight edge, rather than scooping directly from the bag. Scooping can pack too much flour into the cup, leading to a dry cake. Furthermore, avoid overmixing the batter once the dry ingredients are added. Mix only until just combined; overmixing develops the gluten in the flour, resulting in a tough, chewy cake instead of a tender one. A few small lumps are perfectly fine.
To prevent a soggy bottom, make sure to cool your cake on a wire rack immediately after it comes out of the pan. This allows air to circulate all around the cake, preventing condensation from forming and making the bottom wet. Also, ensure the cake is completely cool before applying the glaze. If the cake is warm, the glaze will simply melt and be absorbed, rather than forming a beautiful, opaque coating.
For variations, feel free to experiment with other citrus fruits. Lime buttermilk pound cake or orange buttermilk pound cake are equally delicious, simply swapping the lemon zest and juice for their counterparts. You can also add a tablespoon of poppy seeds to the batter for a lemon poppy seed pound cake. For a richer flavor, consider adding a touch of almond extract along with the vanilla. If you prefer a less sweet glaze, you can reduce the amount of powdered sugar, or for an extra tangy kick, add a pinch more lemon zest to the glaze itself. For those who enjoy a bit of texture, a sprinkle of toasted sliced almonds over the wet glaze would be a delightful addition.
Storage and Reheating
Proper storage is key to keeping your Lemon Buttermilk Pound Cake fresh and delicious for as long as possible. Once the glaze has set, you can store the cake at room temperature, wrapped tightly in plastic wrap or placed in an airtight container. This will help prevent it from drying out. Stored this way, the cake will remain fresh for 3-4 days. For longer storage, you can refrigerate the cake, which will extend its freshness to about a week. If refrigerating, it’s best to allow the cake to come to room temperature for about 30 minutes before serving, as the flavors and texture are often best when not chilled.
This pound cake also freezes beautifully! To freeze the entire cake (unglazed or glazed), wrap it tightly first in plastic wrap, then in aluminum foil, or place it in a freezer-safe airtight container. It can be frozen for up to 2-3 months. If you only want to freeze individual slices, wrap each slice separately before placing them in a freezer bag or container. When you’re ready to enjoy, thaw the cake or slices overnight in the refrigerator, or at room temperature for a few hours. If you froze it unglazed, you can then prepare and apply the fresh glaze just before serving for the best results.
Reheating is generally not necessary for pound cake, as it’s typically enjoyed at room temperature. However, if you prefer a slightly warm slice, you can gently heat it in the microwave for 10-15 seconds, or in a preheated oven at 250°F (120°C) for about 5-10 minutes. Be careful not to overheat, as this can dry out the cake. If the cake is glazed, microwave reheating can cause the glaze to melt and become sticky, so oven reheating is often preferred if you want to keep the glaze intact.
Frequently Asked Questions
How do I know if my pound cake is fully cooked?
The best way to tell if your pound cake is fully cooked is to insert a wooden skewer or toothpick into the very center of the cake. If it comes out clean, with no wet batter attached, your cake is done. If it comes out with wet batter or moist crumbs, continue baking for another 5-10 minutes and test again. Also, the top of the cake should be golden brown and should spring back lightly when gently touched.
Can I substitute regular milk for buttermilk?
While you can make a “buttermilk substitute” by adding 1 tablespoon of lemon juice or white vinegar to a measuring cup and then filling the rest with regular milk (letting it sit for 5-10 minutes until it curdles), this will not yield the exact same results as real buttermilk. True buttermilk has a thicker consistency and a unique tangy flavor that contributes significantly to the tender crumb and distinct taste of this pound cake. Using real buttermilk is highly recommended for the best outcome.
Why did my pound cake crack on top?
It’s very common for pound cakes to crack on top during baking, and it’s actually a sign of a well-made cake! The outside of the cake bakes and sets faster than the inside. As the inside continues to rise, it pushes through the already set crust, causing it to crack. This is completely normal and often desired, as it creates a beautiful, rustic appearance. It doesn’t affect the taste or texture of the cake. If you want to minimize cracking, sometimes lowering the oven temperature slightly or starting with a slightly cooler oven can help, but a crack is usually a good sign.
Can I make this pound cake in a different pan size?
Yes, you can, but you will need to adjust the baking time. This recipe is designed for a 9×5-inch loaf pan. If using a bundt pan, you might need to increase the baking time to 70-90 minutes, depending on the pan’s size and shape. If using smaller loaf pans, the baking time will decrease. Always keep an eye on the cake and use the toothpick test for doneness, regardless of the pan size. You may also need to adjust the amount of batter if your pan is significantly larger or smaller.