
Introduction
Ah, the humble chip. That golden, crispy, salty delight that graces tables worldwide, a universally loved accompaniment to burgers, sandwiches, or simply enjoyed on its own. While seemingly simple, achieving that perfect, shatteringly crisp exterior and fluffy interior can feel like a culinary quest. How many times have you set out to make homemade chips, only to be met with a sad, soggy, and utterly disappointing result? You’re not alone. The quest for truly delicious, crispy chips has baffled home cooks for generations, often leading to a surrender to store-bought, pre-packaged options.
But what if I told you there was a secret, a simple “trick” that could elevate your homemade chips from mediocre to magnificent? A game-changer that promises to deliver that restaurant-quality crispness right in your own kitchen? Prepare to say goodbye to soggy spuds and hello to a golden, crunchy revelation. This isn’t just about frying potatoes; it’s about understanding a fundamental principle that unlocks the ultimate crisp factor, transforming your chip-making endeavors forever.
Today, we’re diving deep into that very trick, revealing the often-overlooked key ingredient that makes all the difference. Get ready to impress your friends and family with chips that are not just good, but truly spectacular – perfectly golden, incredibly crunchy, and seasoned to perfection. This isn’t just another recipe; it’s a culinary hack that will redefine your homemade chip experience.
Nutritional Information
Per serving (approximate values):
- Calories: 350
- Protein: 4g
- Carbohydrates: 45g
- Fat: 18g
- Fiber: 5g
- Sodium: 250mg
Ingredients
- 2 large Russet or Maris Piper potatoes (about 1.5 lbs / 680g)
- 2 tablespoons cornstarch or potato starch
- 1 teaspoon fine sea salt (plus more for seasoning)
- 1/2 teaspoon black pepper (optional)
- 4-6 cups (1-1.5 liters) neutral oil for frying (such as canola, vegetable, or peanut oil)
Instructions
- Prepare the Potatoes: Wash and peel the potatoes. Slice them into uniform sticks, about 1/4 to 1/3 inch thick. For classic fries, aim for an even thickness to ensure even cooking.
- Soak and Rinse: Place the cut potato sticks into a large bowl of very cold water. Let them soak for at least 30 minutes, or up to 2 hours. This step helps to remove excess surface starch, which can prevent crisping and lead to a gummy texture.
- Dry Thoroughly: After soaking, drain the potatoes completely. Spread them out in a single layer on a clean kitchen towel or several layers of paper towels. Pat them absolutely dry. This is a crucial step! Any remaining moisture will cause the oil to splatter and prevent the starch from adhering properly.
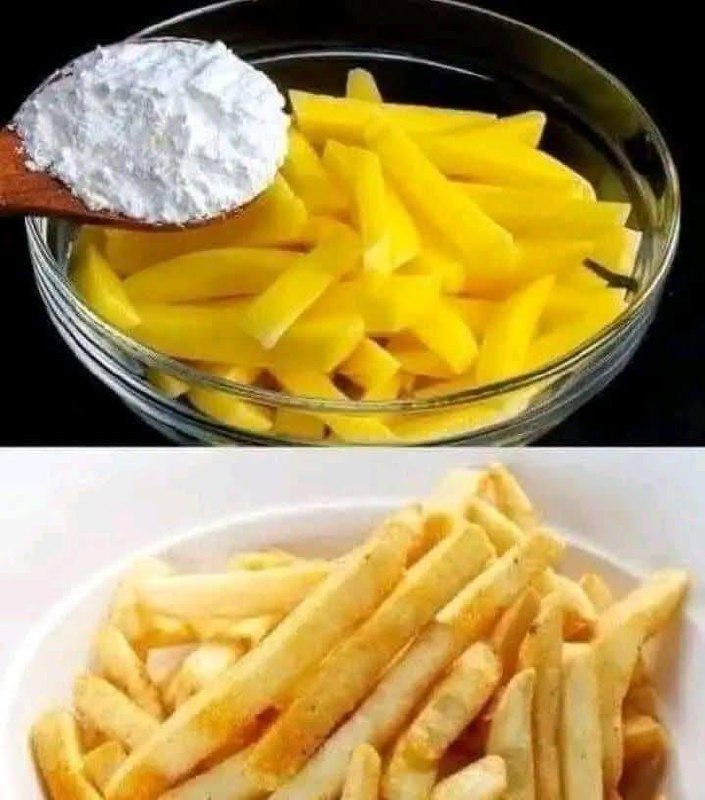
- The Secret Starch Coating: In a large bowl, sprinkle the 2 tablespoons of cornstarch or potato starch evenly over the dried potato sticks. Toss gently but thoroughly until every potato stick is lightly coated with a fine layer of starch. The starch should look like a thin, white dusting.
- Preheat the Oil: Pour the neutral oil into a heavy-bottomed pot or Dutch oven, ensuring there’s at least 3-4 inches of oil depth. Attach a candy or deep-fry thermometer to the side of the pot. Heat the oil slowly over medium-high heat until it reaches 325°F (160°C).
- First Fry (Blanching): Carefully add a single layer of starch-coated potato sticks to the hot oil. Do not overcrowd the pot, as this will drop the oil temperature too much and lead to soggy chips. Fry for 5-7 minutes, or until the chips are soft and slightly translucent but not yet browned. They should be cooked through but still pale.
- Drain and Rest: Using a slotted spoon or spider, remove the blanched chips from the oil and transfer them to a wire rack set over a baking sheet. This allows excess oil to drain and prevents them from steaming. Let them rest for at least 10 minutes, or up to several hours (they can even be refrigerated at this stage). This resting period is essential for the double-frying method.
- Increase Oil Temperature: While the chips are resting, increase the oil temperature to 375°F (190°C).
- Second Fry (Crisping): Carefully return the blanched chips to the hotter oil, again frying in batches to avoid overcrowding. Fry for another 3-5 minutes, or until they are a beautiful golden brown and perfectly crisp. Listen for the sound of the oil; it will be more active when the chips are truly crisping.
- Season Immediately: Once golden and crispy, remove the chips from the oil and transfer them back to the wire rack. Immediately sprinkle generously with fine sea salt and optional black pepper while they are still hot. The salt will adhere best at this stage.
- Serve Hot: Serve your perfectly crispy chips immediately with your favorite dipping sauces.
Cooking Tips and Variations
To truly master the art of crispy chips, attention to detail is key. Firstly, the choice of potato makes a difference. Starchy potatoes like Russet (known as Maris Piper in the UK) are ideal because their high starch content contributes to a fluffier interior and a crispier exterior when fried. Waxy potatoes tend to hold more moisture and can result in a gummier texture. Uniformity in cutting is also paramount; unevenly cut chips will cook at different rates, leading to some being burnt while others are still undercooked. Invest in a good mandoline or practice your knife skills to get consistent sticks. Another critical tip is to always use a thermometer to monitor your oil temperature. Guessing can lead to a host of problems, from oil that’s too cool (soggy chips) to oil that’s too hot (burnt exterior, raw interior). Precision here is your friend.
For variations, consider experimenting with different seasonings. Beyond salt and pepper, try a sprinkle of garlic powder, onion powder, smoked paprika, or a dash of cayenne pepper for a spicy kick. For a gourmet touch, truffle oil drizzled over the hot chips immediately after frying, along with a sprinkle of Parmesan cheese and fresh parsley, is divine. You can also experiment with different oils; while neutral oils are best for frying, a finishing drizzle of a flavorful olive oil can add complexity. If you’re looking for an even deeper flavor, some chefs advocate for frying in beef tallow, which imparts an incredibly rich taste, though it does change the nutritional profile significantly. For those looking for a slightly healthier twist, while still maintaining crispness, you can try par-baking the blanched, starch-coated chips in a very hot oven (400°F/200°C) for 15-20 minutes after the first fry, instead of a second deep-fry. This won’t be quite as crispy as deep-frying, but it’s a good alternative.
Storage and Reheating
Homemade chips are undeniably best enjoyed immediately after frying, when they are at their peak crispness and warmth. However, if you do find yourself with leftovers, proper storage and reheating can help salvage some of that deliciousness, though they will never be quite as perfect as fresh. To store, allow the chips to cool completely to room temperature. This is important to prevent condensation, which can make them soggy. Once cooled, transfer them to an airtight container or a resealable plastic bag. They can be stored in the refrigerator for up to 2-3 days.
When it comes to reheating, avoid the microwave at all costs, as it will only turn your once-crispy chips into a chewy, rubbery disappointment. The best method for reheating is to use an oven or an air fryer. Preheat your oven to 400°F (200°C). Spread the chips in a single layer on a baking sheet. Reheat for 5-10 minutes, or until they are hot and have regained some of their crispness. Keep a close eye on them to prevent burning. If using an air fryer, preheat it to 375°F (190°C) and cook the chips for 3-5 minutes, shaking the basket halfway through. The goal is to heat them through and evaporate any moisture that has accumulated, bringing back as much of that coveted crunch as possible.
Frequently Asked Questions
Why do my homemade chips always turn out soggy?
Soggy chips are a common frustration, and usually stem from a few key issues. The most common culprits are insufficient drying of the potatoes before frying, overcrowding the frying oil (which drops the temperature too much), or not using the double-frying method. The starch coating we discussed is a game-changer for preventing sogginess by creating a barrier and absorbing surface moisture.
Can I use any type of potato for this recipe?
While you can technically use other potatoes, for the absolute best results and crispest chips, it’s highly recommended to use starchy varieties like Russet or Maris Piper. These potatoes have a lower water content and higher starch content, which contributes to a fluffier interior and a much crispier exterior when fried.
Is the soaking step really necessary, and why?
Yes, the soaking step is quite important. Soaking the cut potatoes in cold water helps to remove excess surface starch. This excess starch, if not removed, can lead to chips that stick together, have a gummy texture, and don’t crisp up as effectively. It also helps prevent them from browning too quickly on the outside before the inside is cooked.
What is the benefit of double-frying?
Double-frying is the secret to achieving that perfect restaurant-quality crispness and fluffy interior. The first fry (at a lower temperature) cooks the potato through, softening the interior without browning the exterior. The rest period allows moisture to escape from the center. The second fry (at a higher temperature) then rapidly crisps up the exterior, creating that delightful crunch without overcooking the inside.