
<>
Introduction
Ah, Nana Clara. Just the name conjures up images of warmth, wisdom, and the kind of practical magic only grandmothers possess. There are times in life when every penny counts, when grocery lists are meticulously crafted, and every meal is a testament to resourcefulness. It was during these lean times that Nana Clara unveiled her secret weapon, a dish so simple, so unexpectedly delightful, that it became known as her “3-Ingredient Miracle.” This isn’t some fancy, complicated dessert; it’s a humble, comforting creation born out of necessity, yet it delivers a surprising punch of flavor and satisfaction. It’s the kind of recipe that reminds you that true joy often comes from the simplest things, prepared with love and a sprinkle of ingenuity.
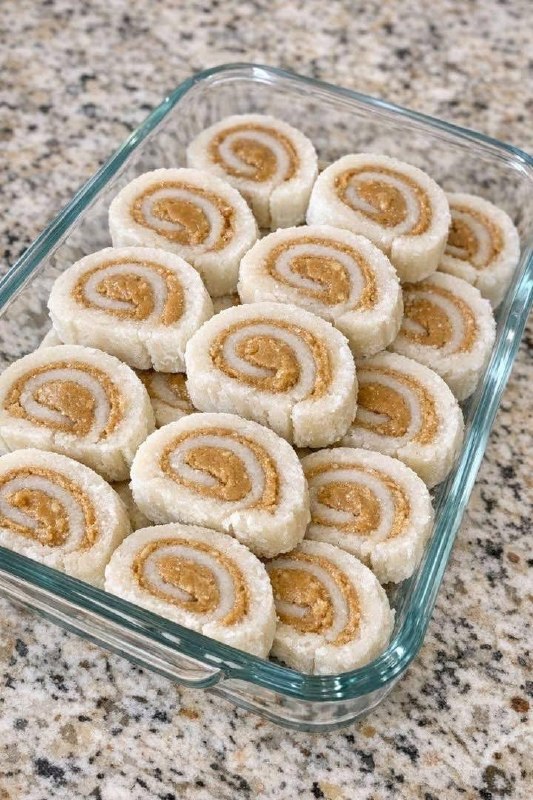
This “miracle” is essentially a sweet, creamy rice roll, a genius combination of readily available pantry staples that transforms into a surprisingly decadent treat. Imagine perfectly cooked, slightly sticky rice, generously spread with a rich, nutty filling, then carefully rolled and sliced into bite-sized morsels. It’s sweet, it’s savory, it’s got a wonderful textural contrast, and most importantly, it’s incredibly easy on the wallet. Nana Clara knew that even when money was tight, a little sweetness could go a long way in lifting spirits and bringing a smile to faces. This recipe isn’t just about food; it’s about resilience, comfort, and the enduring power of a grandmother’s love.
What makes this dish truly special isn’t just its economic brilliance, but its universal appeal. Whether you’re a student on a budget, a parent looking for a quick and easy dessert, or simply someone craving a nostalgic taste of home, Nana Clara’s 3-Ingredient Miracle delivers. It’s a testament to the fact that you don’t need a pantry full of exotic ingredients or hours in the kitchen to create something truly memorable. With just three simple components – rice, peanut butter, and a touch of sweetness – Nana Clara crafted a timeless classic that continues to delight generations. Prepare to be amazed by how much flavor and comfort can be packed into such a straightforward recipe.
Nutritional Information
Per serving (approximate values):
- Calories: 280
- Protein: 8g
- Carbohydrates: 40g
- Fat: 10g
- Fiber: 2g
- Sodium: 150mg
Ingredients
- 1 cup uncooked short-grain white rice (such as sushi rice or arborio)
- 1/2 cup creamy peanut butter
- 1/4 cup granulated sugar (or brown sugar, honey, maple syrup)
- Pinch of salt (optional, for enhancing flavors)
- Water for cooking rice
Instructions
- Prepare the Rice: Rinse the short-grain white rice thoroughly under cold running water until the water runs clear. This removes excess starch, which helps the rice become less sticky and more defined.
- Cook the Rice: In a medium saucepan, combine the rinsed rice with 1 1/2 cups of cold water and a pinch of salt (if using). Bring the water to a rolling boil over medium-high heat.
- Simmer the Rice: Once boiling, reduce the heat to the lowest setting, cover the saucepan tightly with a lid, and let the rice simmer for 18-20 minutes, or until all the water has been absorbed and the rice is tender. Ensure the lid remains on throughout the cooking process to trap steam.
- Rest the Rice: Once cooked, remove the saucepan from the heat, but keep the lid on. Let the rice rest for another 10 minutes. This allows the steam to redistribute and the rice grains to firm up slightly, making them easier to handle.
- Cool the Rice: Transfer the cooked rice to a large, shallow baking dish or a clean, flat surface (like a cutting board lined with parchment paper). Spread the rice out evenly to help it cool down faster. It’s crucial for the rice to be at least lukewarm, if not completely cool, before proceeding to prevent the peanut butter from melting too much.
- Prepare the Peanut Butter Mixture: In a small bowl, combine the 1/2 cup of creamy peanut butter with the 1/4 cup of granulated sugar. Mix well until the sugar is fully incorporated into the peanut butter and the mixture is smooth and spreadable. If the peanut butter is too stiff, you can gently warm it in the microwave for 10-15 seconds to make it more pliable.
- Prepare Your Rolling Surface: Lay out a large sheet of plastic wrap or parchment paper on a clean, flat countertop. This will be your rolling surface and will help prevent sticking.
- Form the Rice Layer: Lightly moisten your hands with water to prevent the rice from sticking. Take the cooled rice and spread it evenly over the plastic wrap or parchment paper, forming a rectangle approximately 10×8 inches and about 1/4 to 1/2 inch thick. Press the rice down gently but firmly to create a cohesive layer.
- Spread the Filling: Evenly spread the peanut butter and sugar mixture over the entire surface of the rice rectangle, leaving a small border (about 1/2 inch) along one of the longer edges. This border will help seal the roll.
- Roll the Rice: Starting from the longer edge opposite the border, carefully and tightly roll the rice rectangle away from you. Use the plastic wrap or parchment paper to help guide and tighten the roll as you go. Roll it as snugly as possible to prevent gaps.
- Seal the Roll: Once you reach the end, gently press the seam to seal the roll. Twist the ends of the plastic wrap to secure the roll tightly, forming a log shape.
- Chill the Roll: Place the wrapped rice roll in the refrigerator for at least 1-2 hours. Chilling is essential as it allows the rice to firm up and the peanut butter mixture to set, making the roll much easier to slice cleanly.
- Slice and Serve: Once thoroughly chilled, unwrap the rice roll. Using a sharp knife that has been lightly moistened with water (to prevent sticking), slice the roll into 1/2 to 3/4-inch thick rounds. Wipe the knife clean and re-moisten it between slices for the cleanest cuts. Arrange the slices on a serving platter and enjoy Nana Clara’s 3-Ingredient Miracle!
Cooking Tips and Variations
Achieving the perfect Nana Clara’s 3-Ingredient Miracle is all about technique and a little bit of love. For the best results, always ensure your rice is cooked to perfection – tender but not mushy, and sticky enough to hold its shape. Using short-grain white rice, like sushi rice or arborio, is paramount as its higher starch content is what gives these rolls their characteristic stickiness and ability to hold together without falling apart. Long-grain rice varieties won’t work as well here as they tend to be too fluffy and separate easily. When cooking the rice, resist the urge to peek under the lid; the steam trapped inside is crucial for even cooking and proper texture. After cooking, letting the rice rest off the heat allows it to absorb any remaining moisture and become firmer, which is a critical step before spreading.
When it comes to handling the rice, moisture is your friend. Lightly wetting your hands before spreading the rice onto the plastic wrap will prevent it from sticking to your fingers, making the process much smoother and less frustrating. Similarly, a lightly moistened, sharp knife is key for clean, precise slices once the roll is chilled. Wiping the knife clean and re-moistening it between each cut will ensure every slice looks as good as it tastes. Don’t rush the chilling process; it’s not just a suggestion, it’s a crucial step. A well-chilled roll will be firm, making it significantly easier to slice without squishing or falling apart, resulting in beautiful, intact morsels.
While Nana Clara’s original recipe was a marvel of simplicity, there are many ways to adapt it to your taste or what you have on hand. For the peanut butter, feel free to experiment with different varieties; crunchy peanut butter can add a delightful textural contrast, while almond butter or cashew butter can offer a different nutty flavor profile. Just be aware that natural nut butters might be oilier and could require a bit more sugar or a touch of powdered sugar to thicken the filling. If you prefer a richer, more complex sweetness, swap out granulated sugar for brown sugar, honey, or maple syrup in the peanut butter mixture. Start with a smaller amount and adjust to your desired sweetness, as liquid sweeteners can change the consistency slightly.
For an extra layer of flavor, consider adding a tiny pinch of cinnamon or a few drops of vanilla extract to the peanut butter mixture. These subtle additions can elevate the overall taste without overpowering the core flavors. A very light sprinkle of shredded coconut or finely chopped nuts (like pecans or walnuts) can also be added to the peanut butter layer before rolling for added texture and flavor. If you’re feeling adventurous and want to introduce a fruity element, a very thin layer of finely mashed banana or a delicate spread of strawberry jam could be added over the peanut butter, though this would technically make it a 4-ingredient variation!
To make this treat even more visually appealing, you could drizzle the finished slices with a little melted chocolate or a dusting of cocoa powder just before serving. This not only adds a touch of elegance but also another layer of flavor. For serving, these rolls are delightful on their own as a snack or dessert. They also pair wonderfully with a cup of tea or coffee, making them a perfect pick-me-up. If you’re serving them for a special occasion, arranging them artfully on a platter with some fresh berries or a sprig of mint can turn this simple treat into a showstopper. Remember, the beauty of Nana Clara’s recipe is its adaptability; feel free to make it your own while honoring its humble origins.
Storage and Reheating
Nana Clara’s 3-Ingredient Miracle rolls are best enjoyed chilled, and thankfully, they store exceptionally well, making them a fantastic make-ahead dessert or snack. Once sliced, any leftover rolls should be placed in an airtight container. Arrange them in a single layer if possible, or separate layers with parchment paper to prevent them from sticking together. Store the container in the refrigerator for up to 3-4 days. The flavors tend to meld even more over time, and the texture remains pleasantly firm.
Freezing is also an option for longer storage. To freeze, arrange the sliced rolls in a single layer on a baking sheet lined with parchment paper. Flash freeze them for about 1-2 hours until they are solid. Once frozen, transfer the rolls to a freezer-safe airtight container or a heavy-duty freezer bag, again separating layers with parchment paper to prevent sticking. They can be stored in the freezer for up to 1-2 months. When you’re ready to enjoy them, simply transfer the desired number of rolls from the freezer to the refrigerator and let them thaw for several hours, or overnight. They are not typically reheated; they are meant to be eaten cold, as reheating would alter the texture of the rice and the peanut butter filling, potentially making them mushy or oily.
Frequently Asked Questions
Can I use brown rice or other rice varieties?
While you can technically cook any rice, for this specific recipe, short-grain white rice (like sushi rice or arborio) is highly recommended. Its higher starch content makes it sticky and cohesive when cooked, which is crucial for the rolls to hold their shape. Brown rice or other long-grain varieties tend to be less sticky and might result in rolls that fall apart, making them difficult to handle and slice.
My rice isn’t sticky enough to roll. What went wrong?
This usually happens if the wrong type of rice was used, or if the rice wasn’t cooked with enough water or for long enough. Always use short-grain white rice. Ensure you’re using the correct water-to-rice ratio (typically 1.5 cups water to 1 cup rice for short-grain) and that it’s cooked covered until all water is absorbed, followed by a 10-minute rest. Not rinsing the rice enough can also sometimes make it too starchy and difficult to handle, but generally, too little starch is the issue for lack of stickiness.
Can I make this recipe vegan?
Absolutely! This recipe is inherently vegan, provided you use plant-based peanut butter (most are) and a vegan sugar if you’re concerned about sugar processing (many granulated sugars are processed with bone char, but organic or certified vegan sugars are available). All other ingredients are plant-based, making this a delicious and accessible vegan treat.
How can I prevent the peanut butter from melting while spreading?
The key is to ensure your cooked rice is at least lukewarm, if not completely cooled, before you spread the peanut butter. If the rice is too hot, the peanut butter will become very runny and difficult to spread evenly, and it will make the rolling process messier. Spreading the rice out on a flat surface to cool speeds up this process. If your peanut butter is very stiff, a quick 10-15 second warm-up in the microwave can make it more pliable, but avoid making it hot.