
Introduction
There’s something undeniably comforting and utterly delightful about a perfectly baked, pillowy soft bun overflowing with a luscious, creamy filling. Cream Filled Buns are a timeless classic that evokes memories of childhood bakeries, cozy afternoon teas, and indulgent breakfast treats. These golden-brown beauties, with their delicate crumb and rich, sweet center, are more than just a pastry; they’re a hug in edible form, a little burst of happiness in every bite.
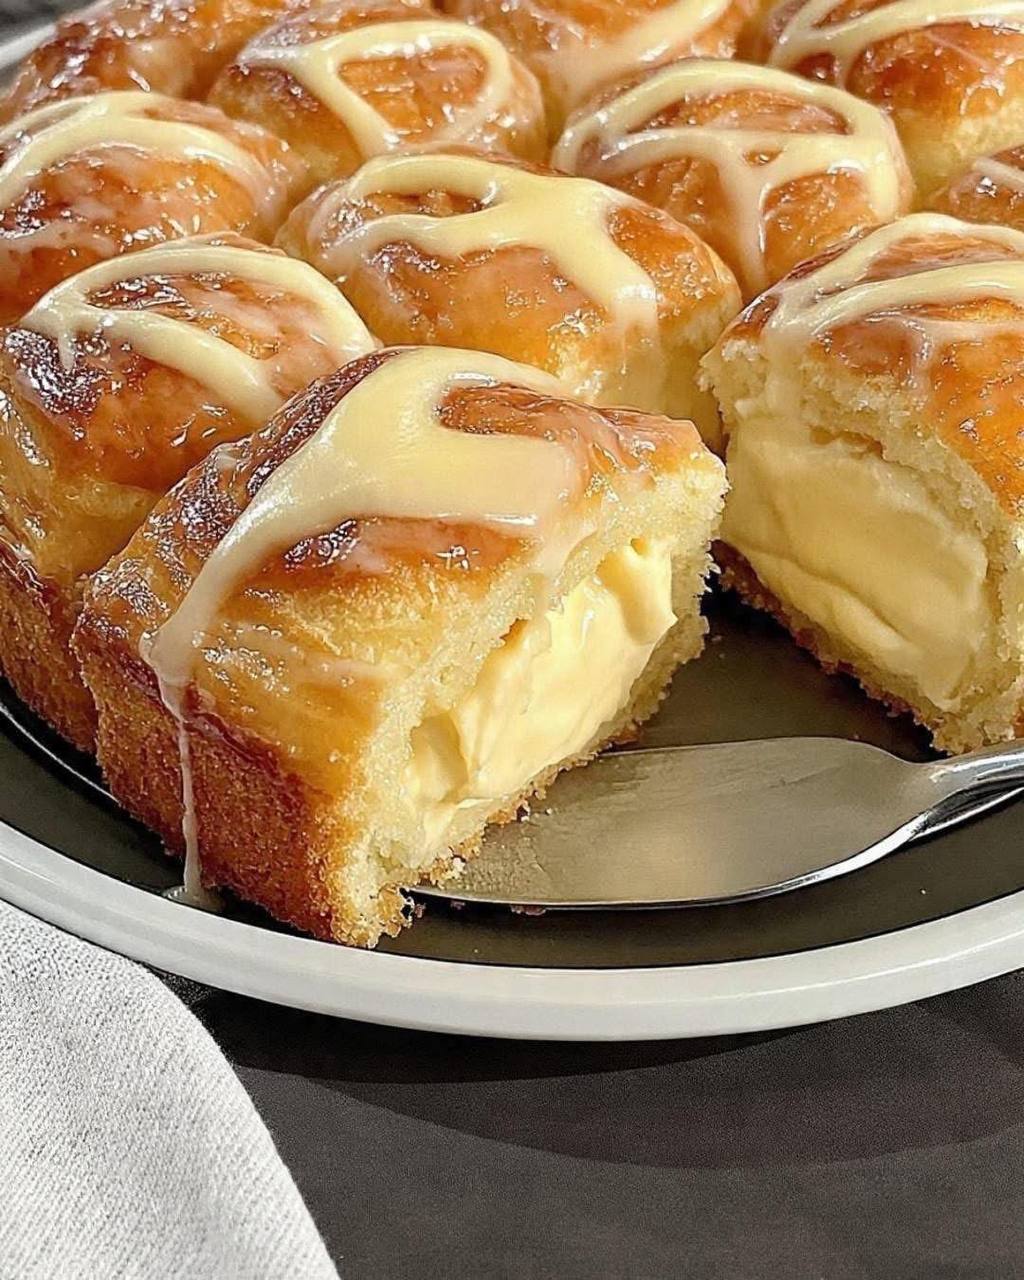
What makes *these* particular Cream Filled Buns truly special is the perfect harmony between the incredibly tender, slightly sweet yeast dough and the velvety smooth, vanilla-scented pastry cream. We’ve meticulously crafted this recipe to ensure each bun boasts a delightful chewiness that yields to a generously piped, melt-in-your-mouth custard. The subtle glaze adds just the right touch of sweetness and a beautiful sheen, making them as appealing to the eye as they are to the palate.
Whether you’re a seasoned baker or just starting your culinary journey, this recipe is designed to guide you to success. Prepare to fill your home with the intoxicating aroma of freshly baked bread and homemade custard, and get ready to impress everyone with these irresistible, bakery-quality Cream Filled Buns that are surprisingly simple to make.
Nutritional Information
Per serving (approximate values):
- Calories: 350
- Protein: 8g
- Carbohydrates: 50g
- Fat: 13g
- Fiber: 2g
- Sodium: 200mg
Ingredients
For the Dough:
- 1 cup (240ml) whole milk, lukewarm (105-115°F / 40-46°C)
- 2 ¼ teaspoons (1 packet) active dry yeast
- ¼ cup (50g) granulated sugar, plus 1 teaspoon
- 1 large egg, at room temperature
- ½ teaspoon salt
- 4 tablespoons (56g) unsalted butter, melted and cooled slightly
- 3 ½ cups (420g) all-purpose flour, plus more for dusting
For the Cream Filling (Pastry Cream):
- 2 cups (480ml) whole milk
- ½ cup (100g) granulated sugar
- 4 large egg yolks
- ¼ cup (30g) cornstarch
- ¼ teaspoon salt
- 2 tablespoons (28g) unsalted butter, cut into small pieces
- 1 ½ teaspoons vanilla extract
For the Glaze:
- 1 cup (120g) powdered sugar
- 2-3 tablespoons whole milk or water
- ½ teaspoon vanilla extract
For Brushing:
- 1 large egg, whisked with 1 tablespoon water (egg wash)
Instructions
Part 1: Making the Dough
- In a large mixing bowl, combine the lukewarm milk and 1 teaspoon of granulated sugar. Sprinkle the active dry yeast over the top and let it sit for 5-10 minutes, until foamy. This indicates the yeast is active.
- Add the remaining ¼ cup granulated sugar, egg, salt, and melted butter to the yeast mixture. Whisk until well combined.
- Gradually add the all-purpose flour, about 1 cup at a time, mixing with a wooden spoon or a stand mixer with a dough hook attachment. Once all the flour is added, the dough will be shaggy.
- Turn the dough out onto a lightly floured surface and knead for 8-10 minutes, or use a stand mixer with a dough hook on medium-low speed for 6-8 minutes, until the dough is smooth, elastic, and no longer sticky. It should spring back when lightly poked.
- Lightly grease a clean large bowl with a little oil. Place the dough in the bowl, turning it once to coat. Cover the bowl with plastic wrap or a clean kitchen towel.
- Let the dough rise in a warm place for 1-1.5 hours, or until doubled in size. This is the first proof.
Part 2: Making the Cream Filling
- In a medium saucepan, heat 1 ¾ cups of the whole milk over medium heat until it just begins to simmer around the edges. Do not boil.
- While the milk is heating, in a separate medium bowl, whisk together the remaining ¼ cup whole milk, granulated sugar, egg yolks, cornstarch, and salt until smooth and no lumps remain.
- Once the milk in the saucepan is simmering, slowly and gradually temper the egg yolk mixture by whisking about half of the hot milk into the egg yolk mixture. This prevents the eggs from scrambling.
- Pour the tempered egg yolk mixture back into the saucepan with the remaining hot milk.
- Return the saucepan to medium-low heat and cook, whisking constantly, for 3-5 minutes, until the mixture thickens considerably and coats the back of a spoon. It should come to a gentle boil for about 1 minute to ensure the cornstarch is cooked through.
- Remove the saucepan from the heat. Stir in the butter until melted and fully incorporated. Then stir in the vanilla extract.
- Pour the pastry cream into a clean bowl. Press a piece of plastic wrap directly onto the surface of the cream to prevent a skin from forming.
- Refrigerate for at least 2-3 hours, or until thoroughly chilled and firm. The colder the better for filling.
Part 3: Assembling and Baking the Buns
- Once the dough has doubled in size, gently punch it down to release the air.
- Turn the dough out onto a lightly floured surface and divide it into 12 equal pieces (approximately 60-65g each).
- Shape each piece of dough into a smooth, round ball. To do this, pull the edges of the dough underneath itself and pinch to seal, then roll gently between your palm and the work surface to create a tight ball.
- Arrange the shaped dough balls in a lightly greased 9×13-inch baking pan, leaving a little space between each bun.
- Cover the baking pan loosely with plastic wrap or a clean kitchen towel. Let the buns rise in a warm place for another 30-45 minutes, or until puffy and almost doubled in size again. This is the second proof.
- Preheat your oven to 375°F (190°C) during the last 15 minutes of the second proof.
- Once the buns have proofed, gently brush the tops with the egg wash.
- Bake for 18-22 minutes, or until the buns are golden brown on top and cooked through. If they start browning too quickly, you can loosely tent them with aluminum foil.
- While the buns are baking, retrieve the chilled pastry cream from the refrigerator. If it’s too stiff, give it a quick whisk to loosen it slightly. Transfer the pastry cream to a piping bag fitted with a round or star tip (or simply snip off the corner of a sturdy Ziploc bag).
- Once the buns are out of the oven, let them cool in the pan for about 5-10 minutes.
- Using a small knife or the tip of the piping bag, make a small incision or poke a hole into the side or top of each bun.
- Pipe a generous amount of the cream filling into each bun until it feels full and slightly plump.
- Let the cream-filled buns cool completely on a wire rack before glazing.
Part 4: Making and Applying the Glaze
- In a small bowl, whisk together the powdered sugar, 2 tablespoons of milk or water, and vanilla extract until smooth. The glaze should be pourable but not too thin. If it’s too thick, add more liquid a teaspoon at a time. If too thin, add more powdered sugar.
- Once the cream-filled buns are completely cooled, drizzle or spread the glaze over the tops of each bun.
- Allow the glaze to set for a few minutes before serving.
Cooking Tips and Variations
Dough Tips: The key to soft buns is proper kneading. Don’t skimp on the kneading time; it develops the gluten which gives the buns their structure and chewiness. If you don’t have a stand mixer, hand kneading is perfectly fine, just be prepared for a good arm workout! Ensure your milk is lukewarm, not hot, to avoid killing the yeast. If your kitchen is cool, you can proof the dough in a slightly warmed (turned off) oven or microwave.
Filling Perfection: When making the pastry cream, constant whisking is crucial to prevent lumps and scorching. Don’t be afraid to let it come to a gentle boil for a minute to ensure the cornstarch activates fully and the cream thickens properly. Chilling the pastry cream thoroughly is non-negotiable; it helps it firm up and makes it much easier to pipe without oozing out of the buns. If your cream filling seems too thick after chilling, you can whisk in a tablespoon or two of cold milk until it reaches your desired consistency.
Flavor Variations:
- Lemon Cream Buns: Add 1-2 teaspoons of lemon zest to the dough and 1 tablespoon of lemon juice to the pastry cream for a bright, citrusy twist.
- Chocolate Cream Buns: Whisk 2 tablespoons of unsweetened cocoa powder into the flour for the dough, and melt 2 ounces of chopped dark chocolate into the hot pastry cream along with the butter.
- Espresso Buns: Dissolve 1 teaspoon of instant espresso powder in the lukewarm milk for the dough, and add ½ teaspoon of espresso powder to the pastry cream.
- Nutty Topping: Instead of a glaze, sprinkle the tops of the buns with chopped toasted nuts (like almonds or pecans) immediately after brushing with egg wash and before baking for a crunchy texture.
- Fruit Infusion: For the glaze, replace some of the milk with fruit juice (like orange or raspberry) for a subtle flavor hint.
Baking Consistency: Ovens can vary, so keep an eye on your buns. If they’re browning too quickly, tent them loosely with aluminum foil. If you want a darker, richer crust, you can increase the baking time by a minute or two, watching carefully. For perfectly even browning, rotate the pan halfway through baking.
Serving Suggestions: These cream-filled buns are perfect on their own as a delightful snack or dessert. They pair wonderfully with a cup of hot coffee, tea, or even a glass of cold milk. They’re also a fantastic addition to a brunch spread or a special breakfast.
Storage and Reheating
Storage: Cream-filled buns are best enjoyed the day they are made when the dough is at its freshest and the cream is perfectly smooth. However, you can store any leftovers. Because of the dairy in the cream filling, these buns should be stored in an airtight container in the refrigerator for up to 2-3 days. The dough will firm up slightly in the fridge, but the flavor will still be delicious.
Reheating: To enjoy refrigerated buns, you can gently warm them. Place them on a baking sheet and heat in a preheated oven at 300°F (150°C) for about 5-10 minutes, or until just warmed through. Be careful not to overheat, as this can dry out the buns or cause the cream to become too liquid. You can also microwave individual buns for 15-30 seconds, but this might alter the texture of the dough slightly.
Frequently Asked Questions
Can I make the dough ahead of time?
Yes, you can! After the first proof, you can punch down the dough, place it in a lightly oiled bowl, cover it tightly with plastic wrap, and refrigerate it overnight (up to 24 hours). The next day, let the dough come to room temperature for about 30-60 minutes before shaping and proceeding with the second proof and baking.
My cream filling is lumpy. What went wrong?
Lumpy cream filling usually occurs if the cornstarch wasn’t fully dissolved or if the mixture wasn’t whisked constantly while cooking, allowing parts to scorch or clump. To fix a slightly lumpy cream, you can press it through a fine-mesh sieve after cooking to remove any lumps before chilling.
Can I use a different type of flour?
While all-purpose flour is recommended for its balanced gluten content, you could try bread flour for a slightly chewier bun. Whole wheat flour would significantly change the texture and flavor, making the buns denser, so it’s not recommended for this specific recipe. Cake flour would result in a very delicate, almost crumbly bun, which might not hold the filling as well.
How do I know when the buns are fully baked?
The buns should be golden brown on top and sound hollow when tapped on the bottom. If you have a thermometer, the internal temperature of the bun should reach around 200-210°F (93-99°C). If they are browning too quickly but don’t seem done, reduce the oven temperature slightly and continue baking, or tent loosely with foil.