
Introduction
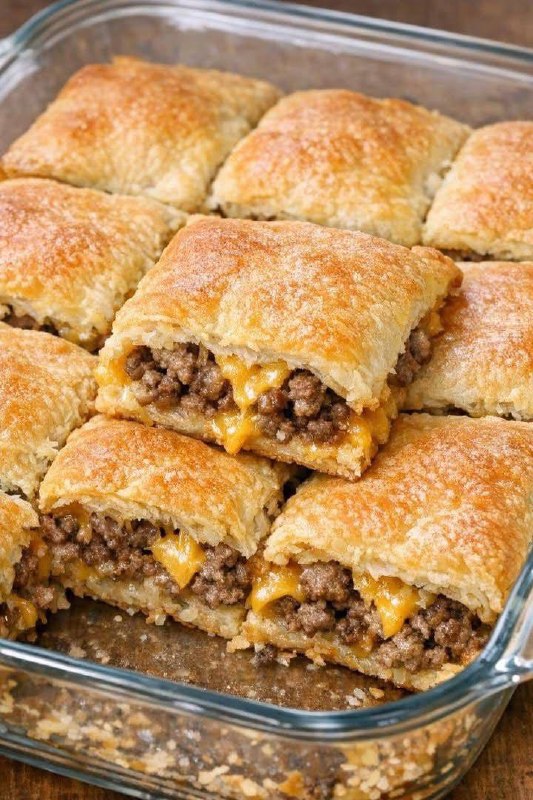
Get ready to meet your new weeknight hero: the Oven-Baked 4-Ingredient Beef Crescent Squares! This incredibly simple yet utterly delicious recipe is about to revolutionize your mealtime routine. Imagine tender, seasoned ground beef and gooey melted cheese, all encased in a flaky, golden crescent roll crust. It’s a savory delight that comes together with minimal effort and delivers maximum flavor, making it perfect for busy evenings, last-minute appetizers, or a crowd-pleasing party snack.
What makes these beef crescent squares so special? It’s their undeniable ease and versatility. With just four core ingredients, you can whip up a batch that satisfies both kids and adults. This dish is designed for those moments when you crave something hearty and comforting but don’t have hours to spend in the kitchen. The magic happens in the oven, transforming simple components into a golden-brown, irresistible meal that looks far more impressive than the effort it took to create.
Beyond its simplicity, this recipe is a fantastic budget-friendly option that can be easily customized to suit your family’s preferences. Whether you’re looking for a quick dinner solution, an exciting addition to your appetizer spread, or just a delicious way to use up some ground beef, these crescent squares are a guaranteed hit. Prepare to be amazed at how quickly these disappear from the plate!
Nutritional Information
Per serving (approximate values):
- Calories: 350
- Protein: 20g
- Carbohydrates: 25g
- Fat: 18g
- Fiber: 1g
- Sodium: 550mg
Ingredients
- 1 pound lean ground beef
- 1 (8-ounce) can refrigerated crescent roll dough sheet (seamless preferred)
- 1 cup shredded cheddar cheese (or your favorite cheese blend)
- 1 tablespoon taco seasoning (or your preferred beef seasoning blend like garlic powder, onion powder, salt, and pepper)
Instructions
- Preheat your oven to 375°F (190°C). Lightly grease a 9×13 inch baking dish or line it with parchment paper for easy cleanup.
- In a large skillet, brown the ground beef over medium heat, breaking it apart with a spoon as it cooks. Once the beef is fully cooked and no longer pink, drain off any excess grease.
- Return the cooked ground beef to the skillet (off the heat) and stir in the taco seasoning until well combined.
- Unroll the crescent roll dough sheet onto a clean, lightly floured surface or directly into your prepared baking dish. If using traditional crescent rolls, pinch the seams together to form a solid sheet. Gently press the dough to fit the bottom of the baking dish, extending slightly up the sides if possible.
- Evenly spread the seasoned ground beef over the crescent roll dough in the baking dish.
- Sprinkle the shredded cheddar cheese generously over the seasoned ground beef.
- Carefully bring the edges of the crescent roll dough up and over the filling, folding them towards the center to create a top crust. You may need to gently stretch the dough to cover as much of the filling as possible. If using a seamless sheet, you can cut a second sheet in half and place it over the top, pinching seams. Alternatively, you can simply fold the bottom crescent dough over itself to cover the filling.
- Bake for 20-25 minutes, or until the crescent dough is golden brown and puffed, and the cheese is melted and bubbly.
- Once baked, remove the dish from the oven and let it cool for 5-10 minutes before slicing into squares. This cooling time helps the layers set and prevents the squares from falling apart when cut.
- Serve warm and enjoy your delicious 4-ingredient beef crescent squares!
Cooking Tips and Variations
To ensure your beef crescent squares are the absolute best, here are a few tips and tricks. First, don’t skimp on draining the ground beef. Excess grease can make your crescent dough soggy, so make sure it’s as lean as possible before adding the seasoning. For an extra golden-brown and slightly crispier top, you can lightly brush the top of the crescent dough with an egg wash (one egg beaten with a tablespoon of water) before baking. This gives it a beautiful sheen and a lovely texture. Also, always allow the squares to cool for at least 5-10 minutes after baking. This seemingly small step is crucial as it allows the cheese and beef filling to set, making for cleaner cuts and preventing the squares from falling apart when you serve them.
The beauty of this recipe lies in its adaptability! While cheddar cheese is a classic, feel free to experiment with other cheeses like Monterey Jack, Colby, or a Mexican blend for a different flavor profile. For the beef seasoning, taco seasoning is fantastic, but you could also use Italian seasoning for a “pizza” vibe, or a simple blend of garlic powder, onion powder, salt, and black pepper for a more neutral base. If you want to add a little heat, a pinch of red pepper flakes mixed with the beef or a dash of hot sauce before baking would be excellent. For a pop of freshness, consider sprinkling some chopped fresh parsley or cilantro over the top after baking. If you’re feeling adventurous, you can even add a thin layer of sautéed onions or bell peppers to the beef mixture before topping with cheese, just be sure they are well-drained to avoid adding moisture.
Storage and Reheating
Storing your leftover beef crescent squares is straightforward, ensuring you can enjoy them for a few more meals. Once completely cooled, place the squares in an airtight container. They will keep well in the refrigerator for up to 3-4 days. For longer storage, you can freeze individual squares. Wrap each square tightly in plastic wrap, then place them in a freezer-safe bag or container. They can be frozen for up to 1-2 months. Thaw frozen squares overnight in the refrigerator before reheating.
When it comes to reheating, the oven is your best friend for maintaining that delicious crispy crust. Preheat your oven to 350°F (175°C). Place the squares on a baking sheet and heat for 10-15 minutes, or until warmed through and the crust is crisp again. If reheating from frozen (after thawing), it might take a bit longer, around 20-25 minutes. While the microwave can be used for a quick reheat, be aware that the crust may become soft and less flaky. If using the microwave, heat in 30-second intervals until warmed through to prevent overcooking.
Frequently Asked Questions
Can I prepare these beef crescent squares ahead of time?
Yes, you can! You can prepare the seasoned ground beef and even assemble the squares up to a few hours before baking. If assembling ahead, cover the baking dish tightly with plastic wrap and refrigerate. When ready to bake, remove from the refrigerator and let it sit at room temperature for about 15-20 minutes while your oven preheats, then bake as directed. This can be a great time-saver for entertaining or busy evenings.
What can I serve with these beef crescent squares?
These squares are quite versatile! For a simple meal, they pair wonderfully with a fresh green salad tossed with a vinaigrette. They also go great with a side of steamed vegetables like broccoli or green beans. If you’re serving them as an appetizer, consider offering dipping sauces like ranch dressing, marinara sauce, BBQ sauce, or even a spicy sriracha mayo for an extra kick. A bowl of chili or a cup of tomato soup would also make a comforting accompaniment.
Can I use other types of meat besides ground beef?
Absolutely! While ground beef is classic, you can certainly experiment with other meats. Ground turkey or ground chicken would be excellent lean alternatives. Just be sure to season them well, as they can be milder in flavor. You could also try cooked, shredded chicken for a different texture. If using a leaner meat, you might want to add a touch more oil to the pan when browning or ensure there’s enough moisture from other additions to keep the filling from being dry.
Why did my crescent squares turn out soggy?
Sogginess is usually caused by excess moisture. The most common culprit is not fully draining the grease from the cooked ground beef. Make sure to drain it thoroughly after browning. Another potential reason could be too much moisture from the cheese or if any liquid-based seasonings were added. Also, ensure your oven is fully preheated to the correct temperature, as a cooler oven can lead to undercooked dough that remains soft and potentially soggy. Using a seamless crescent dough sheet can also help, as there are fewer seams for moisture to seep through.