
Introduction
Prepare your taste buds for an explosion of creamy, dreamy delight! Today, we’re diving headfirst into the irresistible world of “Creamy Fried Bombs” – a dessert so decadent, so utterly satisfying, it’s destined to become your new favorite sweet treat. Imagine a perfectly golden-brown, slightly crisp exterior giving way to an incredibly soft, airy interior, all housing a luscious, velvety cream filling that bursts forth with every bite. These aren’t just donuts; they’re a symphony of textures and flavors, a truly elevated experience that will have everyone reaching for just one more.
What makes these “bombs” so special? It’s the magical combination of deep-fried dough, which achieves that ideal balance of chewiness and lightness, paired with a rich, smooth cream. The process of frying creates a beautiful golden crust, locking in moisture and flavor, while the simple dusting of sugar adds just the right touch of sweetness and a delicate sparkle. While their exact origin is debated, similar fried dough pastries filled with cream are beloved across many cultures, from Italian Bomboloni to German Berliners, proving that the concept of a “cream-filled fried bomb” is universally adored for its comforting and indulgent nature.
Whether you’re looking for a show-stopping dessert for a special occasion or simply craving a truly extraordinary homemade treat, these Creamy Fried Bombs deliver on all fronts. They’re surprisingly fun to make, and the reward of biting into a freshly fried, warm bomb with its cool, sweet cream center is an unparalleled culinary joy. Get ready to embark on a delicious adventure that will fill your kitchen with wonderful aromas and your plate with pure happiness!
Nutritional Information
Per serving (approximate values):
- Calories: 380
- Protein: 7g
- Carbohydrates: 45g
- Fat: 20g
- Fiber: 1g
- Sodium: 220mg
Ingredients
For the Dough:
- 1 cup (240ml) whole milk, warmed (105-115°F / 40-46°C)
- 2¼ teaspoons (1 packet) active dry yeast
- ¼ cup (50g) granulated sugar, plus 1 teaspoon for yeast
- 1 large egg, at room temperature
- 4 tablespoons (56g) unsalted butter, melted and cooled slightly
- 3 cups (360g) all-purpose flour, plus more for dusting
- ½ teaspoon salt
For the Cream Filling (Pastry Cream):
- 2 cups (480ml) whole milk
- ½ cup (100g) granulated sugar
- ¼ cup (30g) cornstarch
- 4 large egg yolks
- 2 tablespoons (28g) unsalted butter
- 1 teaspoon vanilla extract
- Pinch of salt
For Frying and Coating:
- 6-8 cups vegetable oil, canola oil, or peanut oil, for deep frying
- ½ cup (100g) granulated sugar, for coating
Instructions
- Prepare the Cream Filling (Pastry Cream) First: In a medium saucepan, heat 1½ cups of milk over medium heat until it just begins to simmer.
- In a separate medium bowl, whisk together the remaining ½ cup milk, granulated sugar, cornstarch, egg yolks, and a pinch of salt until smooth and no lumps remain.
- Once the milk in the saucepan is simmering, slowly whisk about half of the hot milk into the egg yolk mixture to temper it. This prevents the eggs from scrambling.
- Pour the tempered egg mixture back into the saucepan with the remaining hot milk. Whisk continuously over medium heat. The mixture will thicken considerably. Continue to cook, whisking constantly, for 1-2 minutes after it thickens to ensure the cornstarch is fully cooked.
- Remove from heat. Stir in the butter and vanilla extract until fully incorporated and smooth.
- Pour the pastry cream into a clean bowl. Press a piece of plastic wrap directly onto the surface of the cream to prevent a skin from forming. Refrigerate for at least 3-4 hours, or preferably overnight, until thoroughly chilled and firm.
- Prepare the Dough: In a large bowl or the bowl of a stand mixer, combine the warm milk and 1 teaspoon of sugar. Sprinkle the active dry yeast over the top and let it sit for 5-10 minutes until foamy, indicating the yeast is active.
- Add the remaining ¼ cup granulated sugar, egg, and melted butter to the yeast mixture. Whisk to combine.
- Gradually add the flour and salt to the wet ingredients. If using a stand mixer, attach the dough hook and mix on low speed until a shaggy dough forms.
- Increase speed to medium-low and knead for 5-7 minutes, or until the dough is smooth, elastic, and pulls away from the sides of the bowl. If kneading by hand, turn the dough out onto a lightly floured surface and knead for 8-10 minutes. The dough should be slightly tacky but not sticky.
- Lightly grease a large bowl with a little oil. Place the dough in the bowl, turning it once to coat. Cover the bowl with plastic wrap or a clean kitchen towel.
- Let the dough rise in a warm place for 1-1½ hours, or until doubled in size.
- Shape the Dough: Once the dough has doubled, gently punch it down to release the air.
- Turn the dough out onto a lightly floured surface. Roll the dough to about ½-inch thickness.
- Using a 2½ to 3-inch round cutter (or the rim of a glass), cut out circles of dough. Reroll scraps gently and cut out more circles until all dough is used.
- Place the cut dough circles on a parchment-lined baking sheet, leaving some space between them. Loosely cover with plastic wrap or a clean towel.
- Let the dough circles rise again in a warm place for 30-45 minutes, or until visibly puffy and almost doubled in size. This second rise is crucial for light, airy bombs.
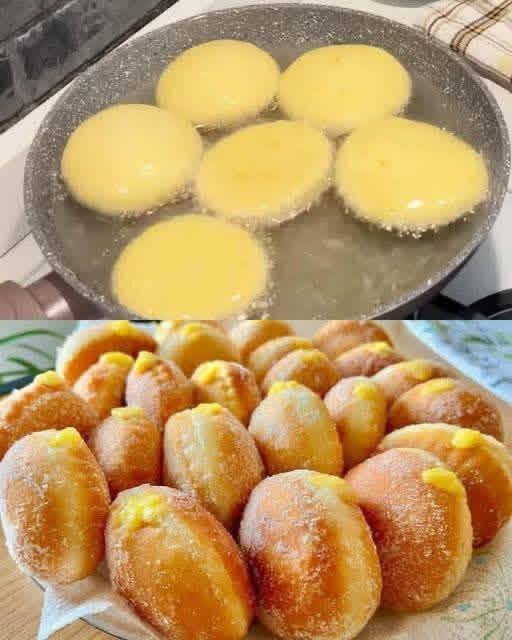
- Fry the Bombs: In a large, heavy-bottomed pot or Dutch oven, pour enough vegetable oil to reach a depth of about 3 inches. Heat the oil over medium heat to 350°F (175°C). Use a candy/deep-fry thermometer to monitor the temperature; it’s critical for proper frying.
- Carefully slide 3-4 dough circles into the hot oil using a slotted spoon or spider. Do not overcrowd the pot, as this will lower the oil temperature and result in greasy bombs.
- Fry for 1-2 minutes per side, or until golden brown and puffed up. Use tongs or a slotted spoon to flip them.
- Once golden brown on both sides, remove the fried bombs from the oil and place them on a wire rack set over a baking sheet lined with paper towels to drain excess oil.
- Repeat with the remaining dough circles, ensuring the oil temperature stays consistent between batches.
- Coat the Bombs: While the fried bombs are still warm (but not scalding hot), roll them gently in the granulated sugar placed in a shallow dish, ensuring they are evenly coated on all sides.
- Fill the Bombs: Once the bombs are cooled to at least warm (not hot), transfer the chilled pastry cream to a piping bag fitted with a long, thin piping tip (a Bismark tip or a round tip with a small opening works best).
- Carefully insert the tip into the side of each fried bomb, wiggling it slightly to create space inside. Gently squeeze the piping bag to fill the bomb with cream until it feels plump and heavy. Be careful not to overfill, as it can cause the bomb to burst.
- Repeat with all remaining bombs.
- Serve immediately and enjoy your homemade Creamy Fried Bombs!
Cooking Tips and Variations
Achieving the perfect Creamy Fried Bomb is all about technique. Firstly, oil temperature control is paramount. If the oil is too cold, the bombs will absorb too much oil and become greasy. If it’s too hot, they’ll brown too quickly on the outside and remain raw in the center. A deep-fry thermometer is your best friend here, aiming for a consistent 350°F (175°C). To test without a thermometer, drop a small piece of dough into the oil; it should sizzle and rise to the surface within a few seconds, turning golden.
Do not overcrowd the pan when frying. Frying in small batches is essential to maintain the oil temperature and ensure even cooking. Overcrowding also makes it difficult to flip the bombs properly. For best results, allow enough space for them to float and expand. Once fried, drain them on a wire rack lined with paper towels to remove any excess oil, preventing them from becoming soggy.
To prevent the cream filling from leaking, ensure your pastry cream is thoroughly chilled and firm. A Bismark tip is specifically designed for filling pastries, as its long, thin shape allows you to create a pocket without tearing the dough excessively. Insert the tip deeply but gently, and fill until the bomb feels plump, not taut.
For variations, the possibilities are endless! For different fillings, consider a rich chocolate ganache, a tangy lemon curd, a vibrant raspberry jam, or even a spiced pumpkin cream for a seasonal twist. You could also fold in finely chopped nuts or mini chocolate chips into your pastry cream for added texture and flavor. For coating, instead of plain granulated sugar, try a fragrant cinnamon sugar, a delicate powdered sugar, or a simple vanilla glaze made from powdered sugar and milk. For the dough itself, adding a teaspoon of citrus zest (lemon or orange) can brighten the flavor, or a pinch of nutmeg can add a warm, comforting note.
Storage and Reheating
Creamy Fried Bombs are always best enjoyed fresh, ideally on the day they are made. The fried dough is at its crispiest and the cream at its most luscious when consumed shortly after preparation. However, if you have leftovers, they can be stored in an airtight container in the refrigerator for up to 2-3 days.
When storing, it’s important to note that the texture of the fried dough will soften considerably in the refrigerator due to moisture from the cream. They will lose their initial crispness.
Reheating is generally not recommended for Creamy Fried Bombs that have already been filled, as heating the cream can alter its texture and potentially cause the dough to become even soggier. If you must reheat, a very brief warm-up in a toaster oven for a few minutes might refresh the dough slightly, but be cautious not to overheat the cream. It’s often better to enjoy them at room temperature when serving leftovers.
A good strategy for making these ahead of time is to prepare the pastry cream and the fried dough separately. Store the chilled pastry cream in the refrigerator and the fried (unfilled) dough in an airtight container at room temperature for up to one day. Then, fill them just before serving to ensure the best possible texture and flavor.
Frequently Asked Questions
Can I use a different type of flour for the dough?
While all-purpose flour is recommended for its balance of gluten and tenderness, you can experiment. Bread flour will result in a chewier bomb due to its higher protein content, while cake flour might make them too delicate. For the best texture, stick with all-purpose flour.
My dough isn’t rising. What went wrong?
There are a few common culprits. The most likely reason is inactive yeast. Ensure your milk was warm (105-115°F / 40-46°C) but not hot, as too hot will kill the yeast. Also, check the expiration date on your yeast. An overly cold kitchen or old flour can also inhibit rising. Make sure your rising spot is warm and draft-free.
How can I make these less greasy?
The key to non-greasy fried bombs is maintaining the correct oil temperature (350°F / 175°C) and not overcrowding the pot. If the oil temperature drops too low, the dough will absorb more oil. Also, ensure you drain them thoroughly on a wire rack lined with paper towels immediately after frying.
Can I bake these instead of frying?
While you can bake dough, it will result in a very different product. Baked bombs will have a bread-like texture rather than the light, airy, and slightly crisp texture of a fried bomb. The “fried” aspect is crucial to what makes these “bombs” so special and delicious, so for the authentic experience, frying is highly recommended.