
Introduction
Sweetened condensed milk is a magical ingredient, a thick, creamy, and intensely sweet dairy product that forms the backbone of countless desserts, beverages, and confections worldwide. From the velvety richness it lends to fudge and pies to its indispensable role in Vietnamese iced coffee and key lime pie, its versatility is unmatched. Traditionally, making sweetened condensed milk involves evaporating a significant portion of the water from cow’s milk and then adding a large amount of sugar, which not only sweetens it but also acts as a preservative, giving it a remarkably long shelf life even before refrigeration.
While readily available in cans at any grocery store, there’s something incredibly satisfying and empowering about making sweetened condensed milk from scratch. Beyond the sheer joy of culinary creation, whipping up a batch at home offers several compelling advantages. Firstly, it’s often more cost-effective, especially if you have milk and sugar on hand. Secondly, it gives you complete control over the ingredients. You can choose the quality of your milk, adjust the sugar level slightly to your preference, and avoid any unwanted additives or preservatives sometimes found in commercial brands. This homemade version boasts a fresh, pure flavor that truly elevates any dish it graces.
Imagine never having to rush to the store for a can again, or being able to whip up a batch whenever a dessert craving strikes! This recipe will guide you through the simple process of transforming basic pantry staples into that luscious, golden liquid gold you know and love. Prepare to impress your taste buds and your guests with this incredibly easy and rewarding homemade sweetened condensed milk recipe.
Nutritional Information
Per serving (approximate values):
- Calories: 130
- Protein: 3g
- Carbohydrates: 25g
- Fat: 3g
- Fiber: 0g
- Sodium: 45mg
Ingredients
- 4 cups (946ml) whole milk
- 1 cup (200g) granulated sugar
- 1 tablespoon unsalted butter (optional, for extra richness and to prevent foaming)
- 1/4 teaspoon vanilla extract (optional, for flavor)
Instructions
- Prepare Your Workspace: Gather all your ingredients and equipment. Choose a heavy-bottomed saucepan, preferably non-stick, that holds at least 6-8 cups to prevent boil-overs.
- Combine Ingredients: Pour the whole milk into the heavy-bottomed saucepan. Add the granulated sugar. If using, add the unsalted butter to the saucepan at this stage.
- Heat and Dissolve: Place the saucepan over medium heat. Stir continuously with a whisk or wooden spoon until the sugar is completely dissolved. This should take about 3-5 minutes. Do not let the mixture come to a boil yet.
- Bring to a Simmer: Once the sugar is dissolved, increase the heat slightly to bring the mixture to a gentle simmer. You’ll see small bubbles forming around the edges of the pan and steam rising. Do not let it come to a rolling boil, as this can cause it to scorch or boil over quickly.
- Reduce and Thicken: Reduce the heat to low-medium, maintaining a steady, gentle simmer. This is the most crucial step. You need to evaporate the water content from the milk. Stir frequently, every 5-10 minutes, to prevent the milk solids and sugar from sticking to the bottom of the pan and burning. As the liquid reduces, stir more often, especially during the last 30 minutes.
- Monitor Consistency: Continue simmering and stirring. The mixture will gradually thicken and turn a pale, creamy yellow color. The reduction process can take anywhere from 45 minutes to 1.5 hours, depending on your stovetop and the width of your pan.
- Test for Doneness: To check for doneness, dip a spoon into the mixture and lift it out. The sweetened condensed milk should coat the back of the spoon, and when you run your finger across the back of the spoon, it should leave a clear path. Another test is to place a small amount on a cold plate and let it cool for a minute; it should be thick and syrupy, not watery. Remember, it will thicken considerably more as it cools.
- Remove from Heat and Add Vanilla: Once it reaches the desired consistency, remove the saucepan from the heat. If using, stir in the vanilla extract now.
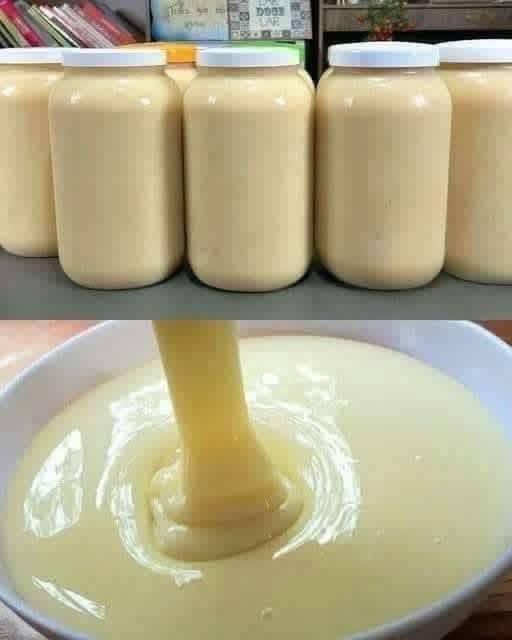
- Cool Completely: Pour the hot sweetened condensed milk into a heatproof bowl or jar. Allow it to cool completely to room temperature. This is essential for it to reach its final thick consistency. You can place the bowl over an ice bath to speed up the cooling process, stirring occasionally.
- Store: Once fully cooled, transfer the homemade sweetened condensed milk to clean, sterilized airtight jars.
Cooking Tips and Variations
Use a Heavy-Bottomed Pot: This is non-negotiable. A heavy-bottomed saucepan distributes heat more evenly, significantly reducing the risk of scorching and burning the milk, which can ruin the entire batch. If your pot isn’t heavy enough, you’ll find yourself stirring almost constantly.
Stir, Stir, Stir: Especially in the beginning, frequent stirring helps dissolve the sugar and prevents it from settling on the bottom. As the mixture reduces, milk solids and sugar become more concentrated at the bottom, so stirring frequently, especially towards the end, is critical to prevent burning. A silicone spatula or a wooden spoon that scrapes the bottom of the pan effectively is ideal.
Low and Slow is the Way to Go: Resist the temptation to rush the process by cranking up the heat. A gentle, consistent simmer is key for even reduction and to prevent the milk from boiling over or caramelizing too quickly and unevenly. Patience is a virtue here; a rapid boil can also curdle the milk.
The “Coats the Spoon” Test: This is your best indicator of doneness. When the mixture coats the back of a spoon and you can draw a clean line through it with your finger, it’s ready. Remember, it will thicken significantly more as it cools, so err on the side of slightly thinner rather than too thick. If it’s too thick, you can always thin it with a little milk or water later.
Skim the Foam: As the milk reduces, some foam might develop on the surface. While not strictly necessary, skimming this foam off can result in a smoother, more aesthetically pleasing final product.
Preventing a Skin: As the sweetened condensed milk cools, a skin can form on top. To prevent this, you can press a piece of plastic wrap directly onto the surface of the milk while it cools, or stir it occasionally as it cools.
What to do if it’s too thick: If, after cooling, your sweetened condensed milk is too thick to pour or use, gently warm it in a saucepan over low heat and whisk in a tablespoon or two of whole milk until it reaches your desired consistency. Be careful not to boil it.
What to do if it’s too thin: If, after cooling, your sweetened condensed milk is too thin, return it to the saucepan and continue to simmer gently over low heat, stirring frequently, until it further reduces and thickens. This might take another 10-20 minutes. Re-test for doneness.
Flavor Variations:
- Vanilla Bean: Instead of vanilla extract, add half a vanilla bean, split lengthwise, to the milk and sugar mixture at the beginning. Remove it before storing.
- Spiced: Add a cinnamon stick, a few cardamom pods, or a star anise during the simmering process for a subtly spiced version. Remove the spices before cooling.
- Citrus Zest: For a bright flavor, add a strip of lemon or orange zest to the milk at the start, removing it before cooling.
- Coffee Infused: Add a tablespoon of instant coffee or a few espresso beans during the simmer to create a coffee-flavored condensed milk, perfect for coffee-based desserts.
Dairy-Free Version: For a dairy-free alternative, you can substitute whole milk with full-fat canned coconut milk (not the beverage kind) or a high-fat vegan milk like cashew milk. The reduction time might vary, and the flavor will be different but equally delicious in specific applications.
Sugar Alternatives: While granulated sugar is traditional, you can experiment with other sugars. Brown sugar will yield a deeper, caramel-like flavor and color, while maple syrup or honey can be used, but they will significantly alter the taste and might require a slightly different reduction time due to their higher water content. Be aware that these will also likely make the final product less stable for long-term storage.
Storage and Reheating
Sterilizing Jars: Proper sterilization is crucial for safe long-term storage of your homemade sweetened condensed milk.
- Method 1 (Boiling Water): Wash jars and lids thoroughly with hot soapy water. Place the jars (without lids) in a large pot, ensuring they are fully submerged in water. Bring the water to a rolling boil and boil for at least 10 minutes. For lids, place them in a separate small saucepan, cover with water, and simmer for 5 minutes (do not boil vigorously, as this can damage the rubber seal). Carefully remove jars and lids with tongs, placing them upside down on a clean kitchen towel to air dry. Do not wipe them, as this can reintroduce bacteria.
- Method 2 (Oven): Wash jars and lids thoroughly. Place the jars (without lids) on a baking sheet in a cold oven. Turn the oven to 275°F (135°C) and heat for 20 minutes once the oven reaches temperature. Keep them in the warm oven until ready to fill. Simmer lids as described in Method 1.
Storage:
Once your homemade sweetened condensed milk has cooled completely to room temperature, transfer it to the prepared, sterilized airtight jars. Fill the jars almost to the top, leaving about 1/2 inch of headspace. Seal the jars tightly with their lids. Store the sealed jars in the refrigerator. The high sugar content acts as a natural preservative, but refrigeration is still necessary for homemade versions due to the lack of industrial processing and preservatives. Properly stored in sterilized jars in the refrigerator, homemade sweetened condensed milk will last for about 2-3 weeks. Always check for any signs of spoilage, such as off-smell, discoloration, or mold, before use.
Reheating:
Homemade sweetened condensed milk is typically used cold or at room temperature in recipes. However, if you need to use it warm or if it has become too thick in the refrigerator, you can gently reheat it.
- Stovetop: Transfer the desired amount of sweetened condensed milk to a small saucepan. Heat over very low heat, stirring constantly, until it reaches your desired consistency. Be careful not to boil it, as this can cause it to thicken further or scorch.
- Microwave: Place the desired amount in a microwave-safe bowl. Heat in 10-15 second intervals on low power, stirring well after each interval, until warmed through and loosened.
If you find that your refrigerated sweetened condensed milk has become too solid or crystalized, gentle warming will usually bring it back to its smooth, pourable consistency. If it’s too thick for your recipe, you can also stir in a tablespoon or two of warm milk or water while reheating to thin it out slightly.
Frequently Asked Questions
What kind of milk is best for homemade sweetened condensed milk?
For the best results, whole milk is highly recommended. Its higher fat content contributes to a richer flavor and a creamier texture in the final product. While you can technically use 2% milk, the end result might be slightly less rich and may take a bit longer to reduce. Skim milk is not recommended as it lacks the necessary fat for the characteristic creamy consistency.
Can I make a sugar-free or low-sugar version?
While you can experiment with sugar substitutes, it’s important to understand that traditional sweetened condensed milk relies on sugar not only for sweetness but also as a preservative and to achieve its thick, syrupy texture. Sugar-free versions made with artificial sweeteners will not have the same consistency or shelf life and may not work in all recipes. They will also likely require a thickening agent. For a truly sugar-free option, you’re essentially making an evaporated milk substitute that will need to be consumed quickly.
Why did my sweetened condensed milk turn lumpy or grainy?
Lumpiness or graininess can occur for a few reasons. One common cause is not stirring frequently enough, allowing the sugar to crystalize on the bottom of the pan. Another reason could be cooking at too high a heat, which can cause the milk solids to separate or the sugar to caramelize unevenly. Ensure you use a heavy-bottomed pan, stir almost constantly, especially towards the end, and maintain a gentle simmer, not a rolling boil, throughout the cooking process.