
Welcome, dessert lovers, to a journey into the heart of classic French pastry! Today, we’re unveiling the secrets behind truly FAMOUS CREAM PUFFS. These delicate, airy confections, known as profiteroles or choux à la crème in France, are more than just a dessert; they’re an experience. Imagine a cloud-like pastry shell, golden and crisp on the outside, hollow and tender within, bursting with a rich, creamy filling. It’s a symphony of textures and flavors that has captivated palates for centuries, gracing patisserie windows and dinner tables alike.
What makes *these* cream puffs famous, you ask? This isn’t just any recipe; it’s a meticulously crafted guide that demystifies the art of choux pastry, transforming what many consider an intimidating bake into an achievable and incredibly rewarding culinary triumph. We’ll dive deep into the science of why these beauties puff, ensuring you achieve that perfect hollow interior every single time. Forget sunken shells or dense dough; with our detailed instructions and expert tips, you’ll be piping perfect cream puffs like a seasoned pro.
In this comprehensive article, you’ll discover the simple yet magical ingredients that form the backbone of choux pastry, learn the precise techniques for cooking and baking them to golden perfection, and master the art of creating a luscious filling that will elevate your cream puffs from delicious to truly unforgettable. Whether you’re a seasoned baker or a curious beginner, prepare to impress yourself and everyone lucky enough to taste these exquisite, homemade FAMOUS CREAM PUFFS.
Nutritional Information
Per serving (approximate values):
- Calories: 280
- Protein: 6g
- Carbohydrates: 25g
- Fat: 18g
- Fiber: 1g
- Sodium: 120mg
Ingredients
For the Choux Pastry:
- 1 cup (240ml) water
- 1/2 cup (113g) unsalted butter, cubed
- 1/4 teaspoon salt
- 1 cup (120g) all-purpose flour, sifted
- 4 large eggs, at room temperature
For the Classic Pastry Cream Filling:
- 2 cups (480ml) whole milk
- 1/2 cup (100g) granulated sugar
- 1/4 cup (30g) cornstarch
- 4 large egg yolks
- 2 tablespoons unsalted butter
- 1 teaspoon vanilla extract
For Garnish (Optional):
- Powdered sugar, for dusting
- Melted chocolate, for drizzling
Instructions
Part 1: Making the Choux Pastry
- Preheat your oven to 425°F (220°C). Line two large baking sheets with parchment paper or silicone mats.
- In a medium saucepan, combine the water, butter, and salt. Bring the mixture to a rolling boil over medium-high heat, stirring occasionally to ensure the butter melts completely before the water boils too rapidly.
- Once boiling and the butter is fully melted, remove the saucepan from the heat. Add the sifted flour all at once. Stir vigorously with a wooden spoon until the mixture comes together and forms a ball that pulls away from the sides of the pan. This process is called “drying out” the dough.
- Return the saucepan to medium-low heat and continue to cook the dough, stirring constantly, for another 1-2 minutes. This step is crucial for evaporating excess moisture and developing the starch, which will help the puffs rise. You should see a thin film form on the bottom of the pan.
- Transfer the dough to a large mixing bowl (or the bowl of a stand mixer fitted with the paddle attachment). Let it cool for 5 minutes, stirring occasionally, until it’s warm to the touch but not hot. This prevents the eggs from scrambling.
- Add the eggs one at a time, beating well after each addition. If using a stand mixer, beat on medium speed. Ensure each egg is fully incorporated into the dough before adding the next. The dough will look curdled and separated at first, but keep beating, and it will come together into a smooth, glossy, and thick paste. The final dough should be shiny and soft, falling slowly off the spoon in a “v” shape.
- Transfer the choux pastry to a large piping bag fitted with a large round tip (or a star tip for a decorative look). You can also use two spoons to drop mounds onto the baking sheet.
- Pipe 1.5 to 2-inch rounds of dough onto the prepared baking sheets, leaving about 2 inches between each puff as they will expand significantly. If using spoons, drop rounded tablespoons of dough.
- Lightly moisten your finger with water and gently press down any peaks on the piped dough to ensure even baking.
- Bake in the preheated oven for 15 minutes at 425°F (220°C). Do NOT open the oven door during this time.
- After 15 minutes, reduce the oven temperature to 375°F (190°C) and continue to bake for another 20-25 minutes, or until the cream puffs are deeply golden brown, firm to the touch, and feel light when lifted. The dark color indicates they are fully cooked and dry inside, which prevents collapsing.
- Once baked, immediately remove the cream puffs from the oven. For extra crispness, you can poke a small hole in the bottom of each puff with a paring knife to release steam. Transfer them to a wire rack to cool completely before filling.
Part 2: Making the Classic Pastry Cream Filling
- In a medium saucepan, heat the milk over medium heat until it just begins to simmer around the edges. Do not let it boil vigorously.
- In a separate medium bowl, whisk together the granulated sugar, cornstarch, and egg yolks until smooth and pale yellow.
- Once the milk is simmering, slowly temper the egg yolk mixture by gradually whisking about half of the hot milk into the egg mixture. This prevents the eggs from scrambling.
- Pour the tempered egg mixture back into the saucepan with the remaining hot milk.
- Return the saucepan to medium heat and cook, whisking constantly, until the mixture thickens considerably and comes to a boil. Boil gently for 1 minute, continuing to whisk, to ensure the cornstarch is fully cooked and the cream is thick.
- Remove from heat and stir in the butter and vanilla extract until completely melted and smooth.
- Transfer the pastry cream to a clean bowl. Press a piece of plastic wrap directly onto the surface of the cream to prevent a skin from forming.
- Refrigerate the pastry cream for at least 2-3 hours, or until thoroughly chilled and firm. Before filling, give it a good whisk to smooth it out.
Part 3: Assembling the Cream Puffs
- Once the choux pastry shells are completely cool and the pastry cream is chilled, you are ready to assemble.
- Using a serrated knife, carefully slice each cooled cream puff horizontally, creating a top and a bottom. Alternatively, you can use a piping bag fitted with a bismarck or round tip to pipe the filling directly into the bottom of the puff without slicing (if you poked holes earlier).
- Spoon or pipe a generous amount of pastry cream into the bottom half of each cream puff.
- Gently place the top half of the choux pastry back on, like a lid.
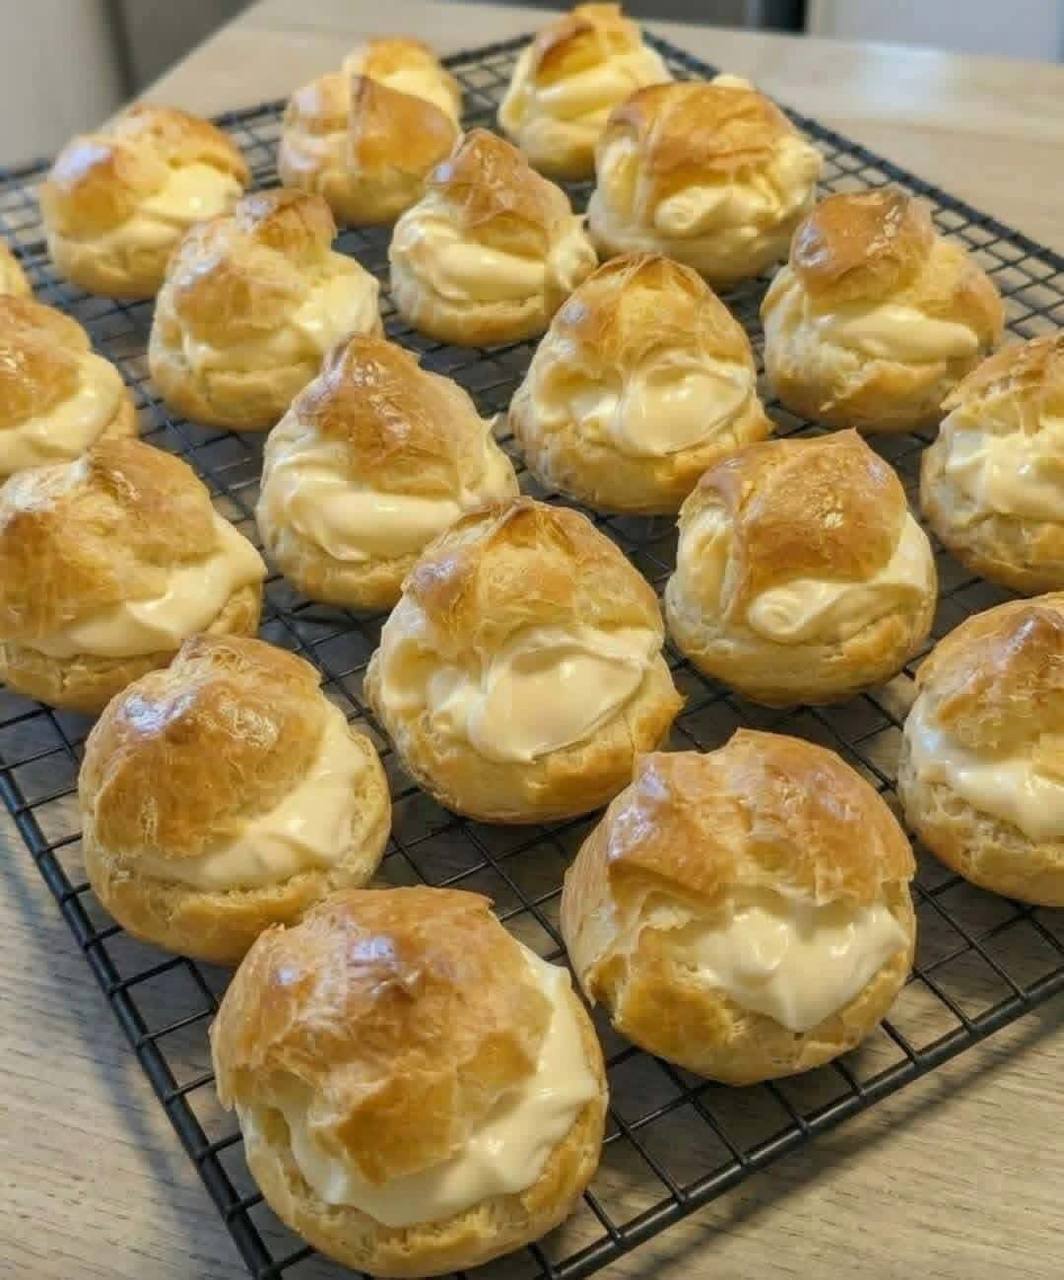
- Arrange the filled cream puffs on a serving platter. Dust generously with powdered sugar just before serving. For an extra touch, drizzle with melted chocolate.
Cooking Tips and Variations
The Golden Rule of Choux: Do not open the oven door during the initial high-heat baking phase! This is when the steam builds up, creating that essential hollow interior. Opening the door too soon will cause your puffs to collapse.
Eggs are Key: The exact number of eggs can vary slightly depending on their size and the humidity. Add the last egg gradually, checking the consistency. The dough should be glossy and soft, slowly falling off a spoon but not runny. If it’s too stiff, add a tiny bit more beaten egg; if too loose, it won’t puff well.
Proper Cooling: Ensure your cream puff shells are completely cool before filling. Filling warm shells will make them soggy and soft, losing their crisp texture.
Crispness Factor: Poking a small hole in the bottom of each puff immediately after baking allows steam to escape, preventing the interior from becoming steamy and keeping the exterior crispier for longer.
Flavorful Choux: For a subtle flavor variation, you can add 1/2 teaspoon of vanilla extract or almond extract to the choux pastry along with the eggs. For savory choux, omit the sugar and salt, and add grated cheese, herbs, or spices to the dough.
Filling Variations: While classic pastry cream is divine, don’t limit yourself! Try a simple whipped cream (sweetened with powdered sugar and vanilla), chocolate pastry cream (add melted chocolate to the hot pastry cream), coffee-flavored cream, or even a fruit curd (lemon, passion fruit). For a truly decadent treat, combine whipped cream and pastry cream for a “crème Chiboust.”
Topping Ideas: Beyond powdered sugar and chocolate drizzle, consider a simple glaze made from powdered sugar and milk, a caramel drizzle, or a dusting of cocoa powder. For a textural contrast, you can add a craquelin topping (a thin, sweet cookie dough baked on top of the choux) before baking.
Storage and Reheating
Unfilled Choux Pastry Shells: These are your best friends for making ahead! Once completely cooled, store the hollow shells in an airtight container at room temperature for up to 2-3 days. For longer storage, freeze them in a single layer on a baking sheet until solid, then transfer to a freezer-safe bag or container for up to 1 month. When ready to use, thaw at room temperature, then crisp them up in a 300°F (150°C) oven for 5-10 minutes before filling.
Filled Cream Puffs: Cream puffs are always best when filled just before serving. This prevents the pastry from becoming soggy. If you must fill them in advance, aim for no more than 2-3 hours before serving and store them in the refrigerator. The shells will inevitably soften, but they will still be delicious.
Storing Leftovers: Any leftover filled cream puffs should be stored in an airtight container in the refrigerator for up to 1-2 days. Be aware that the pastry shells will continue to soften and may lose their crispness over time.
Reheating: Filled cream puffs do not reheat well as the filling will melt and the pastry will become even softer. The beauty of cream puffs lies in their fresh texture. If you have leftover unfilled shells, you can briefly reheat them to crisp them up as described above.
Frequently Asked Questions
Why did my cream puffs collapse after baking?
There are a few common reasons for collapsed cream puffs. The most frequent cause is underbaking. The choux pastry needs to be thoroughly dried out in the oven to create a strong structure. If removed too soon, the steam inside condenses, and the weak walls cannot support themselves, leading to collapse. Ensure your puffs are deeply golden brown and feel very light and hollow. Another reason could be opening the oven door during the initial high-heat baking phase, which causes a sudden drop in temperature and deflates the rising pastry.
Can I make the choux pastry dough ahead of time?
While it’s best to bake choux pastry immediately after making the dough for optimal puff, you can prepare the dough a few hours in advance. Store it in an airtight container in the refrigerator. When ready to bake, let it come to room temperature for about 30 minutes, then pipe and bake as usual. You might notice a slight difference in puff compared to freshly made dough, but it will still yield good results. Freezing the dough is generally not recommended as it can affect the texture.
My pastry cream is lumpy, what went wrong?
Lumpy pastry cream usually indicates that the cornstarch wasn’t fully dissolved or that the mixture wasn’t whisked constantly enough during cooking, allowing parts to overcook. To avoid this, ensure you whisk the cornstarch thoroughly with the sugar and egg yolks until no lumps remain before adding the hot milk. Also, remember to constantly whisk the cream as it thickens over the heat. If you end up with a few lumps, you can push the cooled pastry cream through a fine-mesh sieve or give it a quick blend with an immersion blender to smooth it out before chilling.
How do I get the perfect hollow center in my cream puffs?
Achieving a perfect hollow center depends on several factors. First, properly “drying out” the dough on the stovetop is crucial for evaporating excess moisture. Second, the correct oven temperature and baking time are vital; the initial high heat creates a burst of steam, and then the lower heat dries out the interior. Lastly, resisting the urge to open the oven door during the initial bake is paramount. Poking a small hole in the bottom of the puffs immediately after baking also helps release residual steam, which further contributes to a dry, hollow interior.