
Introduction
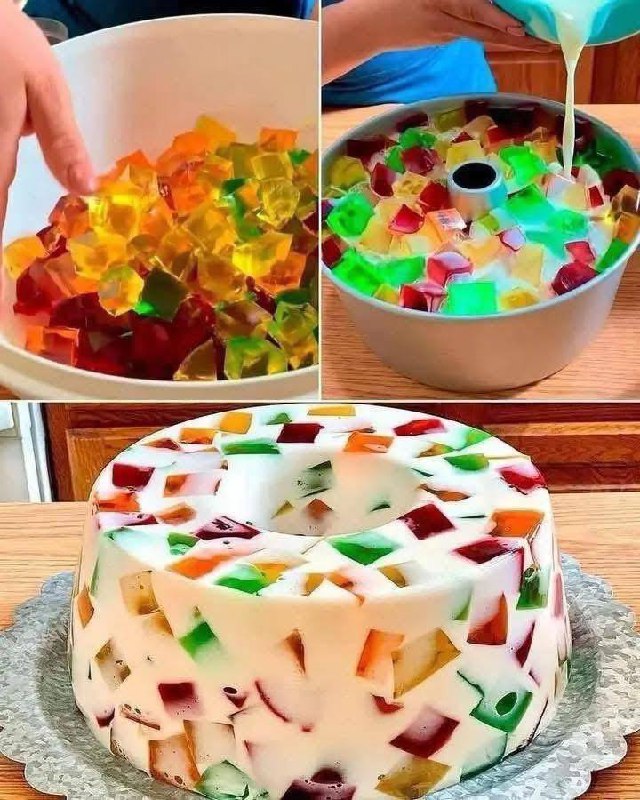
There are some desserts that just scream “celebration,” and this Classic and Colorful Dessert is definitely one of them! Often known as “stained glass” or “broken glass” gelatin, this vibrant, jiggly masterpiece is a feast for both the eyes and the palate. Its playful appearance, featuring jewel-toned cubes suspended in a creamy, ethereal base, evokes a sense of nostalgia and childlike wonder. Perfect for holidays, potlucks, birthdays, or any gathering where you want to add a splash of joy, this dessert is surprisingly simple to make, yet always manages to impress. Its unique texture—a delightful interplay between firm, fruity cubes and a soft, milky cloud—makes it utterly irresistible and a guaranteed conversation starter.
What makes this dessert truly special is its ability to transform humble ingredients into something truly spectacular. The process of creating those distinct, brightly colored gelatin cubes, then artfully arranging them within a sweet, milky setting, is a rewarding experience. It’s a dessert that encourages creativity; you can choose any combination of gelatin flavors to match a theme, a holiday, or simply your favorite colors. Beyond its visual charm, the refreshing and light quality of the gelatin, balanced by the richness of the creamy layer, offers a delightful end to any meal. This isn’t just a dessert; it’s a piece of edible art that brings smiles and a touch of whimsical elegance to your table.
Whether you remember it from childhood parties or are discovering its magic for the first time, this Classic and Colorful Dessert is a timeless treat that continues to captivate. Its popularity endures because it ticks all the right boxes: it’s beautiful, delicious, relatively easy to prepare, and incredibly versatile. Get ready to embark on a culinary adventure that will fill your kitchen with color and your guests with delight. Prepare to become a gelatin guru as we guide you through creating your very own stunning stained glass masterpiece!
Nutritional Information
Per serving (approximate values):
- Calories: 350
- Protein: 8g
- Carbohydrates: 55g
- Fat: 12g
- Fiber: 0g
- Sodium: 150mg
Ingredients
- 4 (3-ounce) packages flavored gelatin (e.g., cherry, lime, lemon, blue raspberry)
- 4 cups boiling water (1 cup per flavored gelatin package)
- 4 cups cold water (1 cup per flavored gelatin package)
- 2 (0.25-ounce) envelopes unflavored gelatin powder
- 1/2 cup cold water (for unflavored gelatin)
- 1 (14-ounce) can sweetened condensed milk
- 1 1/2 cups boiling water (for creamy layer)
- 1/2 cup cold water (for creamy layer)
- Non-stick cooking spray or a light coating of neutral oil for the mold
Instructions
- Prepare the Flavored Gelatin Cubes:
- For each package of flavored gelatin, empty the contents into a separate medium-sized bowl.
- Add 1 cup of boiling water to each bowl and stir until the gelatin powder is completely dissolved.
- Stir in 1 cup of cold water to each bowl.
- Pour each color of gelatin into separate 8×8 inch square pans or shallow dishes. The shallower the dish, the quicker it will set.
- Refrigerate for at least 3-4 hours, or until the gelatin is very firm and completely set. For best results, chill overnight.
- Cut the Flavored Gelatin:
- Once the flavored gelatins are completely set, carefully run a thin knife around the edges of each pan.
- Using a sharp knife, cut each block of gelatin into approximately 1/2 to 3/4 inch cubes. You can also use a pizza cutter for this step.
- Gently loosen the cubes from the bottom of the pan using a spatula or your hands.
- Carefully transfer all the colored gelatin cubes into a large bowl and gently toss them together to mix the colors evenly. Set aside.
- Prepare the Mold:
- Lightly spray a 10-12 cup capacity ring mold (or bundt pan) with non-stick cooking spray or lightly grease it with a neutral oil using a paper towel. This step is crucial for easy unmolding.
- Prepare the Creamy Gelatin Layer:
- In a medium-sized heatproof bowl, sprinkle the 2 envelopes of unflavored gelatin powder over 1/2 cup of cold water. Let it sit for 5 minutes to “bloom” (soften and absorb the water).
- Add 1 1/2 cups of boiling water to the bloomed gelatin mixture. Stir continuously until the unflavored gelatin is completely dissolved and the mixture is clear.
- Pour in the entire can of sweetened condensed milk and stir well until the mixture is uniform and smooth.
- Finally, stir in 1/2 cup of cold water. Allow this creamy mixture to cool down for about 10-15 minutes at room temperature. It should still be liquid but not hot, as hot liquid can melt the colored cubes.
- Assemble the Dessert:
- Place about half of the mixed colored gelatin cubes into the prepared ring mold, spreading them out as evenly as possible.
- Carefully pour about half of the cooled creamy gelatin mixture over the cubes in the mold.
- Add the remaining colored gelatin cubes to the mold, gently pressing them down slightly so they are submerged.
- Pour the remaining creamy gelatin mixture over the top, ensuring all the cubes are mostly covered.
- Gently tap the mold on the counter a few times to release any trapped air bubbles and help the creamy mixture settle around the cubes.
- Chill and Set:
- Cover the mold loosely with plastic wrap.
- Refrigerate for at least 6-8 hours, or preferably overnight, until the dessert is completely firm and set.
- Unmold and Serve:
- To unmold, fill a large bowl or sink with warm (not hot) water.
- Briefly dip the bottom of the mold into the warm water for about 10-15 seconds. Be careful not to let water splash into the dessert. This helps loosen the edges.
- Carefully run a thin, damp knife around the outer and inner edges of the gelatin if needed to ensure it’s fully detached.
- Place a serving plate upside down over the mold.
- Invert the mold and plate together in one swift motion. The gelatin should release onto the plate. If it doesn’t, dip it in warm water for a few more seconds and try again.
- Serve immediately, or keep chilled until ready to serve.
Cooking Tips and Variations
For the best results with your Classic and Colorful Dessert, precision and patience are key. When preparing the flavored gelatin, ensure each color sets completely firm before cutting; under-set gelatin will be difficult to cube and can lead to a messy final product. Using an 8×8 inch pan or a similar shallow dish for each color helps the gelatin set more quickly and uniformly. For cutting the cubes, a sharp knife that is occasionally wiped clean or a pizza cutter works wonders for clean, distinct squares. Don’t be afraid to experiment with the size of your cubes; smaller cubes create a more intricate “stained glass” effect, while larger ones offer a bolder color pop.
The creamy layer is the heart of this dessert, so pay close attention to its preparation. When blooming the unflavored gelatin, make sure the cold water is truly cold to allow proper hydration before adding boiling water. It’s crucial that the creamy mixture cools down to room temperature (or slightly warmer, but not hot) before pouring it over the colored cubes. If it’s too hot, it will melt your carefully prepared cubes, resulting in muddy colors. To speed up the cooling process, you can place the bowl of creamy mixture over an ice bath, stirring occasionally, but be careful not to let it set too much. For an extra creamy texture, some recipes incorporate a block of softened cream cheese or a dollop of sour cream into the condensed milk mixture, which adds a slight tang and richness. Simply blend it in thoroughly with the condensed milk before adding the final cold water.
Variations for this dessert are endless! To customize the colors and flavors, consider using sugar-free gelatin for a lighter version, or natural fruit purees mixed with unflavored gelatin for a more wholesome approach. For a tropical twist, use pineapple, orange, and lime gelatin, and consider replacing some of the cold water in the creamy layer with coconut milk for a subtle coconut flavor. You can also incorporate fresh fruit pieces like mandarin orange segments or berries, but add them carefully so they don’t sink to the bottom. For a patriotic theme, use red and blue gelatin with a white creamy layer. If you don’t have a ring mold, a bundt pan, a loaf pan, or even individual serving cups work wonderfully. When using individual cups, simply alternate layers of cubes and creamy mixture, chilling each layer briefly if you want very distinct lines, or pouring all at once for a more integrated look.
Storage and Reheating
Storing your Classic and Colorful Dessert properly is essential to maintain its beautiful appearance and delightful texture. Once unmolded, any leftovers should be covered tightly with plastic wrap or placed in an airtight container. This prevents the gelatin from drying out, absorbing refrigerator odors, or developing a rubbery skin. Store the dessert in the refrigerator. Gelatin desserts are best enjoyed chilled, so there is no reheating involved. The cold temperature helps maintain its firmness and refreshing quality. When stored correctly, this dessert will keep well in the refrigerator for up to 3-4 days. After this time, while still safe to eat, the texture might begin to soften slightly, and the colors might start to bleed a little more into the creamy layer.
Do not freeze this gelatin dessert. Freezing and then thawing gelatin will alter its delicate structure, causing it to become watery, grainy, and lose its signature jiggly texture. The creamy layer, especially if it contains dairy, can also separate or become unpleasantly gritty after freezing. For the freshest taste and best presentation, plan to serve this dessert within a few days of making it. If you are making it for a party, preparing it the day before or the morning of the event is ideal, allowing ample time for chilling and ensuring it’s at its peak.
Frequently Asked Questions
Why did my gelatin not set properly?
There are a few common reasons why gelatin might not set. First, ensure you used the correct ratio of water to gelatin powder as specified in the recipe. Too much water, especially cold water, can dilute the gelatin’s setting power. Second, make sure the boiling water was truly boiling and that the gelatin powder was completely dissolved; undissolved granules will prevent a proper set. Third, certain fresh fruits like pineapple, kiwi, and papaya contain enzymes (proteases) that break down gelatin’s proteins and prevent it from setting. If using these fruits, they must be cooked or canned to deactivate these enzymes. Lastly, ensure sufficient chilling time; gelatin needs several hours, often overnight, to become completely firm.
How can I make this dessert dairy-free?
To make this Classic and Colorful Dessert dairy-free, you can substitute the sweetened condensed milk with a dairy-free sweetened condensed coconut milk. These products are readily available in most grocery stores and will provide a similar creamy texture and sweetness. When using dairy-free versions, ensure you still bloom the unflavored gelatin and follow the cooling steps for the creamy layer as directed. The flavor profile will have a subtle coconut hint, which can be a delicious variation, especially if you choose tropical-flavored gelatins.
Can I prepare this dessert in advance?
Absolutely! This is an excellent dessert to prepare in advance, making it perfect for parties and holidays. In fact, it requires significant chilling time, so making it the day before you plan to serve it is highly recommended. The flavored gelatin cubes need at least 3-4 hours (preferably overnight) to set firmly, and the assembled dessert needs 6-8 hours (or overnight) to become completely firm. Preparing it in advance allows for stress-free party planning and ensures the dessert is perfectly set and chilled when it’s time to serve. Just keep it covered and refrigerated until ready to unmold and present.
What if I don’t have a ring mold?
No problem at all! While a ring mold creates a classic and elegant presentation, you can use various other molds or containers. A standard bundt pan works perfectly and will yield a beautiful fluted shape. Alternatively, you can use a large loaf pan, a 9×13 inch baking dish (though this will result in a flatter, more rectangular dessert that can be cut into squares), or even individual ramekins or clear dessert cups for single servings. If using individual cups, simply layer the colored cubes and creamy mixture directly into them. Remember to lightly grease any mold or dish you use for easier unmolding, except for individual cups where unmolding isn’t necessary.