
Introduction
There’s something undeniably magical about a dessert that looks as good as it tastes, especially when it requires absolutely no baking. Enter the “creamy dessert in a glass,” a delightful individual serving of pure indulgence that’s as easy to assemble as it is to devour. Today, we’re putting a spotlight on the beloved Banana Pudding Parfait, a classic Southern comfort food reimagined into an elegant, layered masterpiece. Forget the casserole dish; we’re elevating this timeless treat into a stunning, ready-to-serve creation that’s perfect for any occasion, from casual weeknight dinners to sophisticated gatherings.
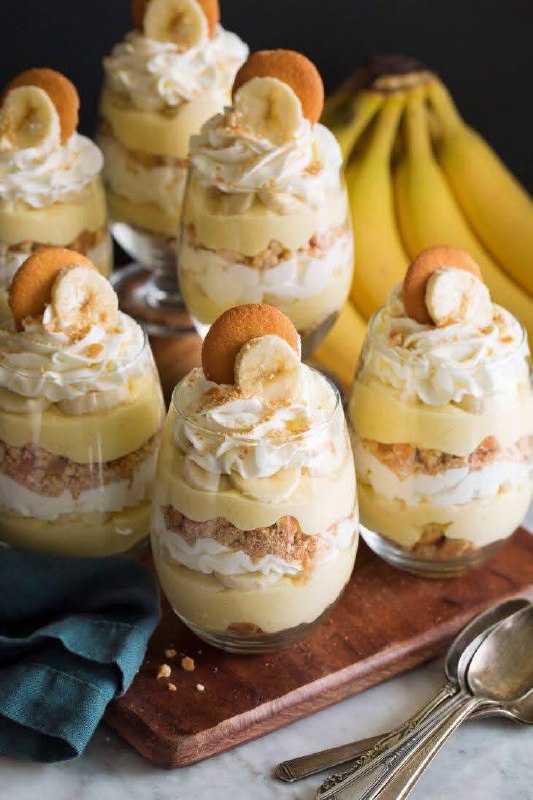
What makes these Banana Pudding Parfaits so special? It’s the harmonious dance of creamy, sweet, and subtly tangy flavors, all brought together with a delightful interplay of textures. Each spoonful offers a journey through velvety vanilla pudding, tender slices of ripe banana, and the satisfying crunch of vanilla wafers, all crowned with a cloud of fluffy whipped cream. Beyond its incredible taste, this dessert shines in its simplicity. It’s a no-bake wonder, making it an ideal choice for those hot summer days when turning on the oven is unthinkable, or for when you need a show-stopping dessert without spending hours in the kitchen.
The beauty of this “creamy dessert in a glass” also lies in its versatility and customizable nature. While the traditional banana pudding rendition is a guaranteed crowd-pleaser, you can easily adapt the layers, add your favorite mix-ins, or experiment with different puddings and fruits to create your own signature parfait. Whether you’re a seasoned dessert enthusiast or a complete novice in the kitchen, these parfaits promise a rewarding and delicious experience that will have everyone asking for the recipe.
Nutritional Information
Per serving (approximate values):
- Calories: 450-550
- Protein: 8-12g
- Carbohydrates: 60-75g
- Fat: 20-30g
- Fiber: 3-5g
- Sodium: 250-350mg
Ingredients
- 1 (5.1 ounce) package instant vanilla pudding mix (or 1 ½ cups homemade vanilla pudding)
- 3 cups cold milk (whole milk or 2% recommended for best creaminess)
- 1 teaspoon vanilla extract (if using instant pudding, optional for homemade)
- 4-5 ripe but firm bananas, sliced into ¼-inch thick rounds
- 1 (11 ounce) box vanilla wafers (about 70-80 wafers)
- 1 ½ cups heavy cream, very cold
- ¼ cup powdered sugar
- ½ teaspoon vanilla extract (for whipped cream)
- Optional: 1 tablespoon fresh lemon juice (for banana slices)
- Optional garnishes: extra vanilla wafers, banana slices, a sprinkle of cinnamon or nutmeg, chocolate shavings
Instructions
- Prepare the Pudding: In a large mixing bowl, combine the instant vanilla pudding mix and cold milk. Whisk vigorously for 2-3 minutes until the mixture thickens. If using, stir in 1 teaspoon of vanilla extract. Cover the bowl with plastic wrap and refrigerate for at least 15-20 minutes, or until the pudding is fully set. If making homemade pudding, prepare according to your recipe and allow to cool completely before use.
- Prepare the Bananas: While the pudding chills, peel and slice the bananas. If you want to prevent browning, gently toss the banana slices with 1 tablespoon of fresh lemon juice in a small bowl. This step is optional but highly recommended if you’re making the parfaits ahead of time.
- Prepare the Whipped Cream: In a separate large, chilled mixing bowl, combine the very cold heavy cream, powdered sugar, and ½ teaspoon vanilla extract. Using an electric mixer (handheld or stand mixer with a whisk attachment), beat on medium-high speed until stiff peaks form. Be careful not to overbeat, or you’ll end up with butter.
- Assemble the Parfaits – First Layer: Gather 6-8 clear individual glasses (wine glasses, mason jars, or small bowls work well). Start by placing a layer of 3-4 vanilla wafers at the bottom of each glass. You may need to break some wafers to fit the bottom evenly.
- Assemble the Parfaits – Second Layer: Spoon about ¼ cup of the prepared vanilla pudding over the wafers in each glass, spreading it gently to cover the wafers.
- Assemble the Parfaits – Third Layer: Arrange a single layer of banana slices over the pudding. Try to place them around the edges of the glass for a visually appealing effect.
- Assemble the Parfaits – Fourth Layer: Add another layer of 3-4 vanilla wafers over the banana slices.
- Assemble the Parfaits – Fifth Layer: Spoon another ¼ cup of vanilla pudding over the wafers, spreading it out.
- Assemble the Parfaits – Sixth Layer: Top with another layer of banana slices.
- Repeat Layers (Optional): Depending on the size of your glasses, you can repeat the pudding, wafer, and banana layers one more time until you reach about ¾ full. Ensure you leave enough space for the whipped cream topping.
- Top with Whipped Cream: Spoon or pipe a generous dollop of whipped cream over the top of each parfait.
- Garnish (Optional): Garnish each parfait with an extra vanilla wafer, a few fresh banana slices, a sprinkle of cinnamon or nutmeg, or a few chocolate shavings for an extra touch of elegance.
- Chill: Cover the assembled parfaits loosely with plastic wrap and refrigerate for at least 2-4 hours before serving. This allows the flavors to meld and the wafers to soften slightly, creating that perfect classic banana pudding texture.
- Serve: Serve chilled and enjoy your beautiful, creamy dessert in a glass!
Cooking Tips and Variations
For the ultimate “creamy dessert in a glass” experience, attention to a few details can elevate your parfaits from good to absolutely unforgettable. First and foremost, the quality of your ingredients matters. Opt for ripe but firm bananas; they offer the best flavor and hold their shape well. Overripe bananas can become mushy too quickly. When it comes to vanilla wafers, classic Nilla Wafers are a staple for a reason, but feel free to experiment with other plain cookies like shortbread or even graham crackers for a different twist. For the pudding, while instant pudding is a fantastic time-saver, making your vanilla pudding from scratch offers a richer, more nuanced flavor that truly shines. If you choose the homemade route, ensure it’s fully cooled before layering.
To prevent your banana slices from turning an unappealing brown, a quick toss in a little lemon juice is a simple yet effective trick. The acidity helps to slow down the oxidation process. Don’t worry, the small amount of lemon juice won’t significantly alter the dessert’s sweet flavor. Another crucial tip is to ensure your heavy cream is very cold before whipping. Chilling your mixing bowl and whisk attachment for 10-15 minutes beforehand can also help achieve perfectly stiff, stable peaks for your whipped cream, which is essential for a beautiful presentation and a delightful texture. When layering, try to press the wafers down gently into the pudding; this helps them absorb moisture and become tender, a hallmark of traditional banana pudding.
The beauty of this dessert lies in its adaptability. Here are some delightful variations to inspire your creativity:
- Chocolate Banana Parfait: Substitute vanilla pudding with chocolate pudding and add a layer of chocolate shavings or mini chocolate chips.
- Strawberry Banana Parfait: Incorporate fresh sliced strawberries into the layers with the bananas. A strawberry-flavored pudding could also be used.
- Caramel Drizzle: Drizzle a little caramel sauce over the pudding layers or as a final topping for an extra touch of sweetness and depth.
- Nutty Crunch: Add a sprinkle of finely chopped toasted pecans or walnuts between layers for added texture and a nutty flavor.
- Dairy-Free Option: For those with dietary restrictions, use a dairy-free instant pudding mix (often made with almond or soy milk) and substitute heavy cream with chilled full-fat canned coconut cream, whipped until fluffy. Ensure your vanilla wafers are also dairy-free.
- Spice It Up: A tiny pinch of cinnamon or nutmeg in the pudding or sprinkled over the whipped cream can add a warm, comforting note.
- Boozy Bliss: For an adult version, you can lightly brush the vanilla wafers with a splash of rum or banana liqueur before layering.
- Trifle Style: If you’re feeding a crowd, skip the individual glasses and assemble all the ingredients in a large trifle bowl. This creates a stunning centerpiece for any gathering.
Remember, the chilling time is not just for setting; it’s essential for the flavors to meld and for the wafers to soften to that perfect, cake-like consistency. Resist the urge to dig in too soon!
Storage and Reheating
These “creamy dessert in a glass” parfaits are best enjoyed fresh, ideally within 24-48 hours of assembly. The longer they sit, the softer the wafers will become, and the bananas may start to brown slightly, even with lemon juice treatment. While still delicious, the texture and appearance are at their peak shortly after chilling.
To store any leftover parfaits, cover each individual glass tightly with plastic wrap. This helps to prevent air exposure, which can lead to banana browning and the whipped cream absorbing odors from the refrigerator. Store them in the coldest part of your refrigerator. They will generally keep well for up to 2-3 days. After this point, the wafers may become too soggy, and the bananas might discolor more significantly.
Because this is a no-bake, chilled dessert, reheating is not recommended or necessary. The beauty of these parfaits is their cool, refreshing nature. Simply pull them out of the refrigerator a few minutes before serving to allow them to lose some of their chill, enhancing the flavors and creaminess. If you’ve garnished with extra banana slices or wafer pieces, it’s best to add these just before serving for the freshest look and crunch.
If you’re planning to make a large batch for an event, consider assembling them in stages. You can prepare the pudding and whipped cream a day in advance and store them separately in the refrigerator. Slice the bananas and assemble the parfaits on the day of the event, ideally 4-6 hours before serving, to ensure optimal freshness and texture.
Frequently Asked Questions
Can I use store-bought whipped topping instead of making my own whipped cream?
Yes, absolutely! Store-bought whipped topping (like Cool Whip) is a convenient substitute for homemade whipped cream. It’s often more stable and holds its shape longer, which can be an advantage if you’re making the parfaits further in advance. Just be sure to thaw it in the refrigerator before using, if it’s frozen.
How can I prevent the bananas from browning in the parfaits?
The most effective way to prevent banana browning is to toss the sliced bananas very gently with a small amount of fresh lemon juice (about 1 tablespoon for 4-5 bananas) before layering them. The acidity in the lemon juice acts as an antioxidant, slowing down the oxidation process. While they may still show some minimal discoloration over a couple of days, it will be significantly less than if untreated.
Can I make these parfaits ahead of time for a party?
Yes, these parfaits are an excellent make-ahead dessert! They actually benefit from chilling for at least 2-4 hours to allow the flavors to meld and the wafers to soften to the perfect consistency. You can assemble them up to 24 hours in advance. For best results, cover them tightly with plastic wrap and store them in the refrigerator. If you plan to add extra garnishes like fresh banana slices or wafer pieces, it’s best to add those just before serving to maintain their freshness and crispness.
What kind of glasses are best for serving these parfaits?
Any clear individual serving glasses work beautifully! This dessert is all about showcasing those gorgeous layers. Wine glasses, mason jars, small tumblers, or even clear dessert cups are all excellent choices. The size of the glass will determine how many layers you can create and how many parfaits your recipe yields.