
Introduction
Ah, crepes! Just the word conjures images of Parisian cafes, delicate breakfast spreads, and delectable desserts. These ultra-thin pancakes, a beloved staple of French cuisine, are an absolute culinary delight that can be enjoyed at any time of day. Unlike their thicker American cousins, crepes boast a wonderfully delicate texture, almost melting in your mouth, making them the perfect canvas for an endless array of fillings, both sweet and savory. Whether you’re craving a light breakfast, a decadent dessert, or even a sophisticated appetizer, crepes offer an elegance and versatility that’s hard to beat.
What makes *this* particular “Delicious Crepes Recipe” so special? It’s all about simplicity, reliability, and that unmistakable homemade taste. We’ve honed this classic recipe to ensure it’s incredibly easy to follow, even for beginner cooks, while still delivering crepes that are consistently tender, flavorful, and perfectly golden. Say goodbye to sticky, torn nightmares and hello to beautifully thin, pliable crepes that are a joy to make and even more joyful to eat. Get ready to impress your family and friends with this timeless dish that’s sure to become a cherished favorite in your kitchen.
From the first whisk of the batter to the final sprinkle of powdered sugar or a savory filling, this recipe guides you through every step to achieve crepe perfection. So, grab your apron, gather your ingredients, and let’s embark on a delicious journey to create these irresistible French delicacies right in your own home. Get ready for a taste of pure bliss!
Nutritional Information
Per serving (approximate values):
- Calories: 180
- Protein: 7g
- Carbohydrates: 25g
- Fat: 6g
- Fiber: 1g
- Sodium: 120mg
Ingredients
- 1 cup all-purpose flour
- 2 large eggs
- 1/2 cup milk
- 1/2 cup water
- 1/4 teaspoon salt
- 2 tablespoons granulated sugar (optional, for sweet crepes)
- 2 tablespoons melted unsalted butter, plus extra for greasing the pan
- 1/2 teaspoon vanilla extract (optional, for sweet crepes)
Instructions
- In a large bowl, whisk together the flour, granulated sugar (if using), and salt.
- In a separate medium bowl, whisk together the eggs, milk, water, melted butter, and vanilla extract (if using).
- Gradually add the wet ingredients to the dry ingredients, whisking continuously until the batter is smooth and free of lumps. The batter should have the consistency of thin cream. If it seems too thick, add a tablespoon or two more water or milk.
- Cover the bowl with plastic wrap and let the batter rest in the refrigerator for at least 30 minutes, or up to 2 hours. This resting period allows the flour to fully hydrate and the gluten to relax, resulting in more tender crepes.
- Heat a 6-8 inch non-stick crepe pan or frying pan over medium heat. Lightly grease the pan with a small amount of butter or oil. You can use a paper towel to spread it thinly and evenly.
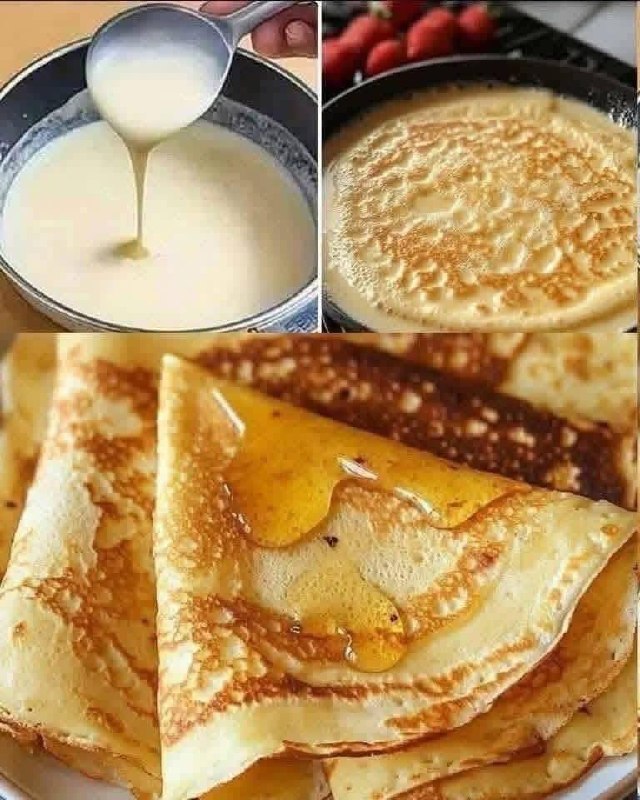
- Once the pan is hot, pour about 1/4 cup of batter into the center of the pan. Immediately tilt and swirl the pan in a circular motion to spread the batter thinly and evenly over the entire bottom surface.
- Cook the crepe for 1-2 minutes, or until the edges begin to crisp slightly and the bottom is golden brown. You’ll see small bubbles forming on the surface.
- Carefully loosen the edges of the crepe with a thin spatula. Gently slide the spatula under the crepe and quickly flip it over to cook the other side.
- Cook the second side for about 30 seconds to 1 minute, or until lightly golden.
- Slide the cooked crepe onto a plate. Repeat the process with the remaining batter, lightly greasing the pan between each crepe if necessary. Stack the cooked crepes on top of each other on the plate; the residual heat will keep them warm and pliable.
- Serve immediately with your favorite sweet or savory fillings and toppings.
Cooking Tips and Variations
For the most tender crepes, allowing the batter to rest is crucial. This step, even for just 15-30 minutes, lets the gluten relax, preventing tough crepes. Don’t skip it! When it comes to pan selection, a good quality non-stick crepe pan or a well-seasoned cast-iron skillet works best. The key is consistent, medium heat. If your pan is too hot, the crepes will brown too quickly and be difficult to spread thinly. If it’s too cool, they won’t cook properly and might stick. You can test the temperature by adding a tiny drop of batter; it should sizzle gently.
The first crepe is often a “test crepe.” Don’t be discouraged if it doesn’t turn out perfectly! It helps you adjust the pan temperature and batter amount. For spreading the batter, a quick tilt and swirl of the pan is essential. If you find the batter is too thick to spread easily, whisk in a tablespoon or two of milk or water until it reaches the desired consistency. Conversely, if your crepes are tearing easily, the batter might be too thin – whisk in a tablespoon of flour. A thin, flexible spatula is your best friend for flipping; it helps prevent tearing. If you’re making a large batch, you can keep the cooked crepes warm by placing them on a plate covered with foil in a low oven (around 200°F/90°C).
Sweet Variations
For a dessert crepe, increase the sugar to 3-4 tablespoons and add 1 teaspoon of vanilla extract to the batter. Serve with fresh berries, whipped cream, Nutella, chocolate sauce, sliced bananas, a dusting of powdered sugar, or a drizzle of honey or maple syrup. A classic “Crepes Suzette” involves a butter, sugar, and orange juice sauce, often flambéed.
Savory Variations
Omit the sugar and vanilla from the batter for savory crepes. These are fantastic with fillings like ham and cheese, sautéed mushrooms and spinach, smoked salmon and cream cheese, or even chicken and béchamel sauce. You can also add a pinch of dried herbs like chives or parsley to the batter for extra flavor.
Gluten-Free Crepes
Substitute the all-purpose flour with a 1:1 gluten-free flour blend. Ensure the blend contains xanthan gum for elasticity. The consistency might be slightly different, but you can still achieve delicious gluten-free crepes.
Storage and Reheating
Cooked crepes are remarkably easy to store, making them perfect for meal prepping or enjoying later. Once cooled completely, stack the crepes with a piece of parchment paper or wax paper between each one to prevent sticking. This is crucial for easy separation later. Place the stack in an airtight container or a resealable plastic bag. Stored this way, crepes will keep beautifully in the refrigerator for up to 2-3 days.
To reheat refrigerated crepes, you have a few options. For individual crepes, you can gently warm them in a non-stick pan over low to medium heat for about 30 seconds to 1 minute per side, until soft and warm. You can also microwave them for 10-15 seconds per crepe, or until warmed through. For a larger batch, wrap the stack loosely in foil and reheat in an oven preheated to 200°F (90°C) for 5-10 minutes, or until warm and pliable.
Yes, crepes freeze exceptionally well! This is fantastic for having them on hand for impromptu breakfasts or desserts. Again, stack the cooled crepes with parchment or wax paper between each layer. Wrap the entire stack tightly in plastic wrap, then place it in a freezer-safe bag or airtight container. Frozen crepes will maintain their quality for up to 1-2 months. To use, simply transfer the frozen stack to the refrigerator to thaw overnight, then reheat as described above. You can also gently separate individual frozen crepes and warm them directly in a pan over low heat, though they may take a little longer to become pliable.
Frequently Asked Questions
Why are my crepes tearing when I try to flip them?
Crepes tearing can be due to a few reasons. The most common culprits are a batter that’s too thin, a pan that isn’t hot enough, or trying to flip the crepe too early. Ensure your batter has rested and is the consistency of thin cream. Make sure your pan is heated to a consistent medium temperature before adding the batter. Wait until the edges are slightly crispy and the surface looks set before attempting to flip. A thin, flexible spatula also helps greatly.
Can I make the crepe batter ahead of time?
Absolutely! Making the batter ahead of time is actually recommended. The batter can be made up to 24 hours in advance and stored in an airtight container in the refrigerator. This allows the flour to fully hydrate, resulting in more tender and flavorful crepes. Just give it a quick whisk before using, and you might need to add a splash more milk or water if it has thickened too much.
What’s the best way to get uniformly thin crepes?
The trick to uniformly thin crepes lies in the amount of batter and the swirling technique. Use a consistent measurement for each crepe (usually 1/4 cup for an 8-inch pan). As soon as you pour the batter into the hot pan, immediately tilt and swirl the pan in a quick, circular motion to spread the batter to the edges. Practice makes perfect, so don’t worry if your first few aren’t exactly uniform!
Can I make these crepes savory instead of sweet?
Yes, absolutely! This recipe is incredibly versatile. For savory crepes, simply omit the granulated sugar and vanilla extract from the batter. You can even add a pinch of salt and a dash of black pepper, or some dried herbs like chives or parsley, to the batter for an extra savory kick. They are delicious filled with ham and cheese, sautéed mushrooms, or smoked salmon and cream cheese.